
Creating a Simple Facebook Messenger AI Bot with API.ai in Node.js
Hey, happy new year!!!
Previously, I created a HTTP Status Cats bot for Slack (and its tutorial on Medium), and this time I tried with Facebook Messenger with some interesting 3rd party APIs, and I decide to give API.ai a try.
As you may have heard of, API.ai, which recently acquired by Google, provides a conversational platform for natural language processing and it allows us to create bots easily.
Writing apps with the services aren’t hard, however it requires some time reading the docs to figure out how to set them up, so I would like to share my experiences as this tutorial so hopefully you can write your bot in less time.
There are two major parts:
- Setting up a Facebook Messenger App and writing the webhook
- Using API.ai Small Talk domain and creating a custom Intents
My step-by-step instruction uses Node.js, so if you’d like to follow the how-to, make sure Node.js is installed on your machine.
The source code (on tutorial-01 branch) is on GitHub.
*(Updated on Jan 9: The bot has been approved by Facebook so you can try the bot!) * Live Demo - Scan the code below (the one looks sort of like a QR code) from the Messenger App on mobile, or access on m.me/tomomiBot from browser.

1. Developing a Facebook Messenger App
Before configuring your Messenger app on Facebook Developer, let’s create a bare minimum webhook with Node.js to get started.
Setting Up a Temporary Webhook Endpoint with ngrok
I choose ngrok to serves a localhost to a public URL because it is simple and easy to use. This URL will be used as a Messenger webhook endpoint during the development, so you don’t need to deploy to a server until the app is completed.
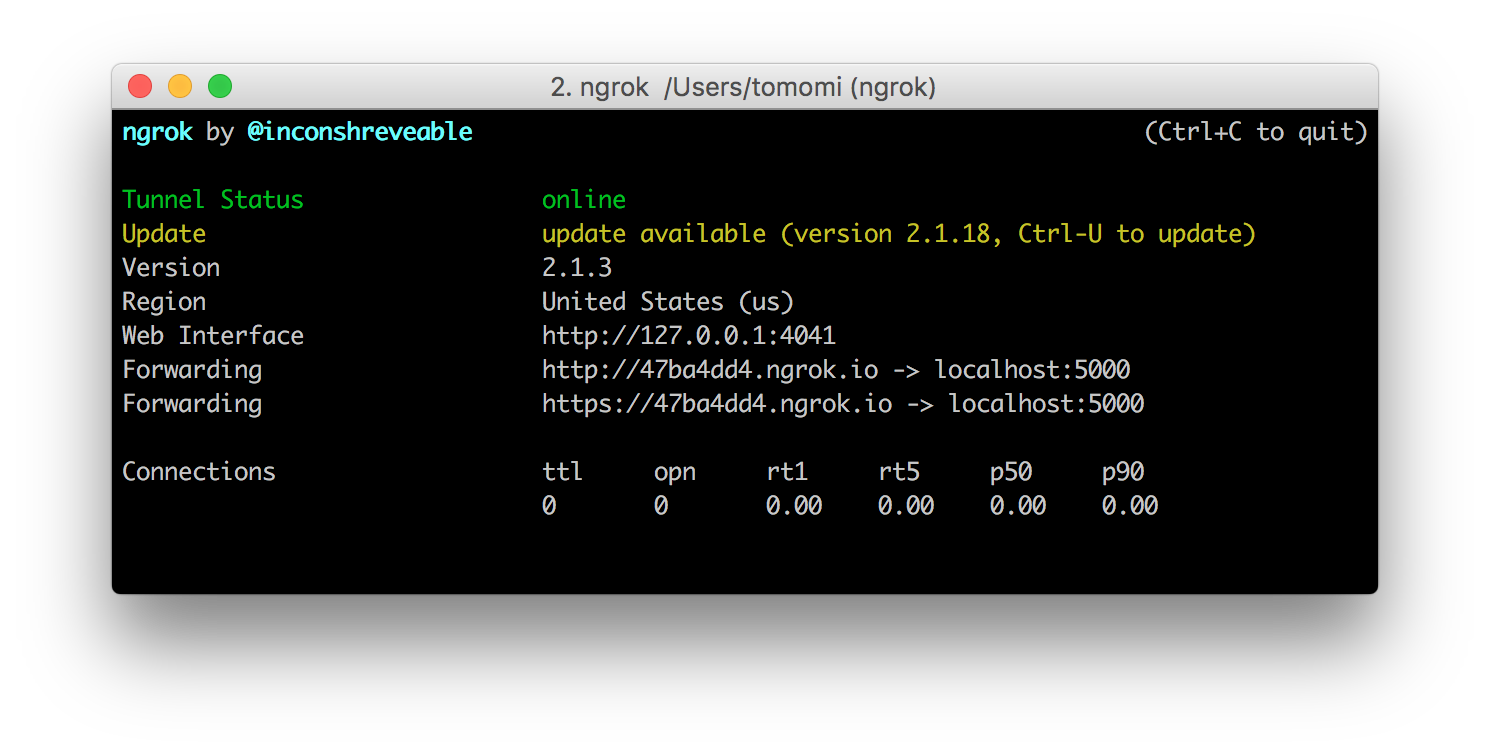
Download ngrok, install it on your machine, and run with a port number, let’s use 5000:
$ ngrok http 5000
When you start ngrok, it will display a public URL of your tunnel in the terminal. We will need the URL later when setting up the Facebook app. (In the screenshot, the URL is https://47ba4dd4.ngrok.io)
Writing a Webhook with Express.js
Create your app directory and set up your Node.js app:
$ npm init
Once you configure your app, install Express and body-parser:
$ npm install express body-parser --save
Let’s create a webhook.js, and instantiate express and listen the server to port 5000, or whatever the port you have set with ngrok:
const express = require('express');
const bodyParser = require('body-parser');
const app = express();
app.use(bodyParser.json());
app.use(bodyParser.urlencoded({ extended: true }));

const server = app.listen(process.env.PORT || 5000, () => {
  console.log('Express server listening on port %d in %s mode', server.address().port, app.settings.env);
});
Now, create HTTP GET and POST route method to handle the command:
/* For Facebook Validation */
app.get('/webhook', (req, res) => {
  if (req.query['hub.mode'] && req.query['hub.verify_token'] === 'tuxedo_cat') {
    res.status(200).send(req.query['hub.challenge']);
  } else {
    res.status(403).end();
  }
});

/* Handling all messenges */
app.post('/webhook', (req, res) => {
  console.log(req.body);
  if (req.body.object === 'page') {
    req.body.entry.forEach((entry) => {
      entry.messaging.forEach((event) => {
        if (event.message && event.message.text) {
          sendMessage(event);
        }
      });
    });
    res.status(200).end();
  }
});
This is how you receive messages to your webhook via Facebook Messenger- All requests should come via post, while the GET route is only used at the time you configure your Facebook app.
Where you see the tuxedo_cat, just use an arbitrary string. You will need later when setting up your Facebook app.
Run the code, and go to the next step.
$ node webhooks.js
Setting Up a Facebook App
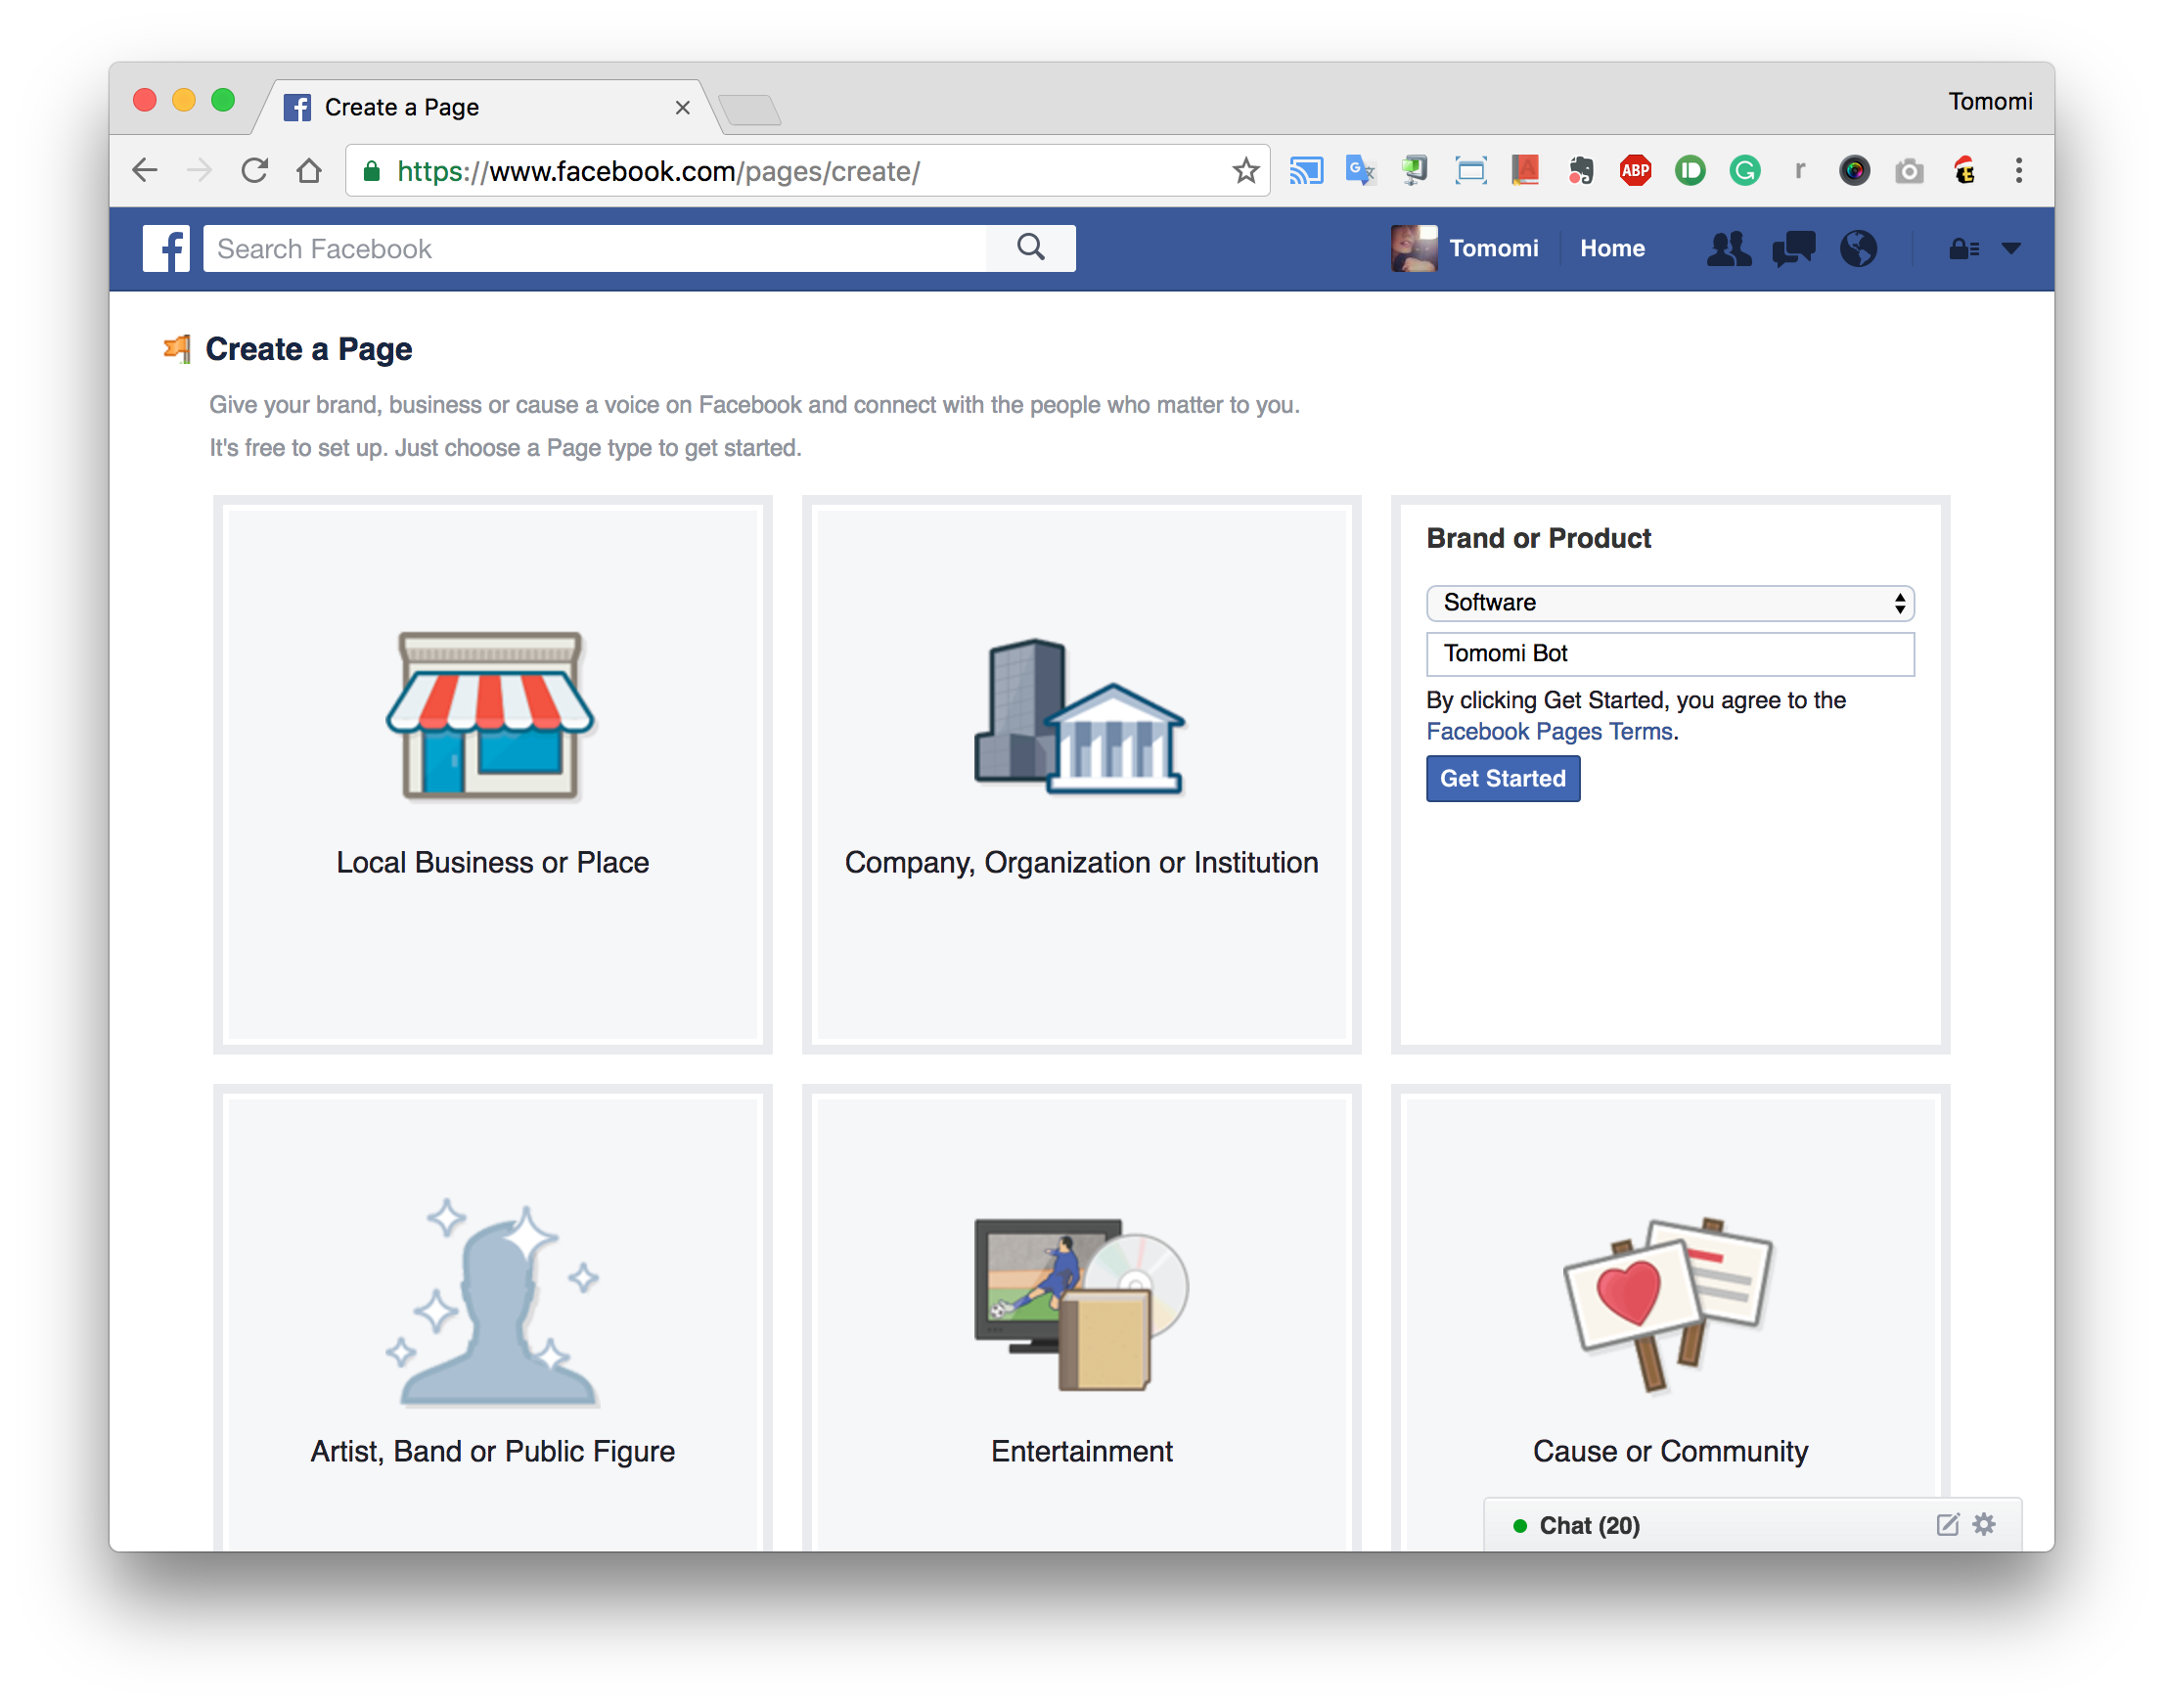
You need a Facebook Page to set up your chat bot. Create one from facebook.com/pages/create. Choose a category, and select a sub category from the dropdown and fill out the required filed. Then click Get Started.
Then create an app at developers.facebook.com/quickstarts.
Give it a name and click the button, then fill out the required info:
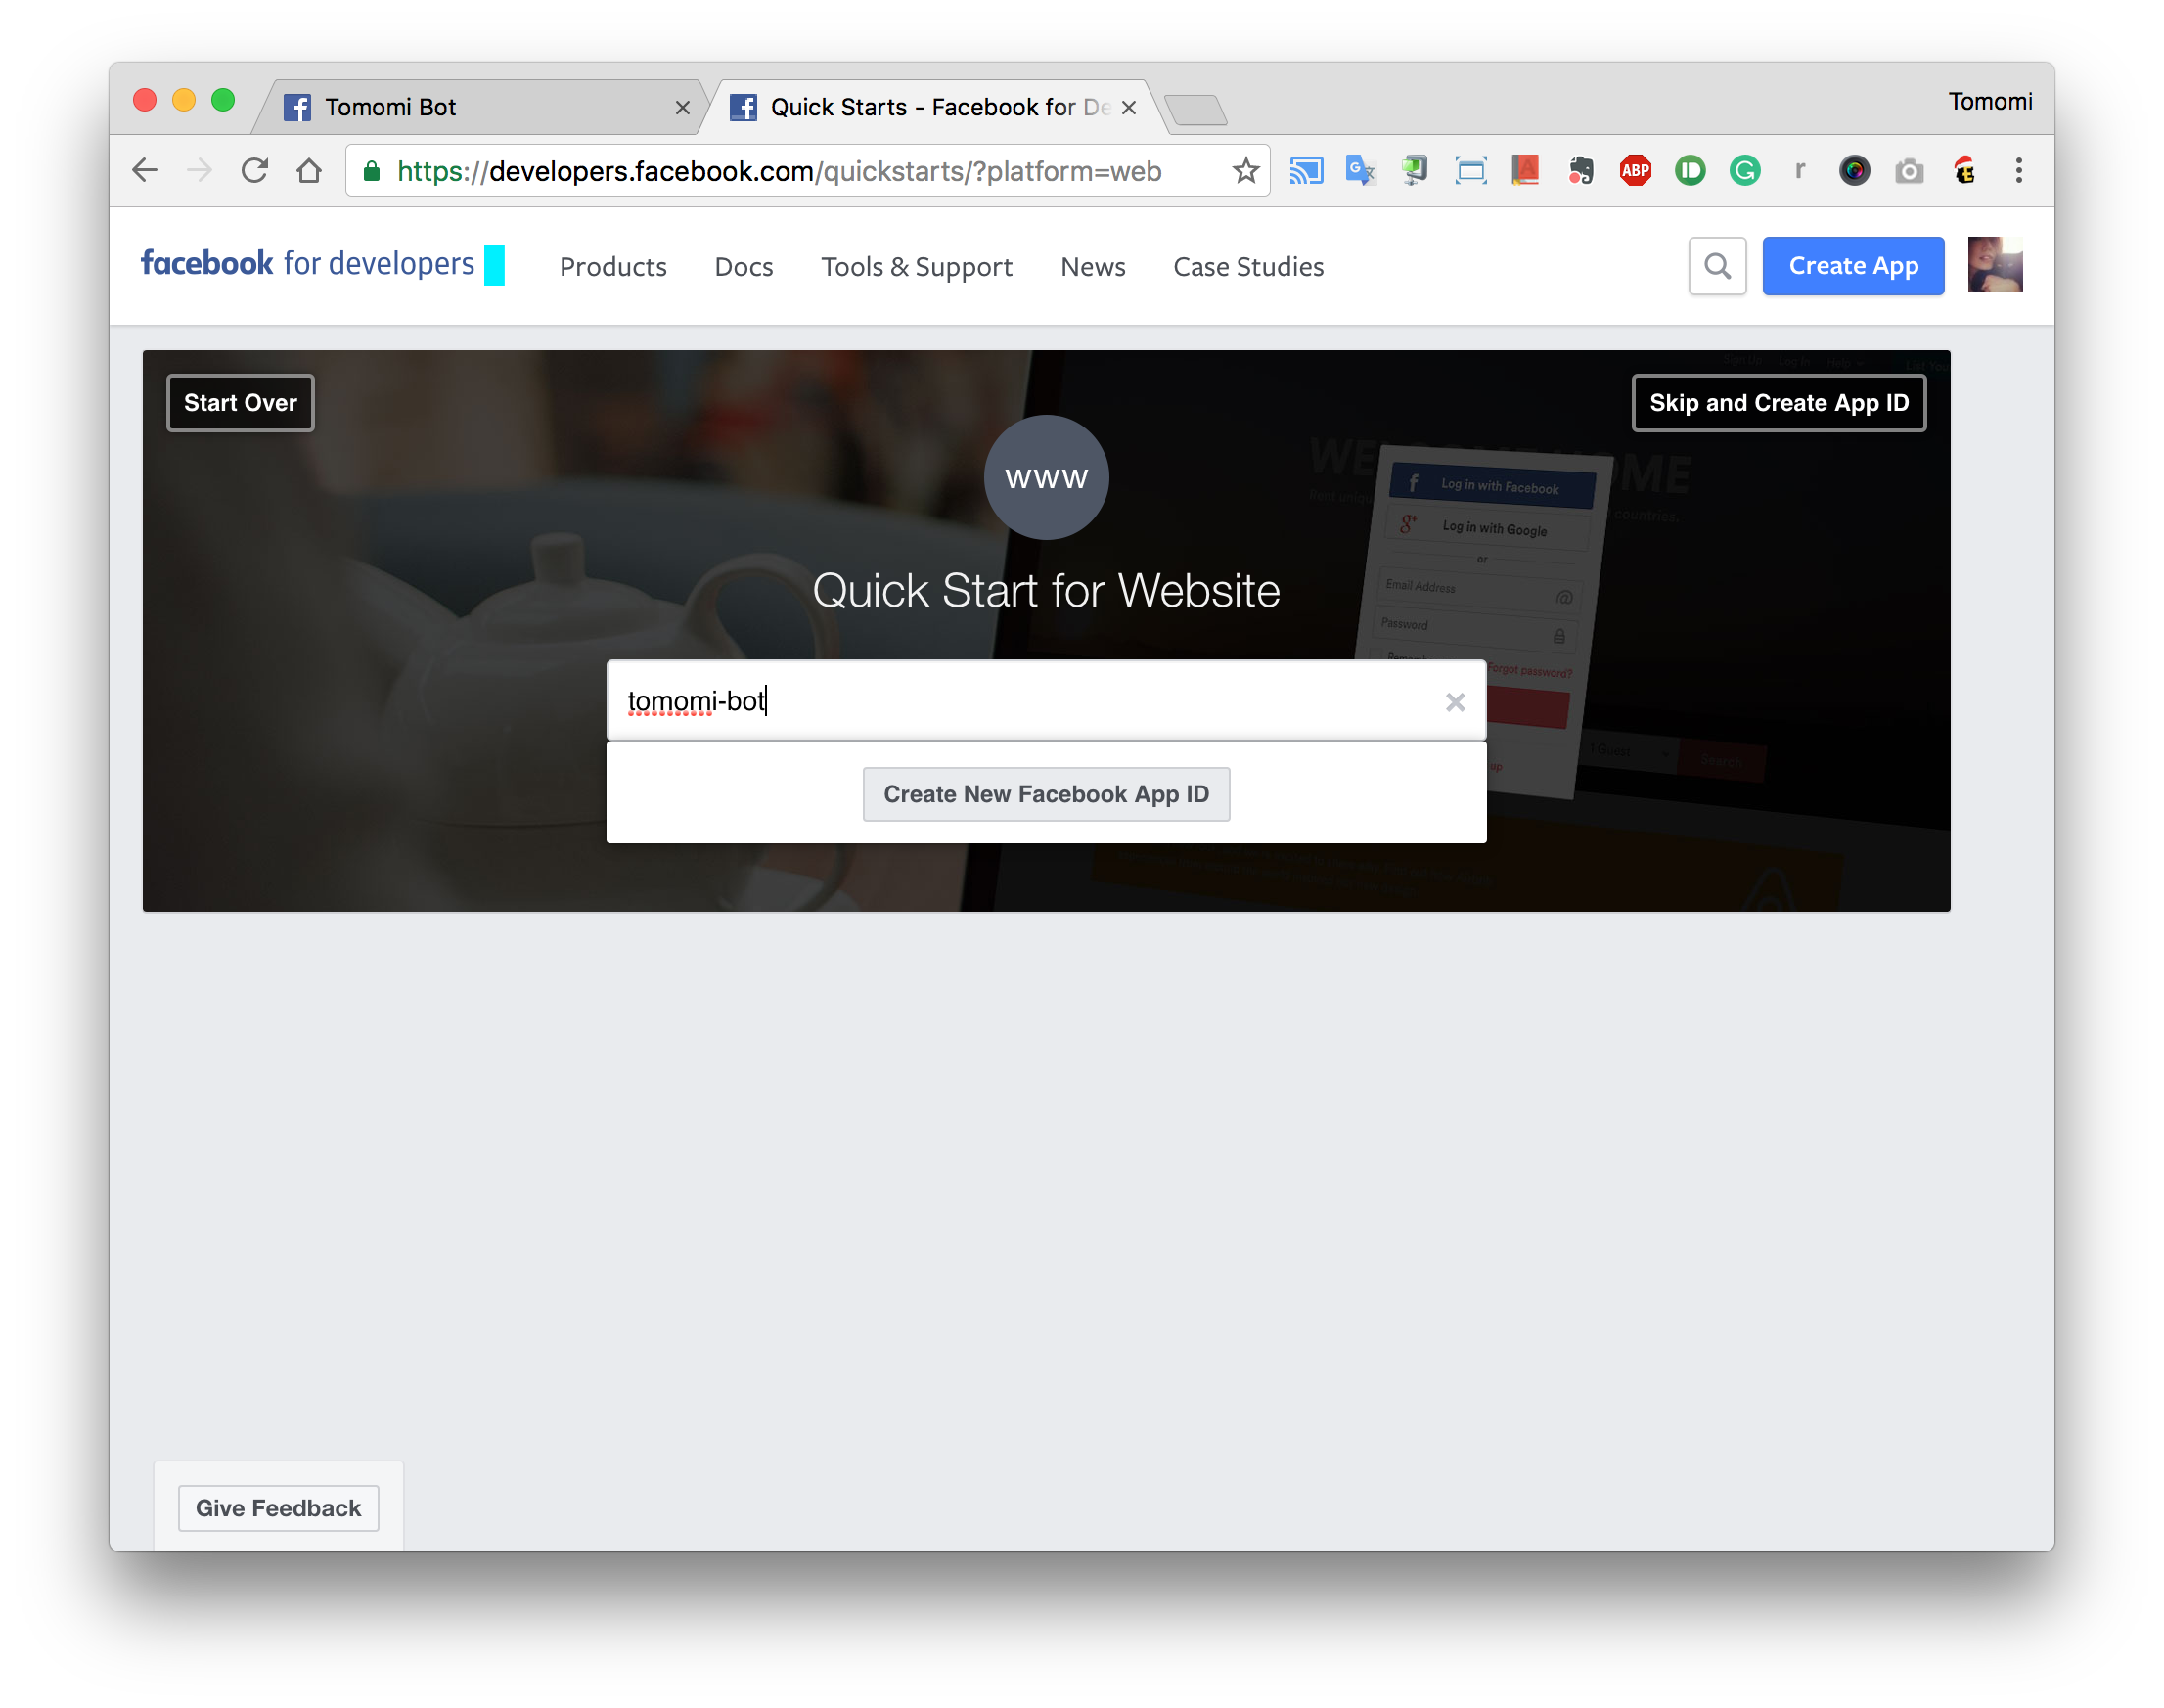
Once your app is created, follow the steps to configure or skip it to your Dashboard.
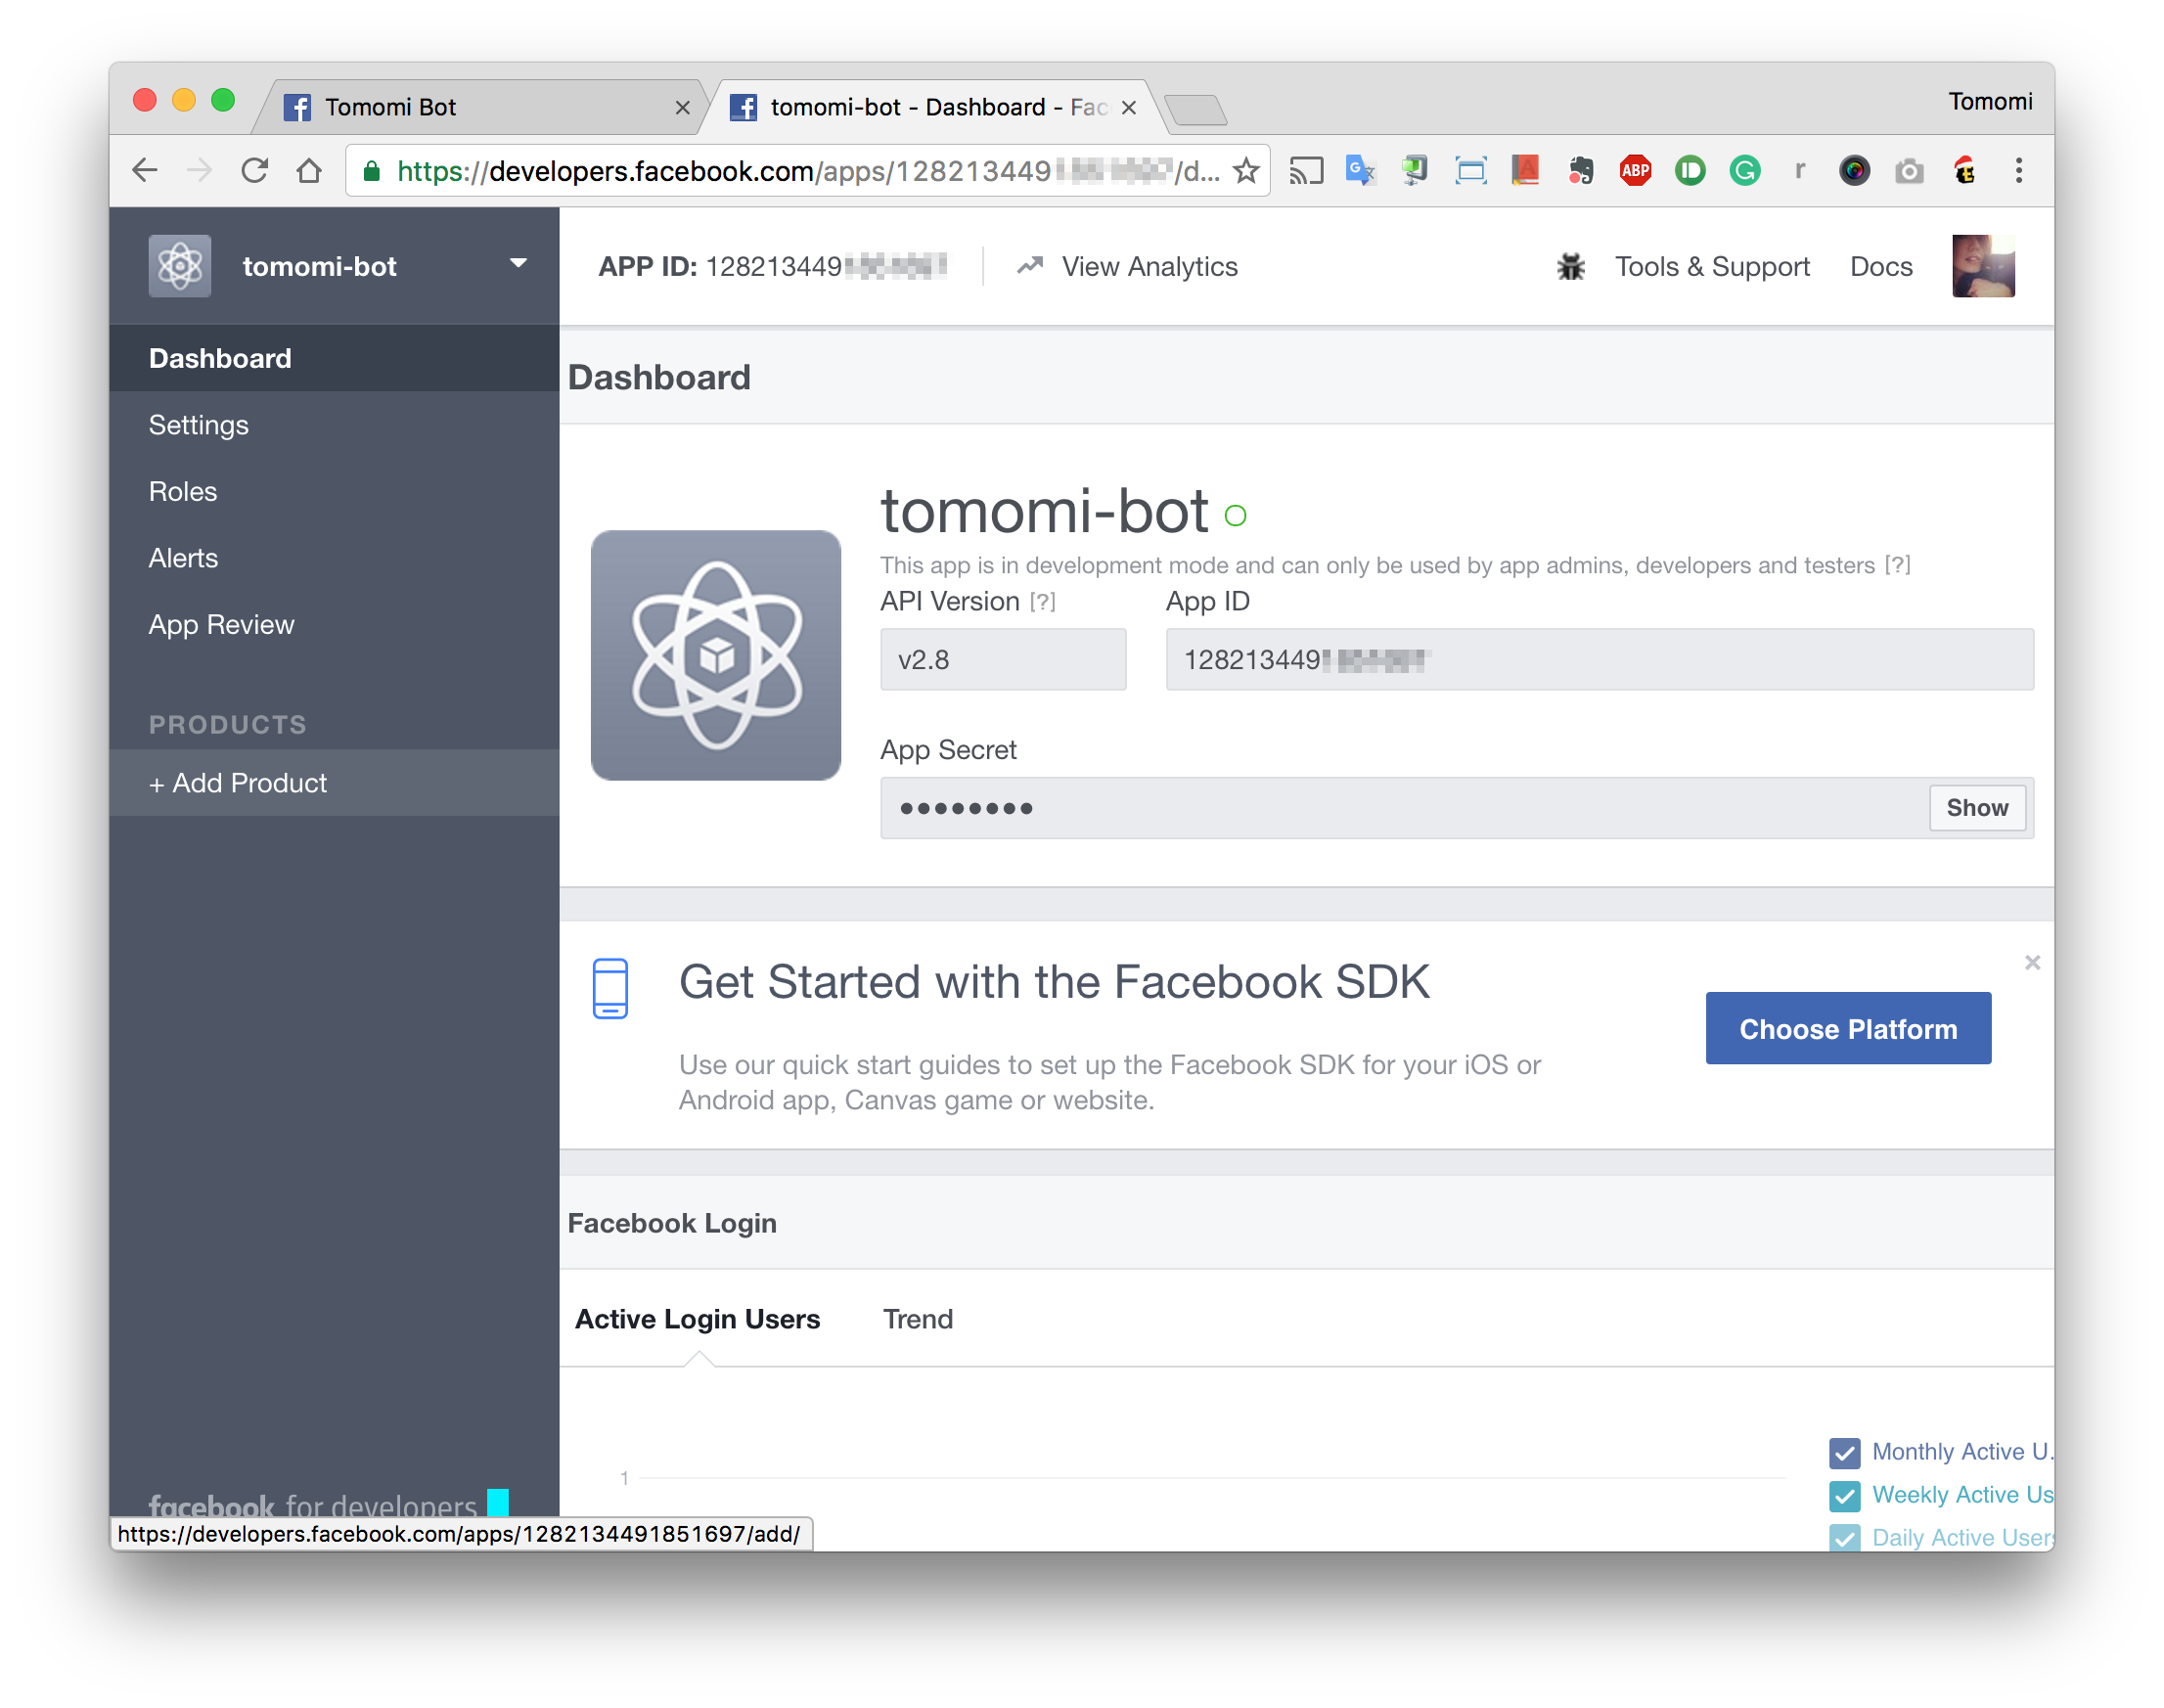
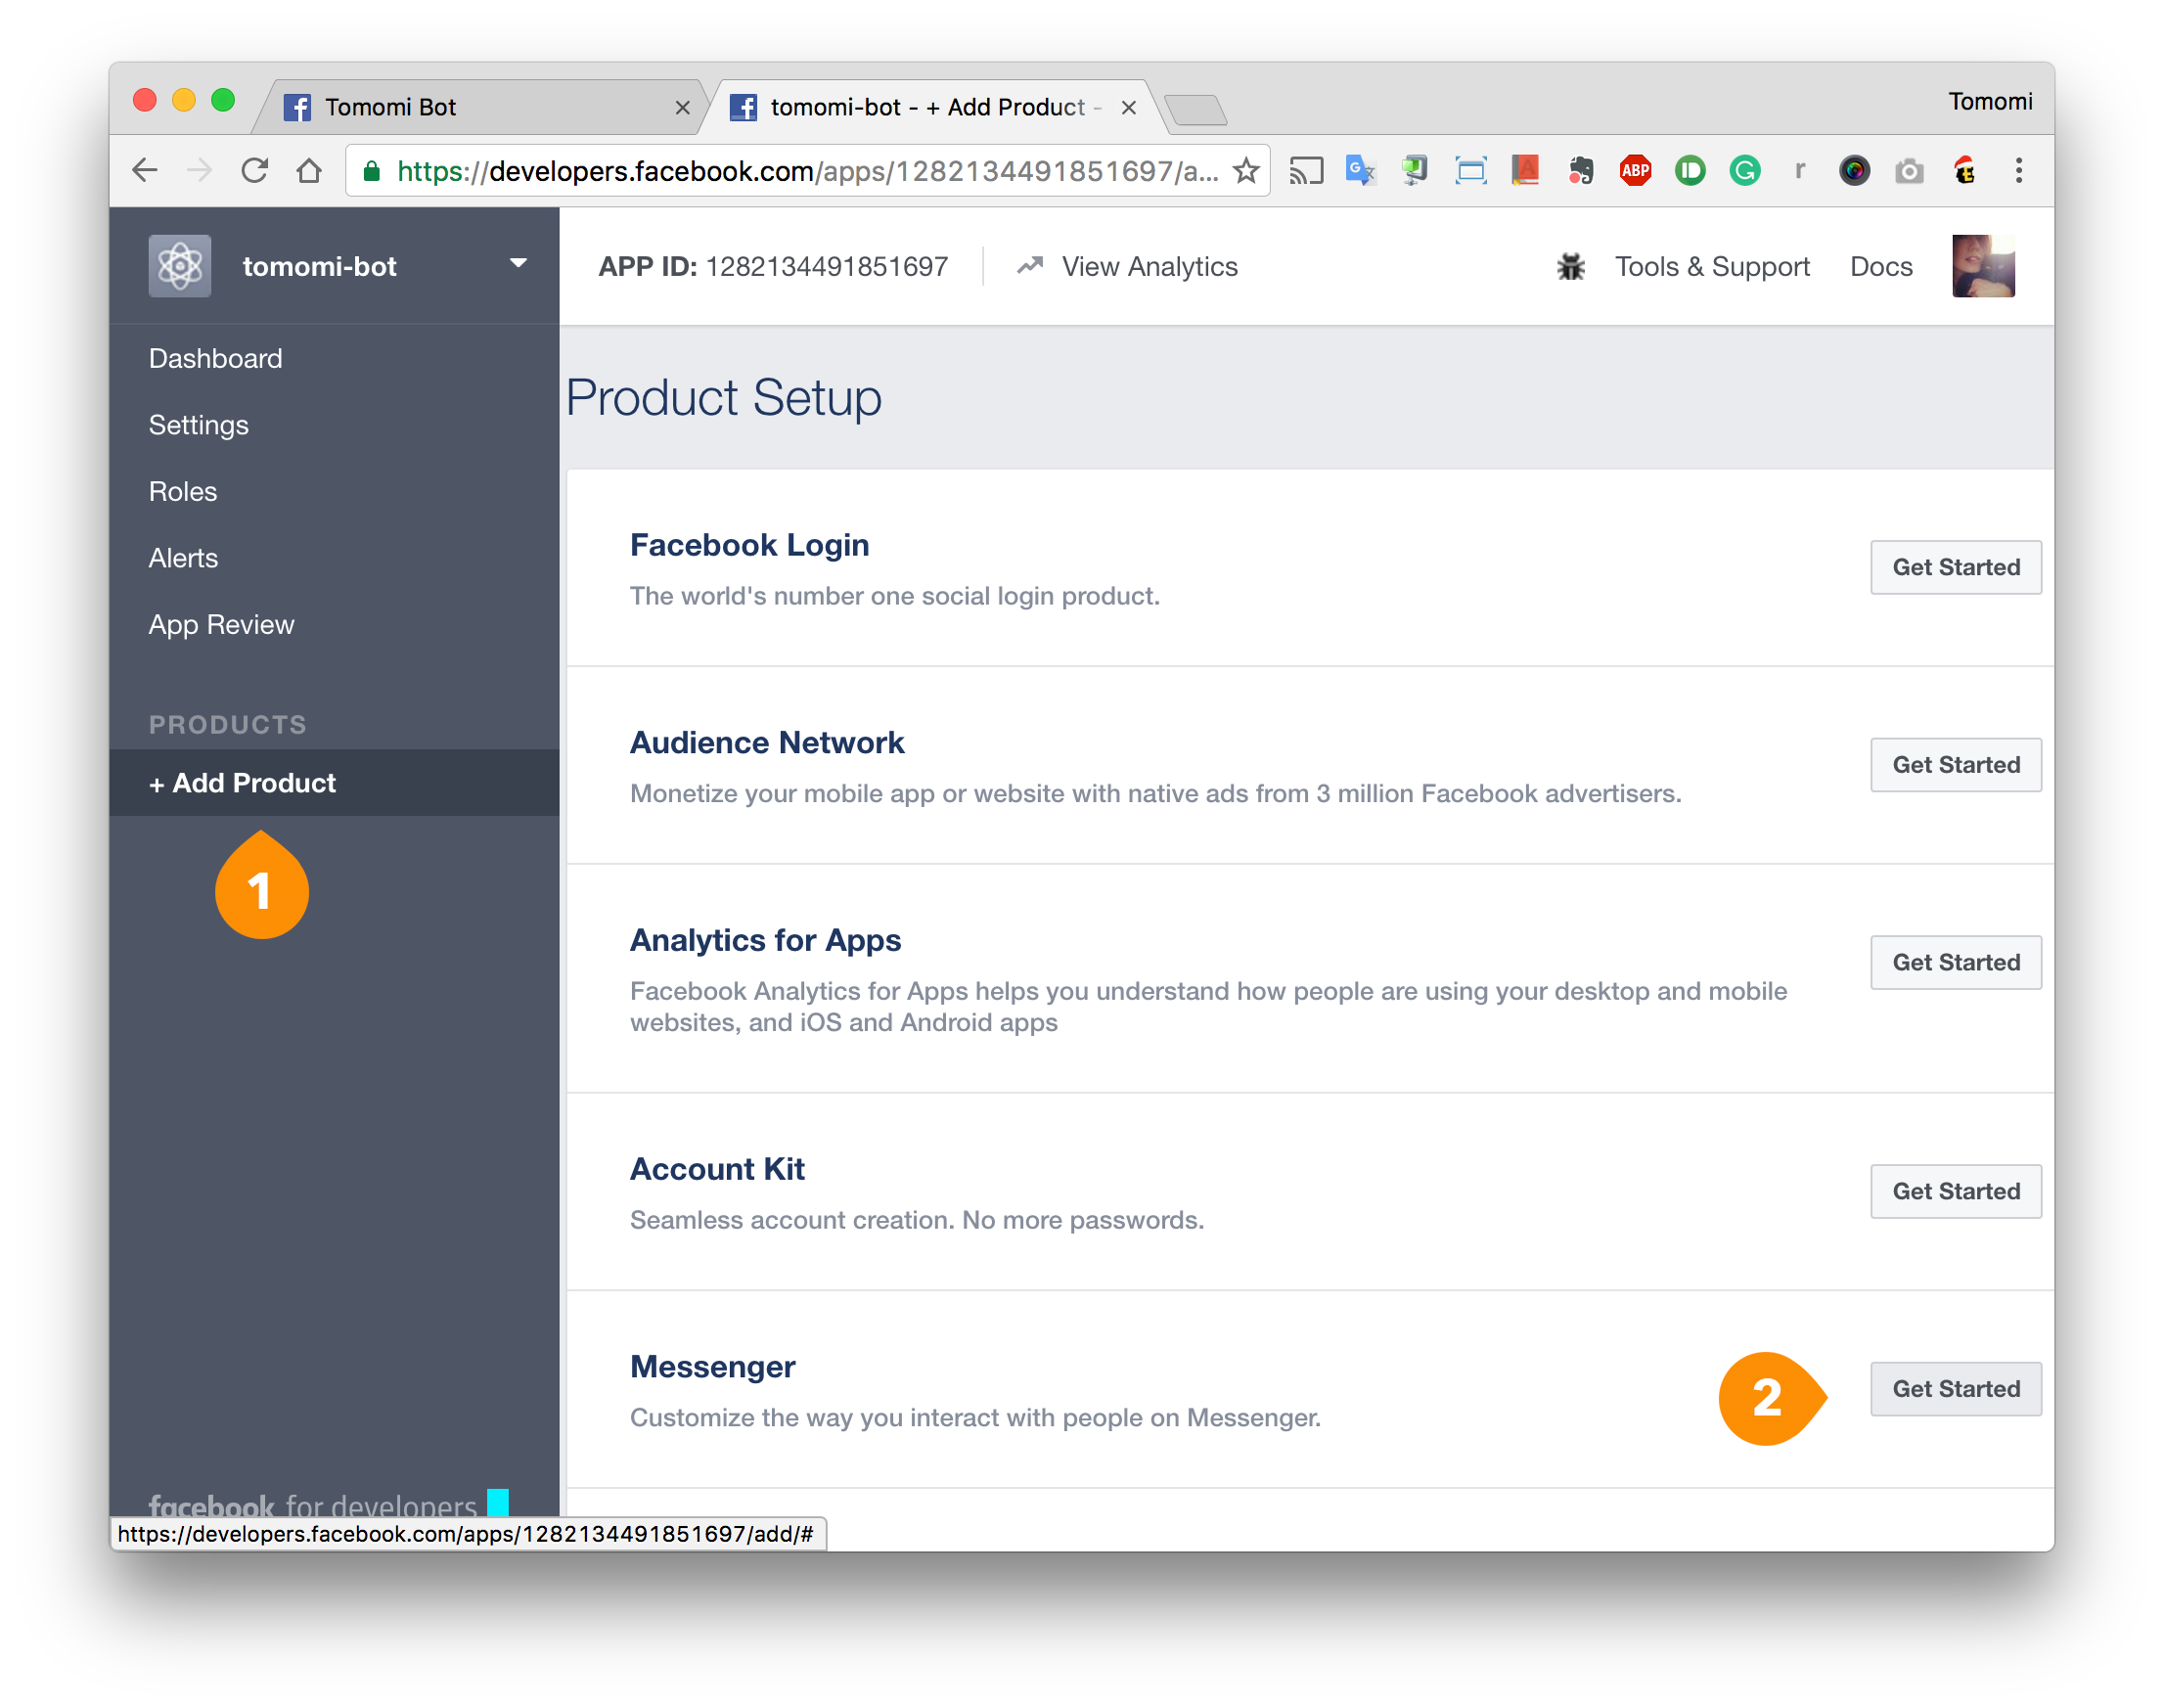
Click Add Product from the left menu, then choose Messenger. Click Get Started.
At the Token Generation, (1) choose the page you just created from the dropdown menu, and it will generate a token (2) that you will need to include in your node code.
Then, at the Webhooks, (3) click the Setup Webhooks button:
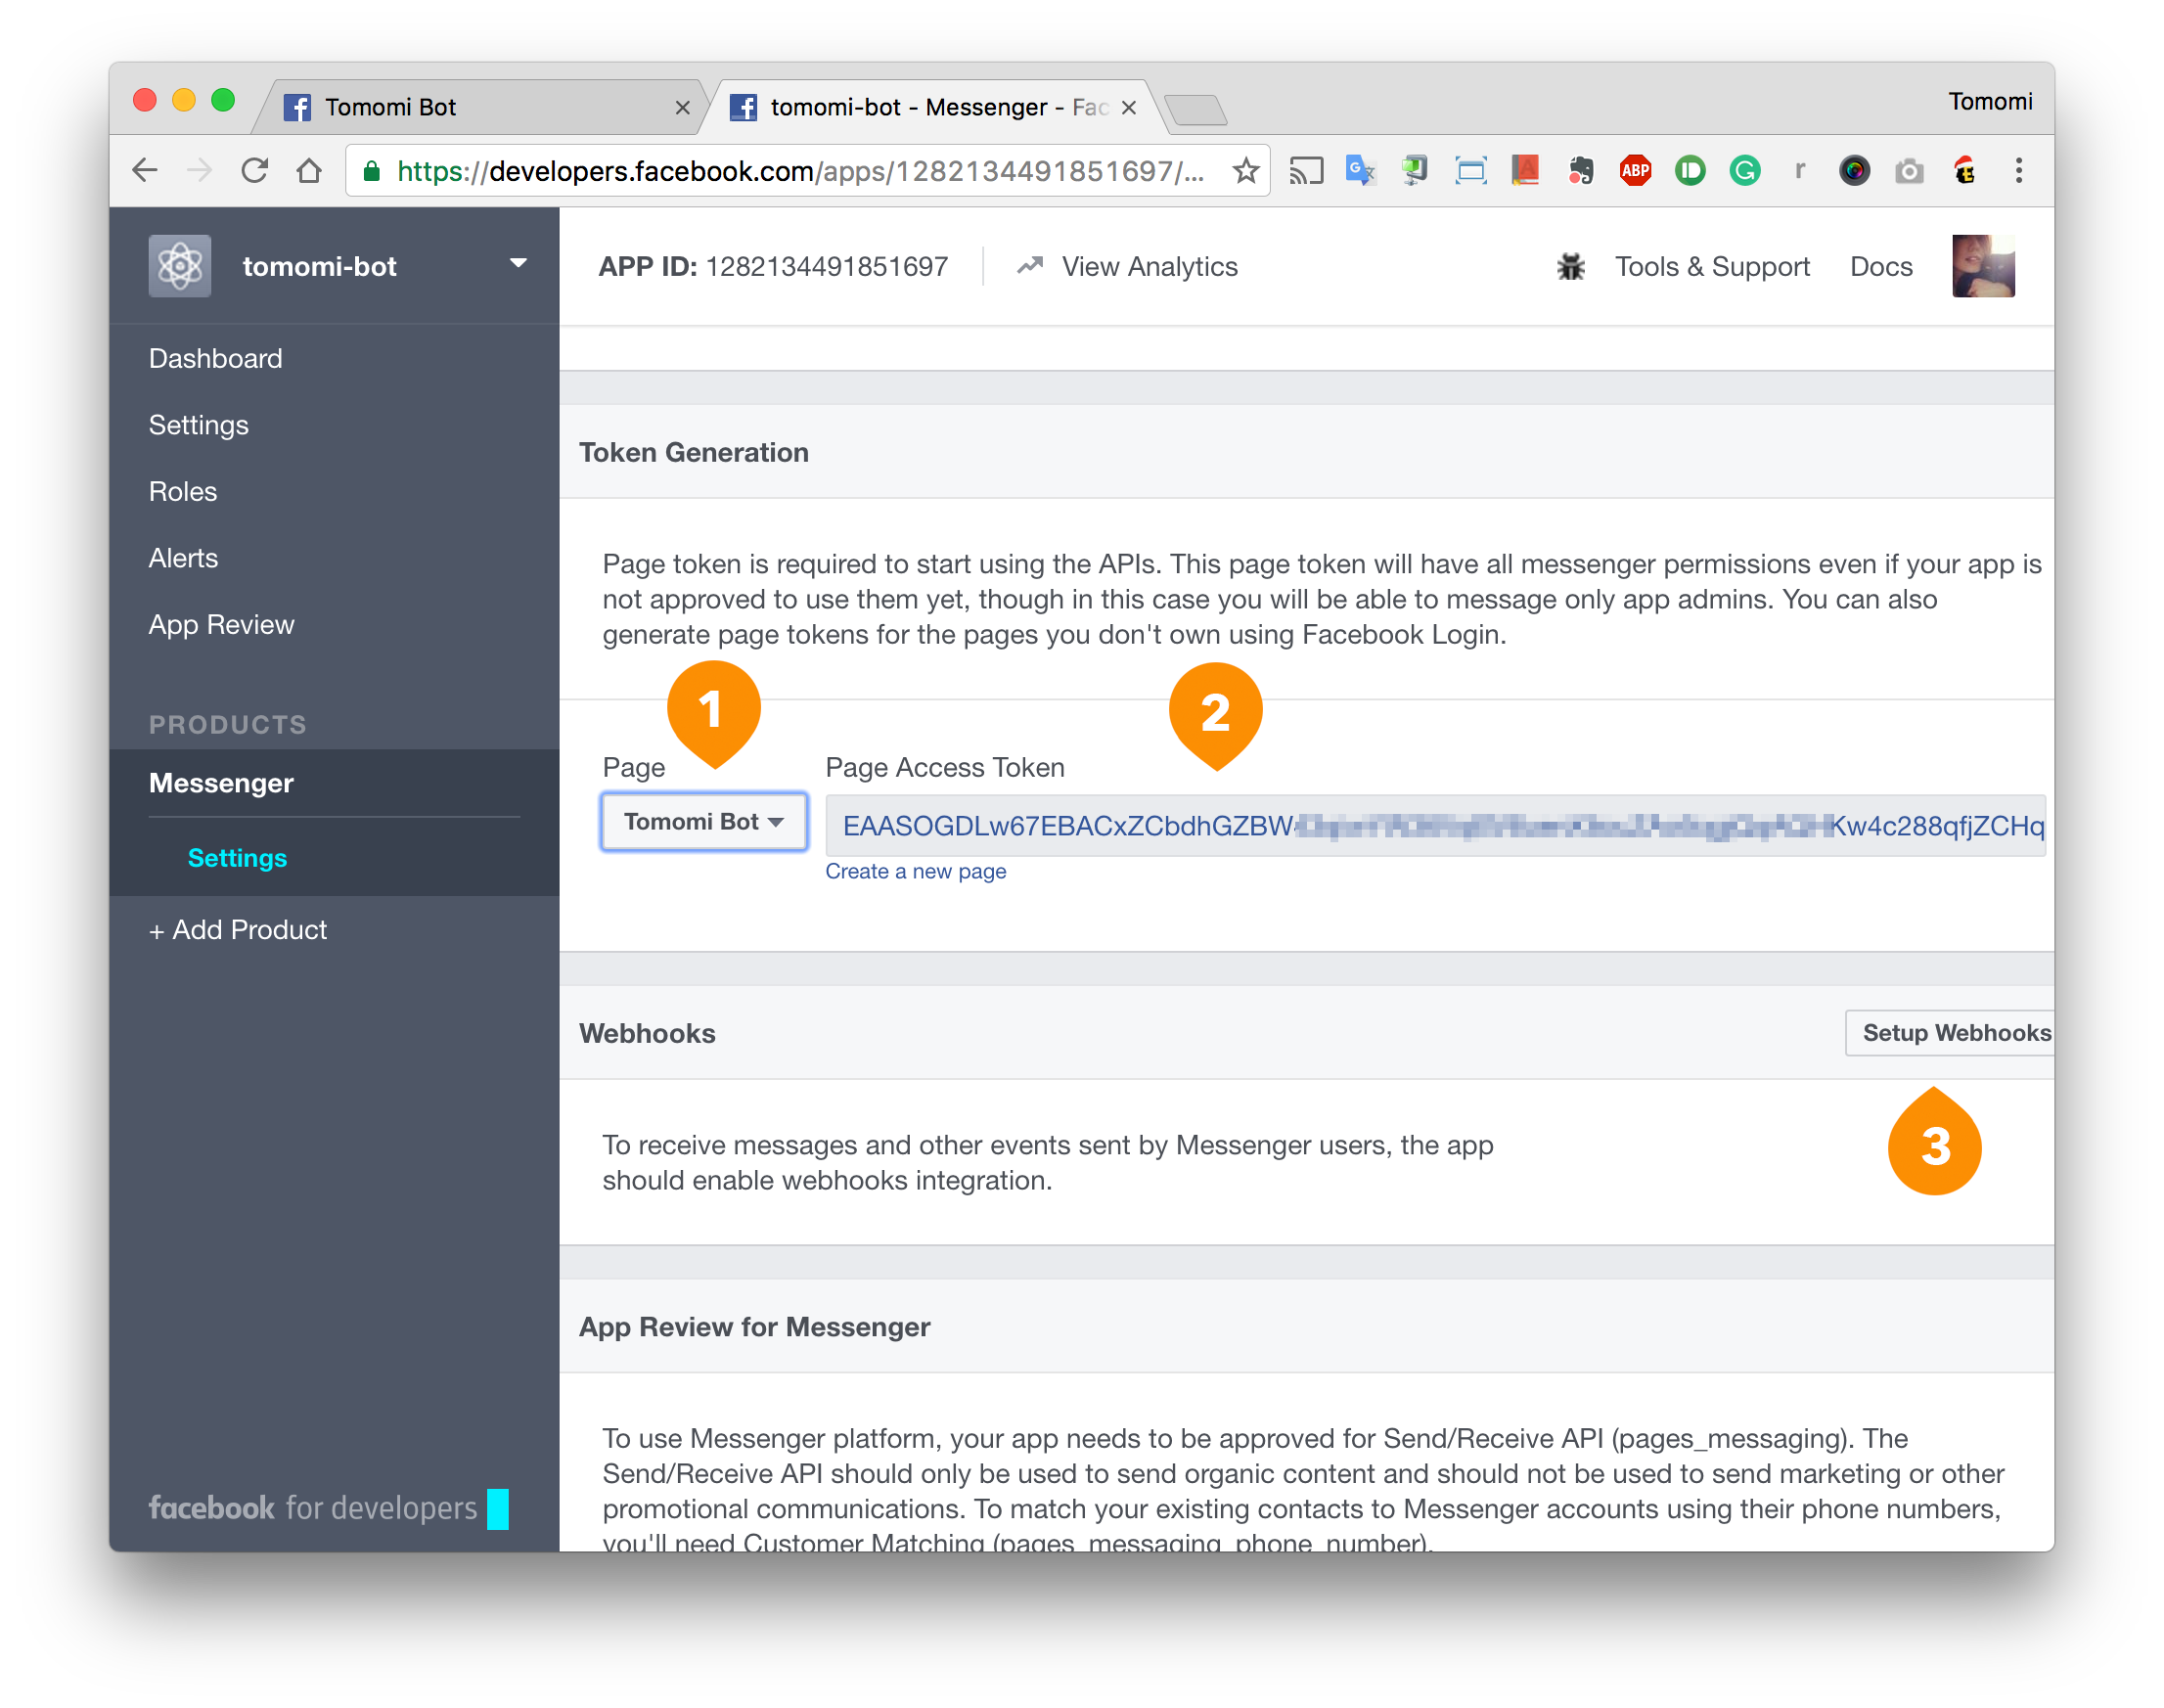
In the dialog, fill out the (1) Callback URL with your ngrok URL, (2) the random string for validation (the one you’ve specified in your ‘GET’ route in the webhook.js), then (3) check messages.
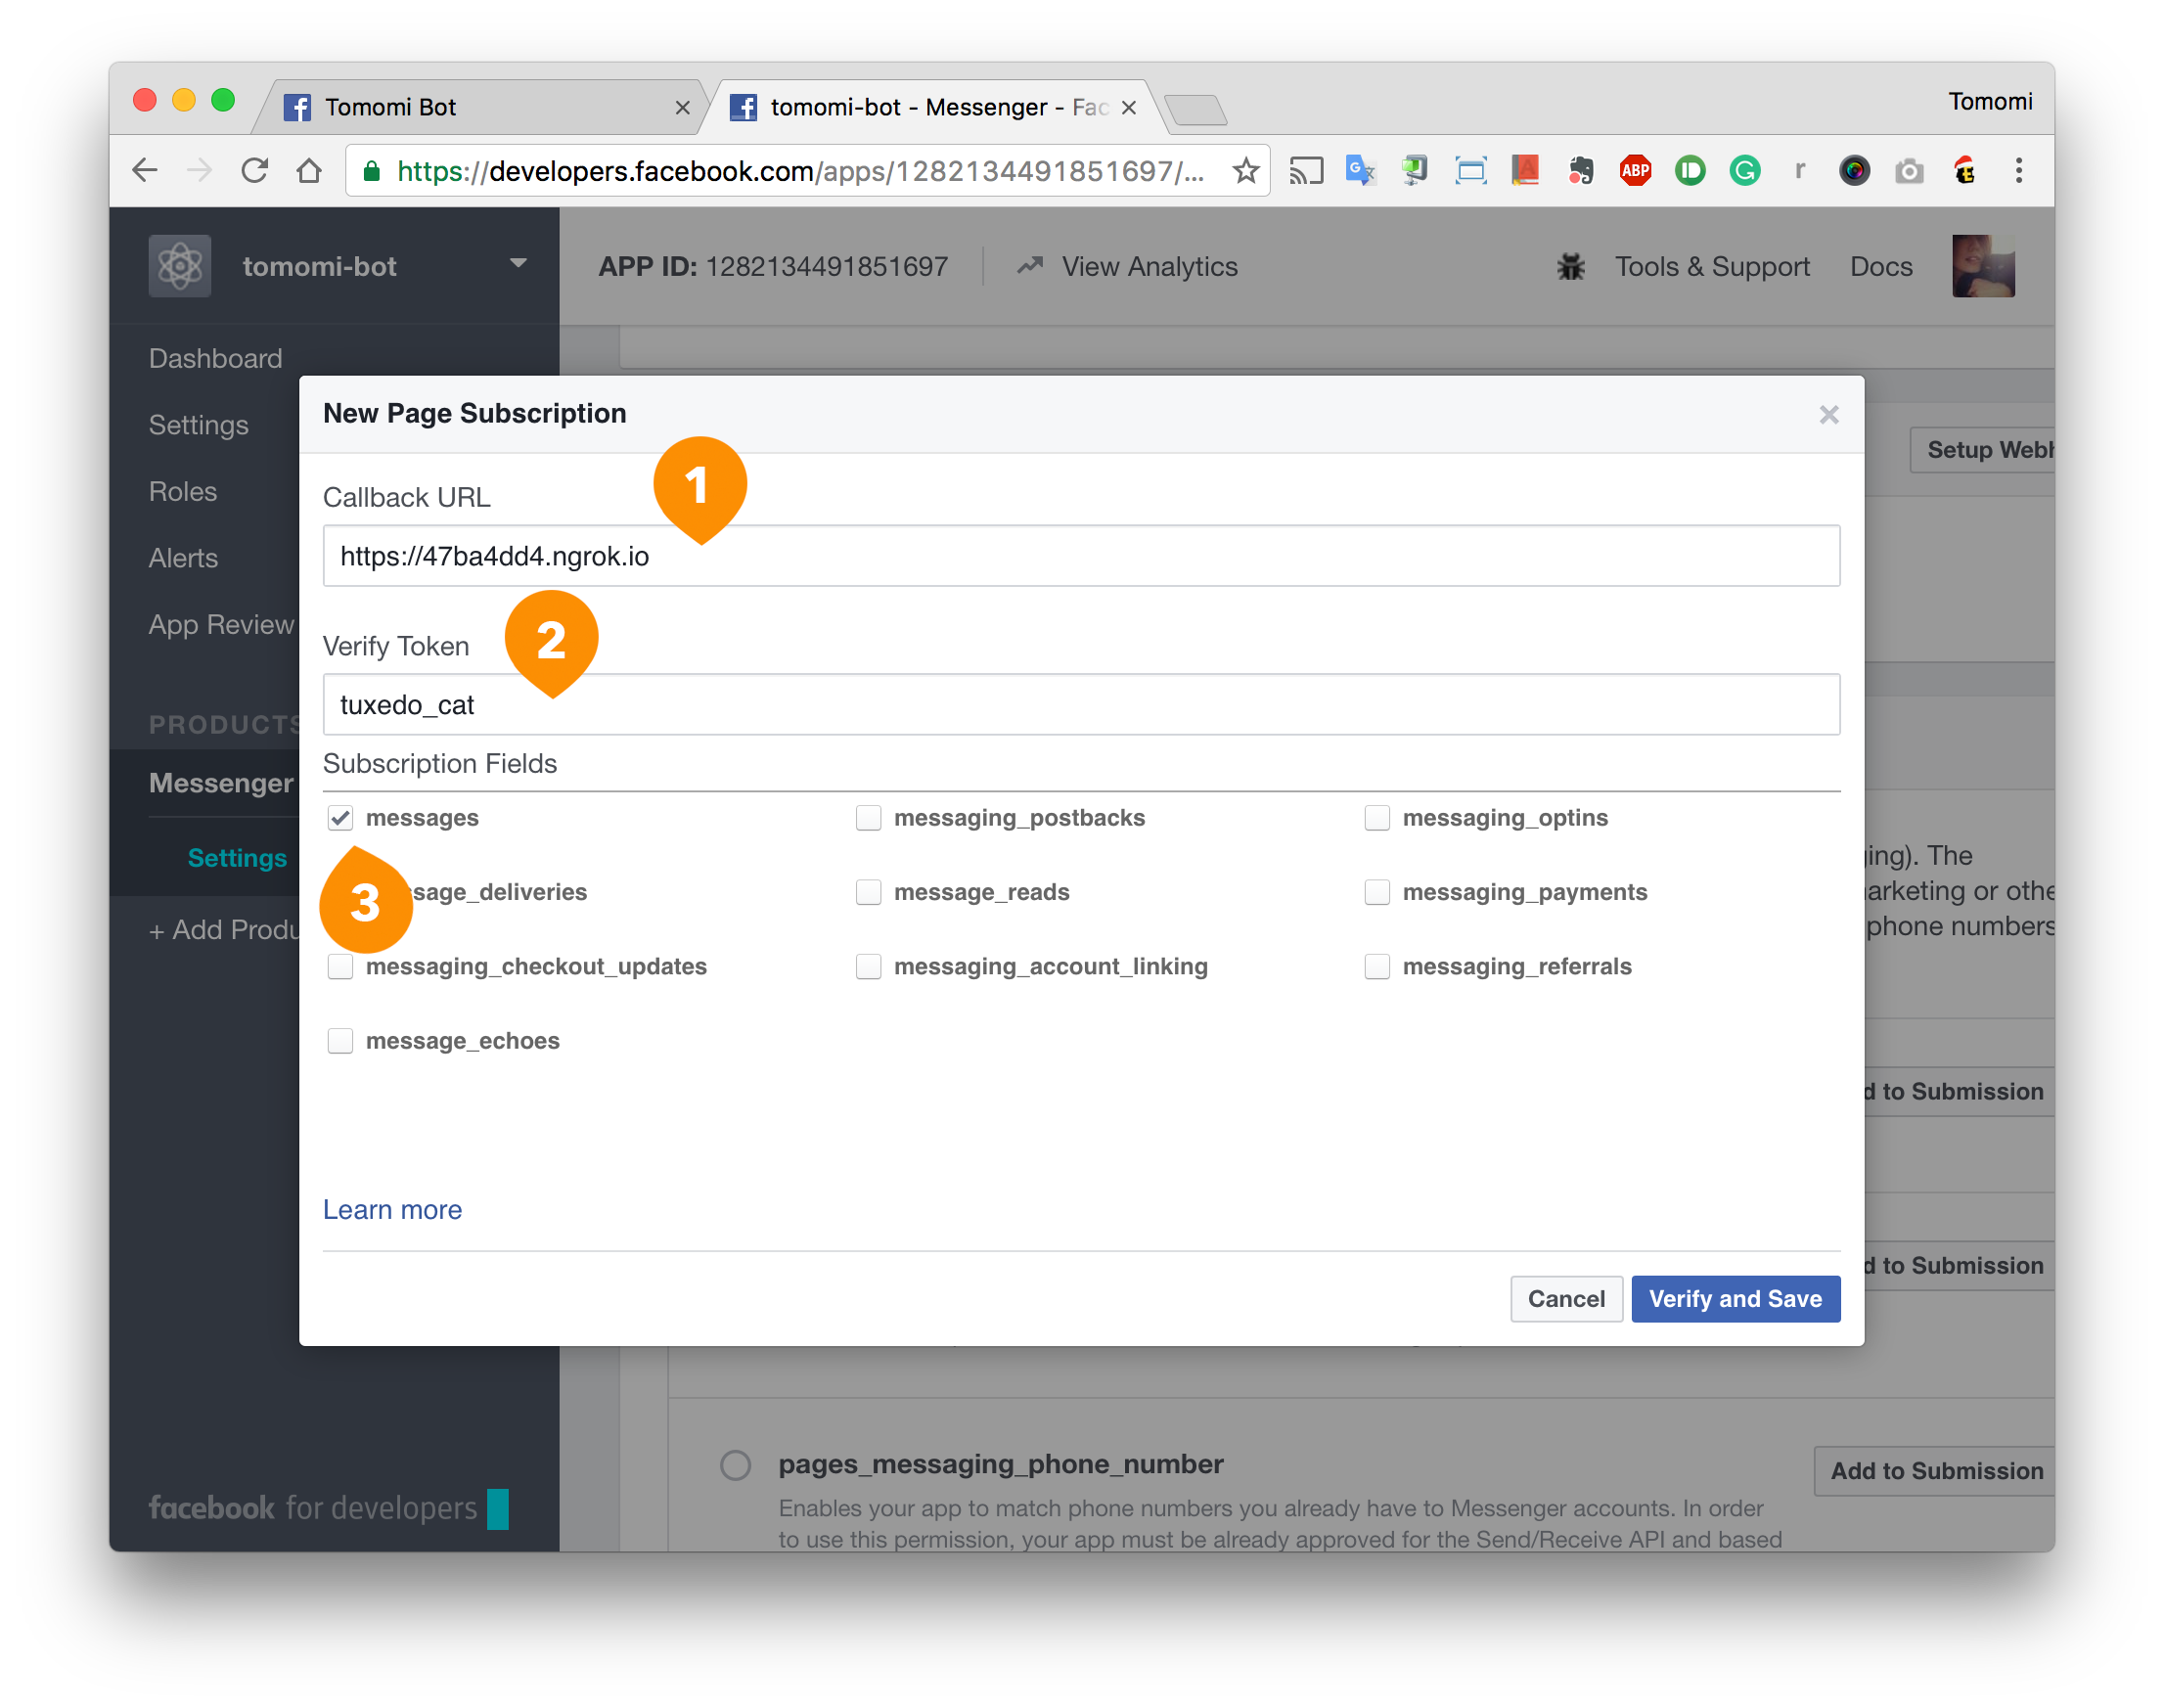
Click the Verify and Save. If you get a red icon with x at the Callback URL, it means the URL is not validated- either the URL is wrong or your node code is not properly running. Otherwise, you are ready to get back to code.
Writing a Super Simple Chat Bot
Install request to POST messages:
$ npm install request --save
Continue with your webhook.js, let’s implement sendMessage() that simply replies the sender an echo to just test your Messenger bot:
const request = require('request');

function sendMessage(event) {
  let sender = event.sender.id;
  let text = event.message.text;

  request({
    url: 'https://graph.facebook.com/v2.6/me/messages',
    qs: {access_token: PAGE_ACCESS_TOKEN},
    method: 'POST',
    json: {
      recipient: {id: sender},
      message: {text: text}
    }
  }, function (error, response) {
    if (error) {
        console.log('Error sending message: ', error);
    } else if (response.body.error) {
        console.log('Error: ', response.body.error);
    }
  });
}
Where you see the PAGE_ACCESS_TOKEN, use the generated token.
Try running the code. This acts as a very simple bot, which interact the Messenger platform to receive a message and echo the message as the reply- Go to [https://m.me/YOUR-PAGE] and start a conversation. If your the simple bot works correctly, it just replies the exactly what you send:
Your entry is simply echoed back. This is boring, so let’s use API.ai next to make this conversation more interesting.
2. Using API.ai with Your Facebook Messenger Bot
API.ai allows developers to integrate your app with the AI system with speech-to-text and natural language processing.
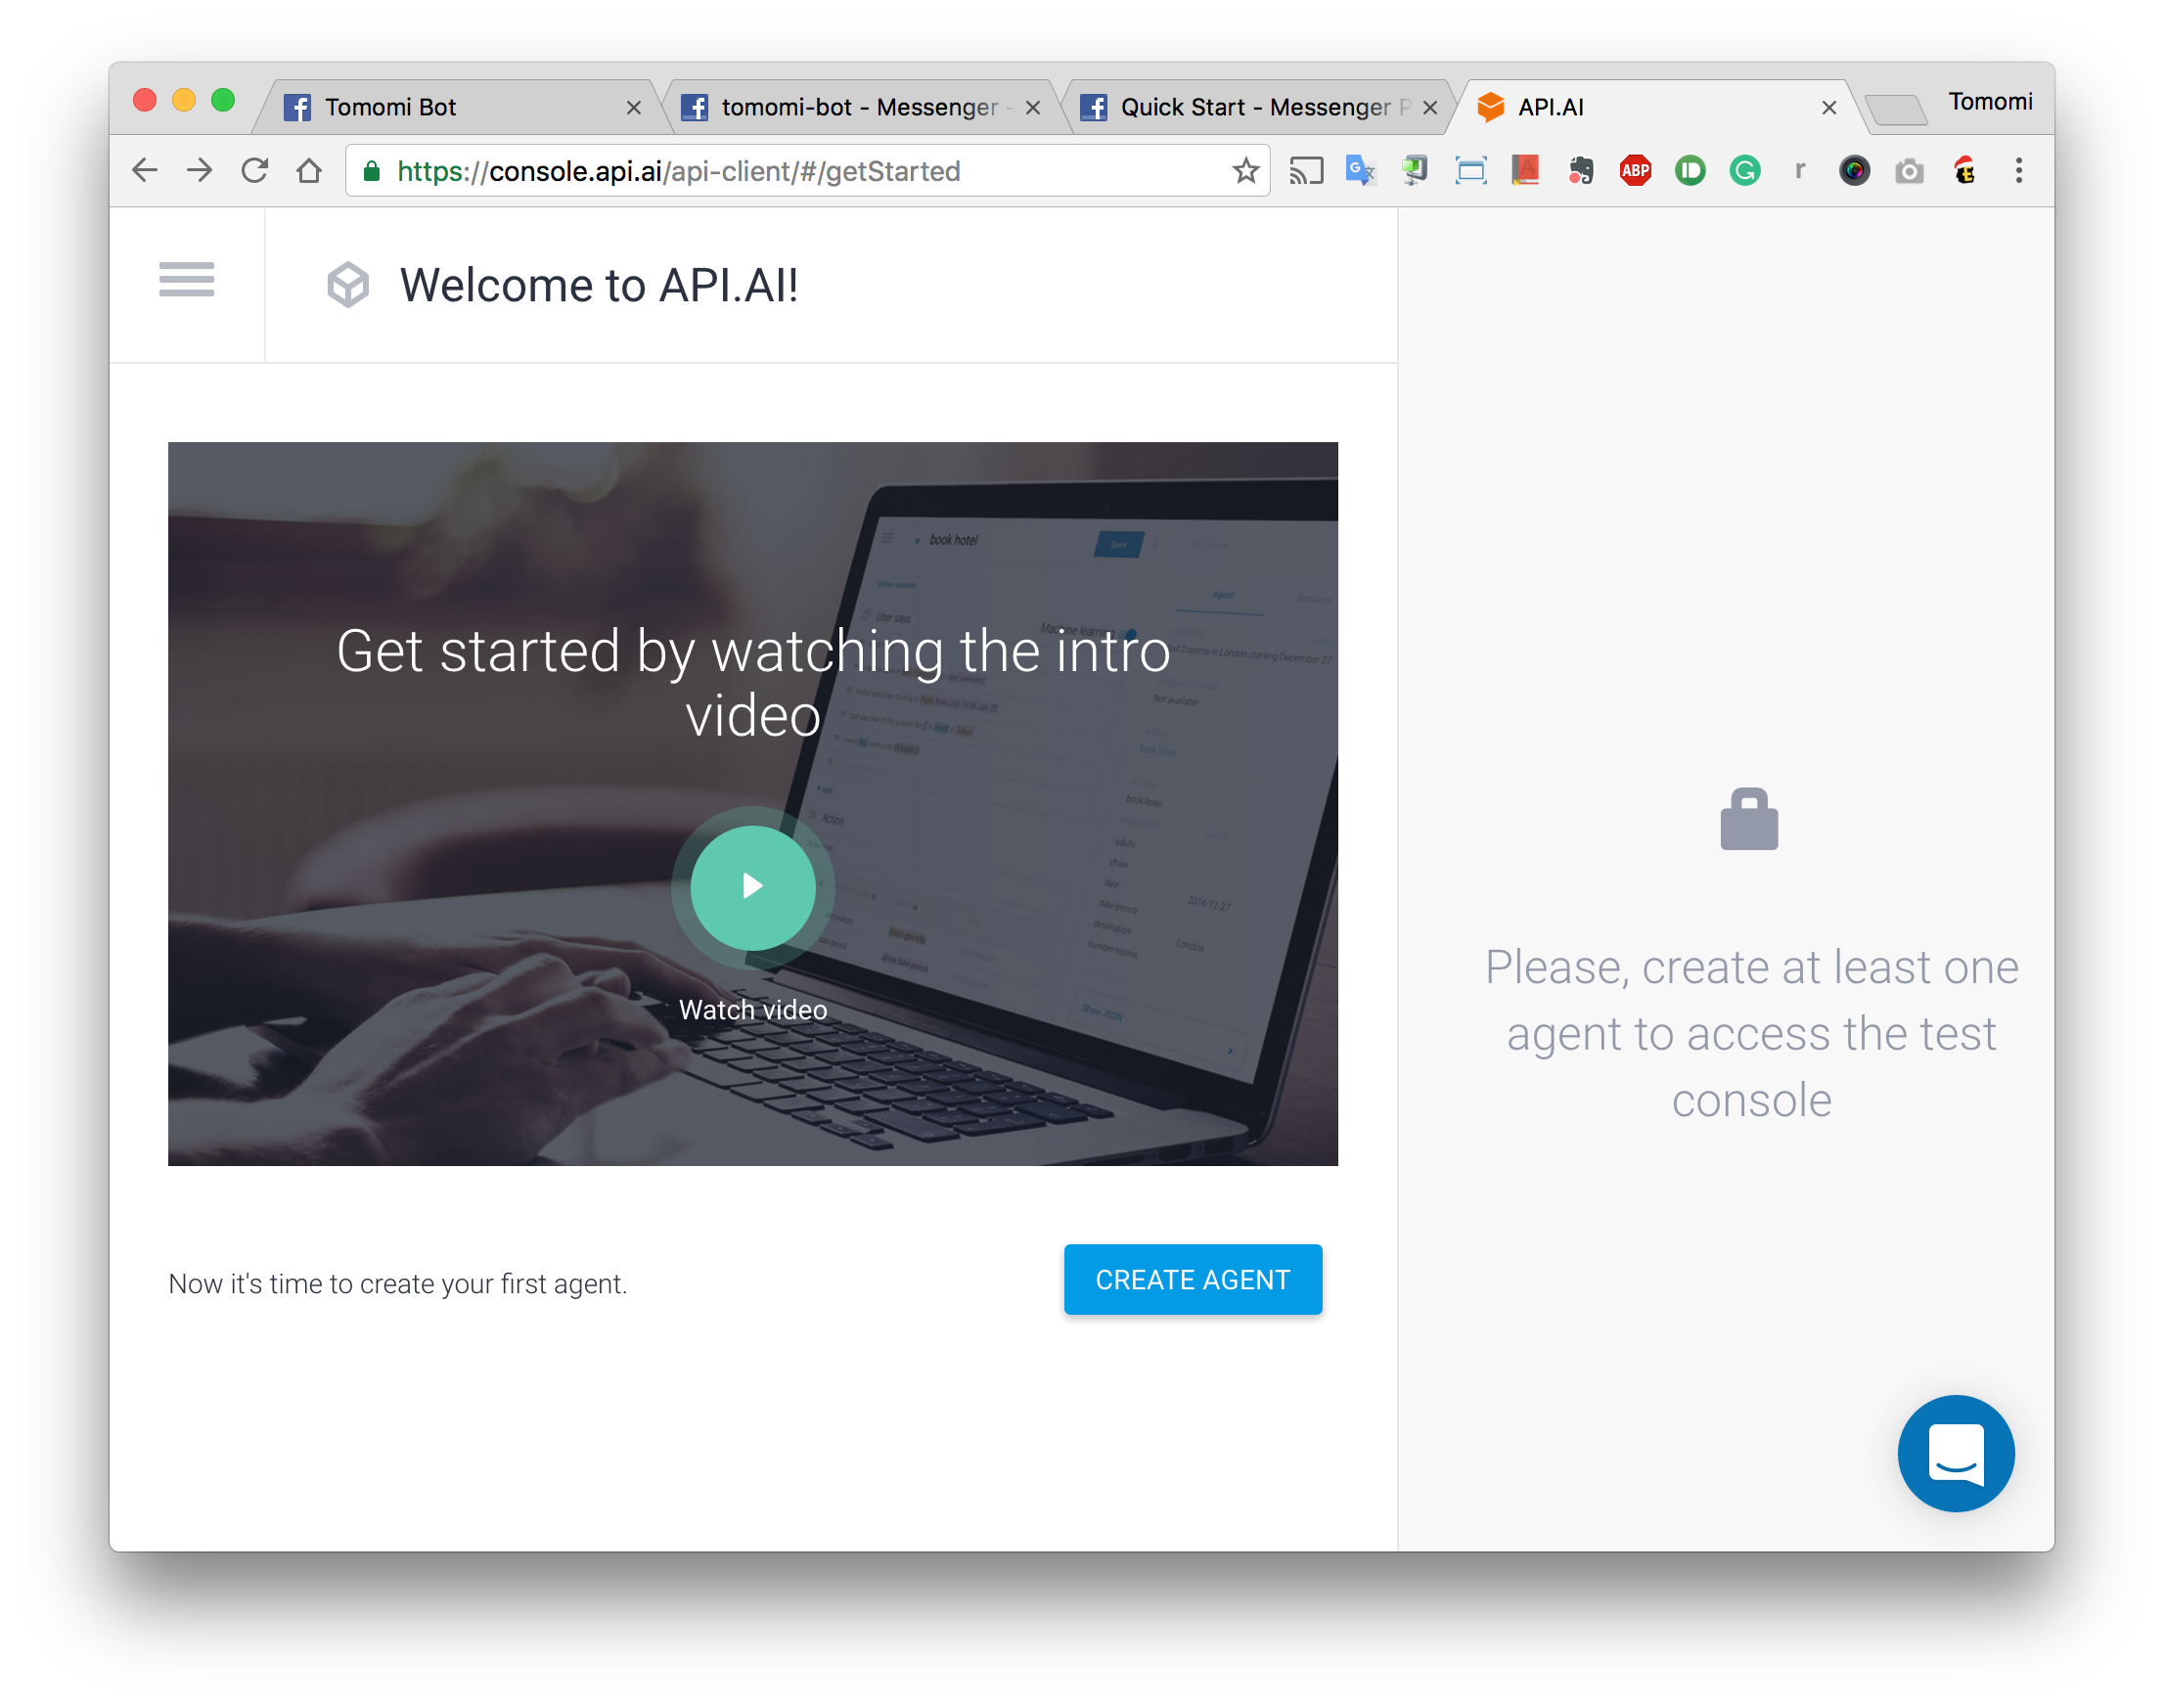
Let’s get started with API.ai by sigining up.
Once you get your account, create an agent. You can either click the button that says CREATE AGENT or from the menu.
Give it a name and fill out the required info:
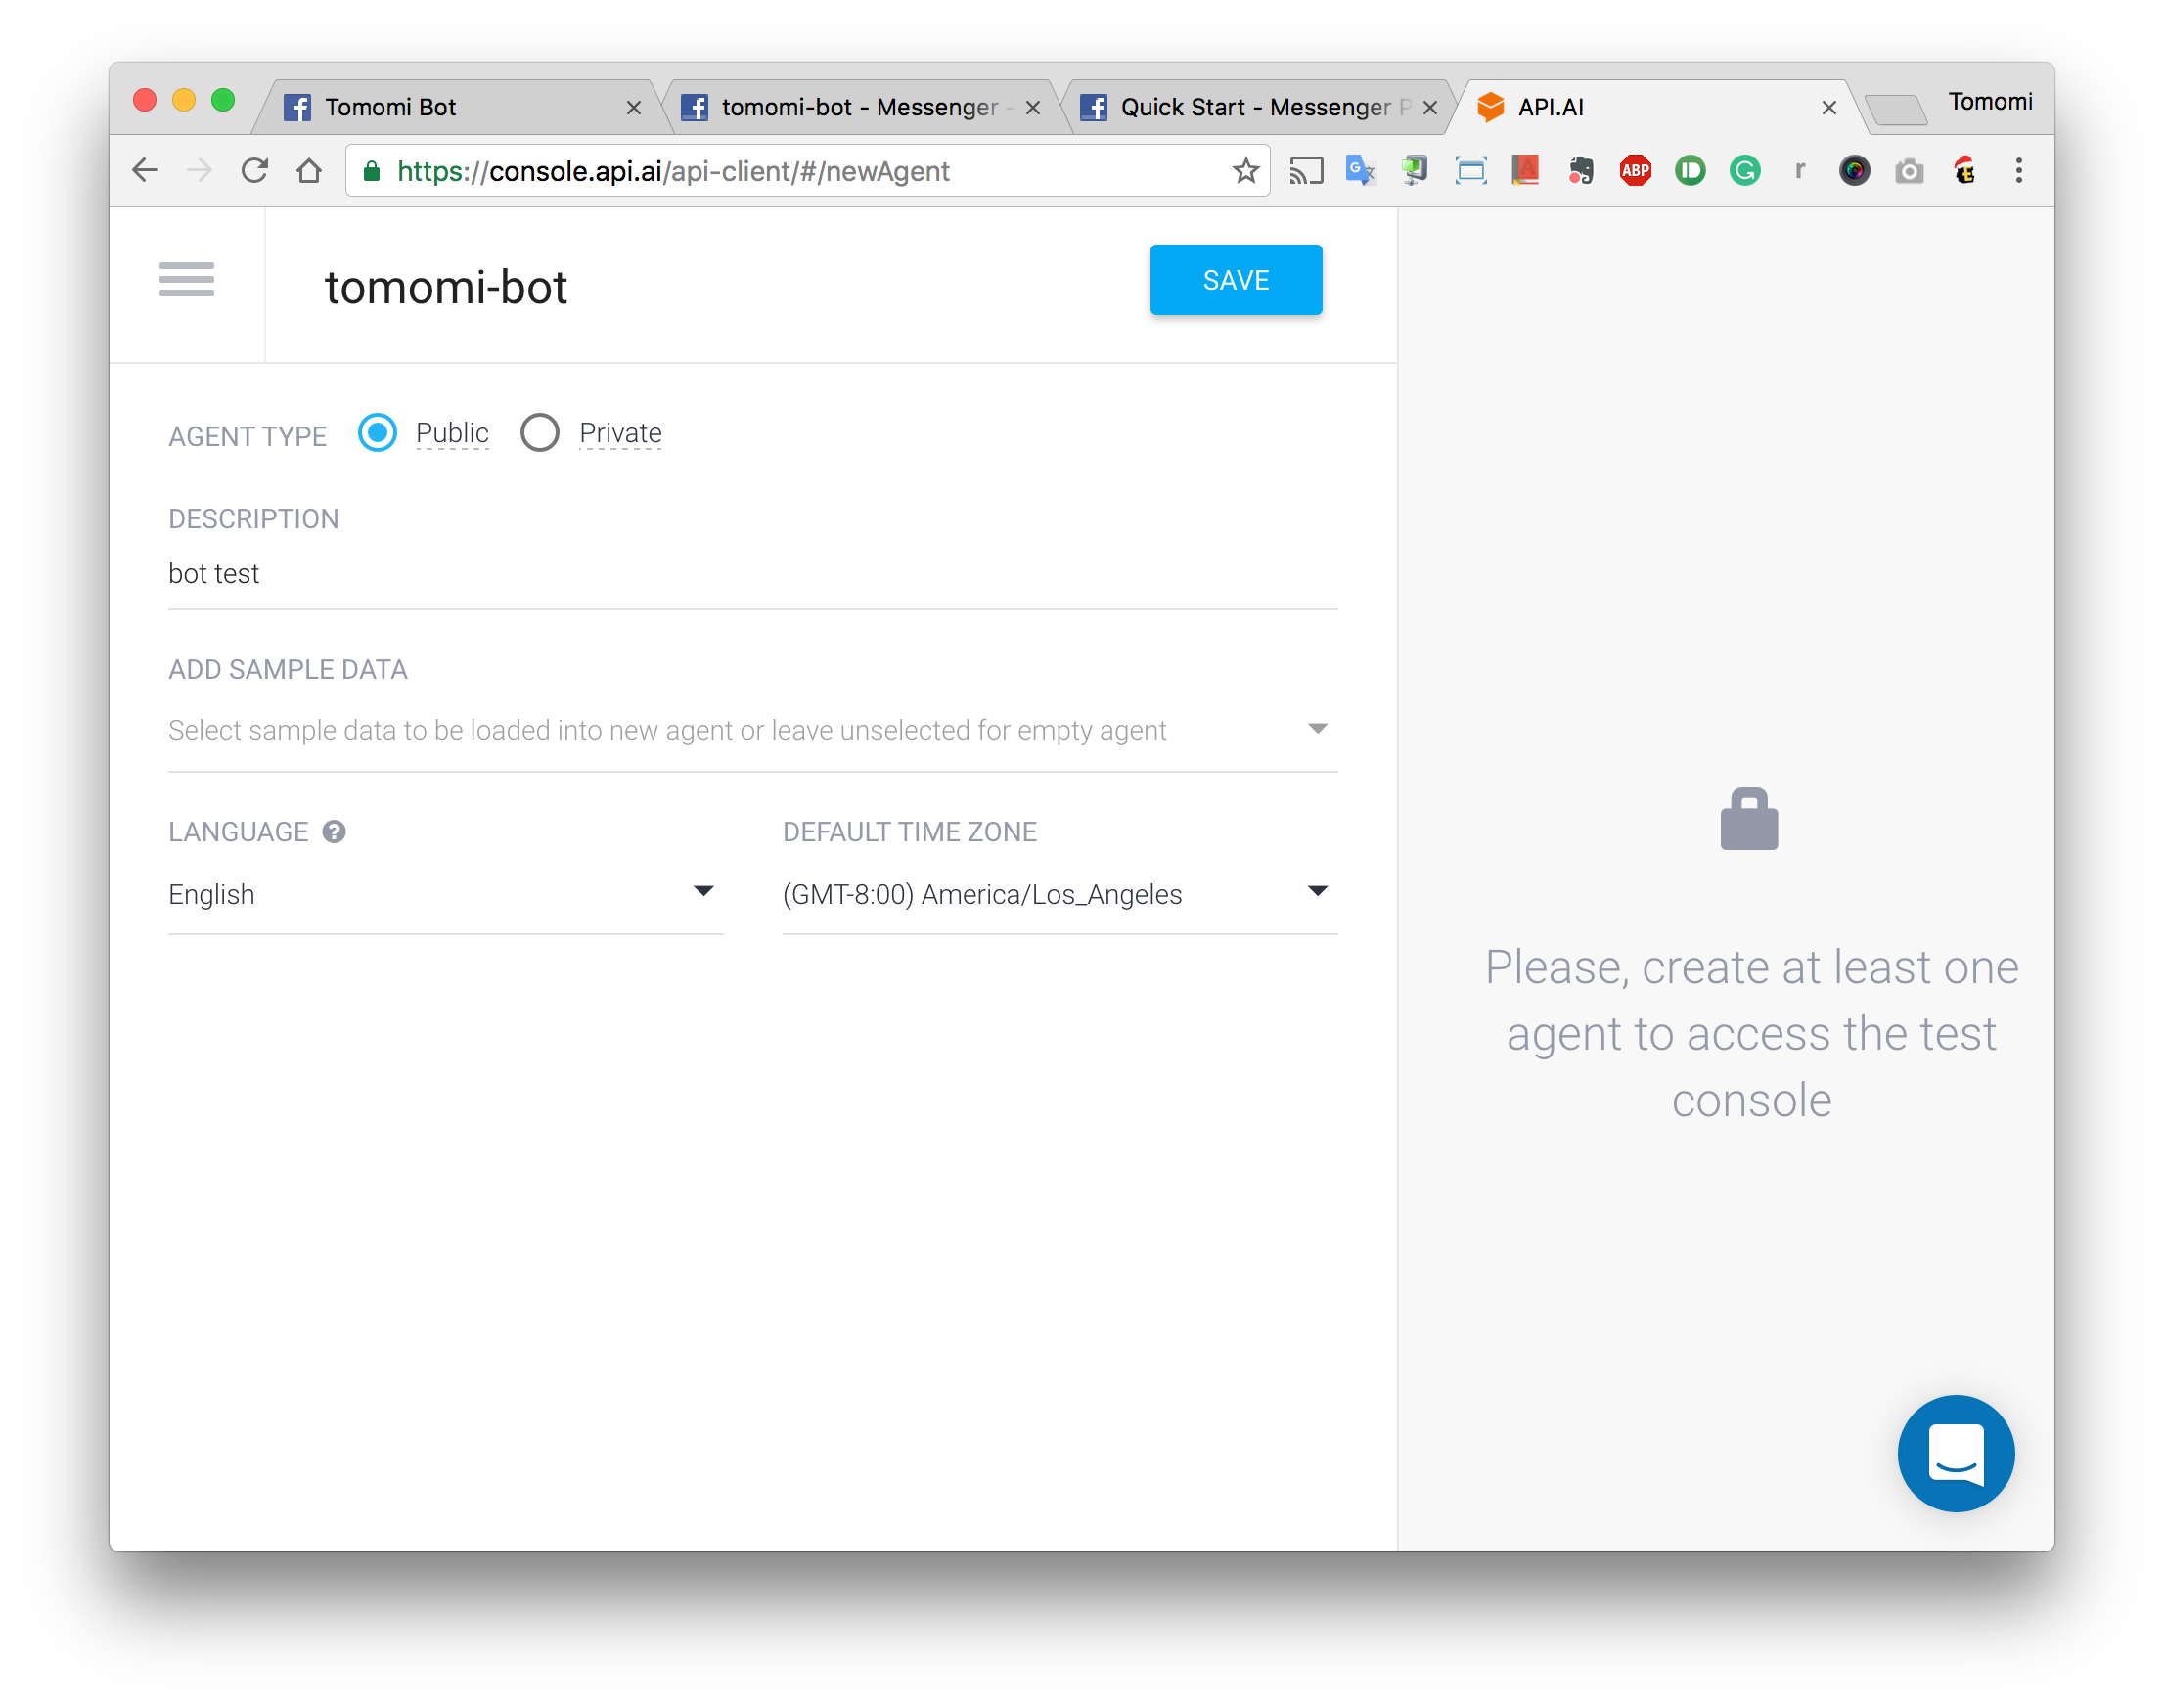
Make sure to click the Save button on the top every time you make changes.
Making “Small Talk” with your Messenger Bot
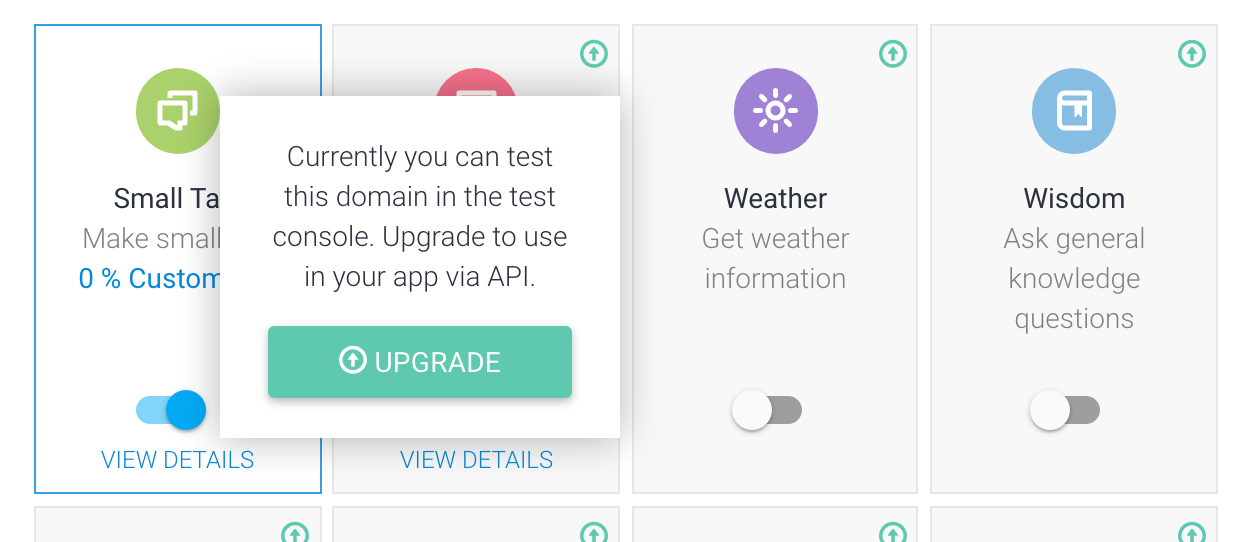
Instead of having your bot just echo you, let’s give it the API.ai’s Small Talk feature. This gives your bot an ability to have simple conversations.
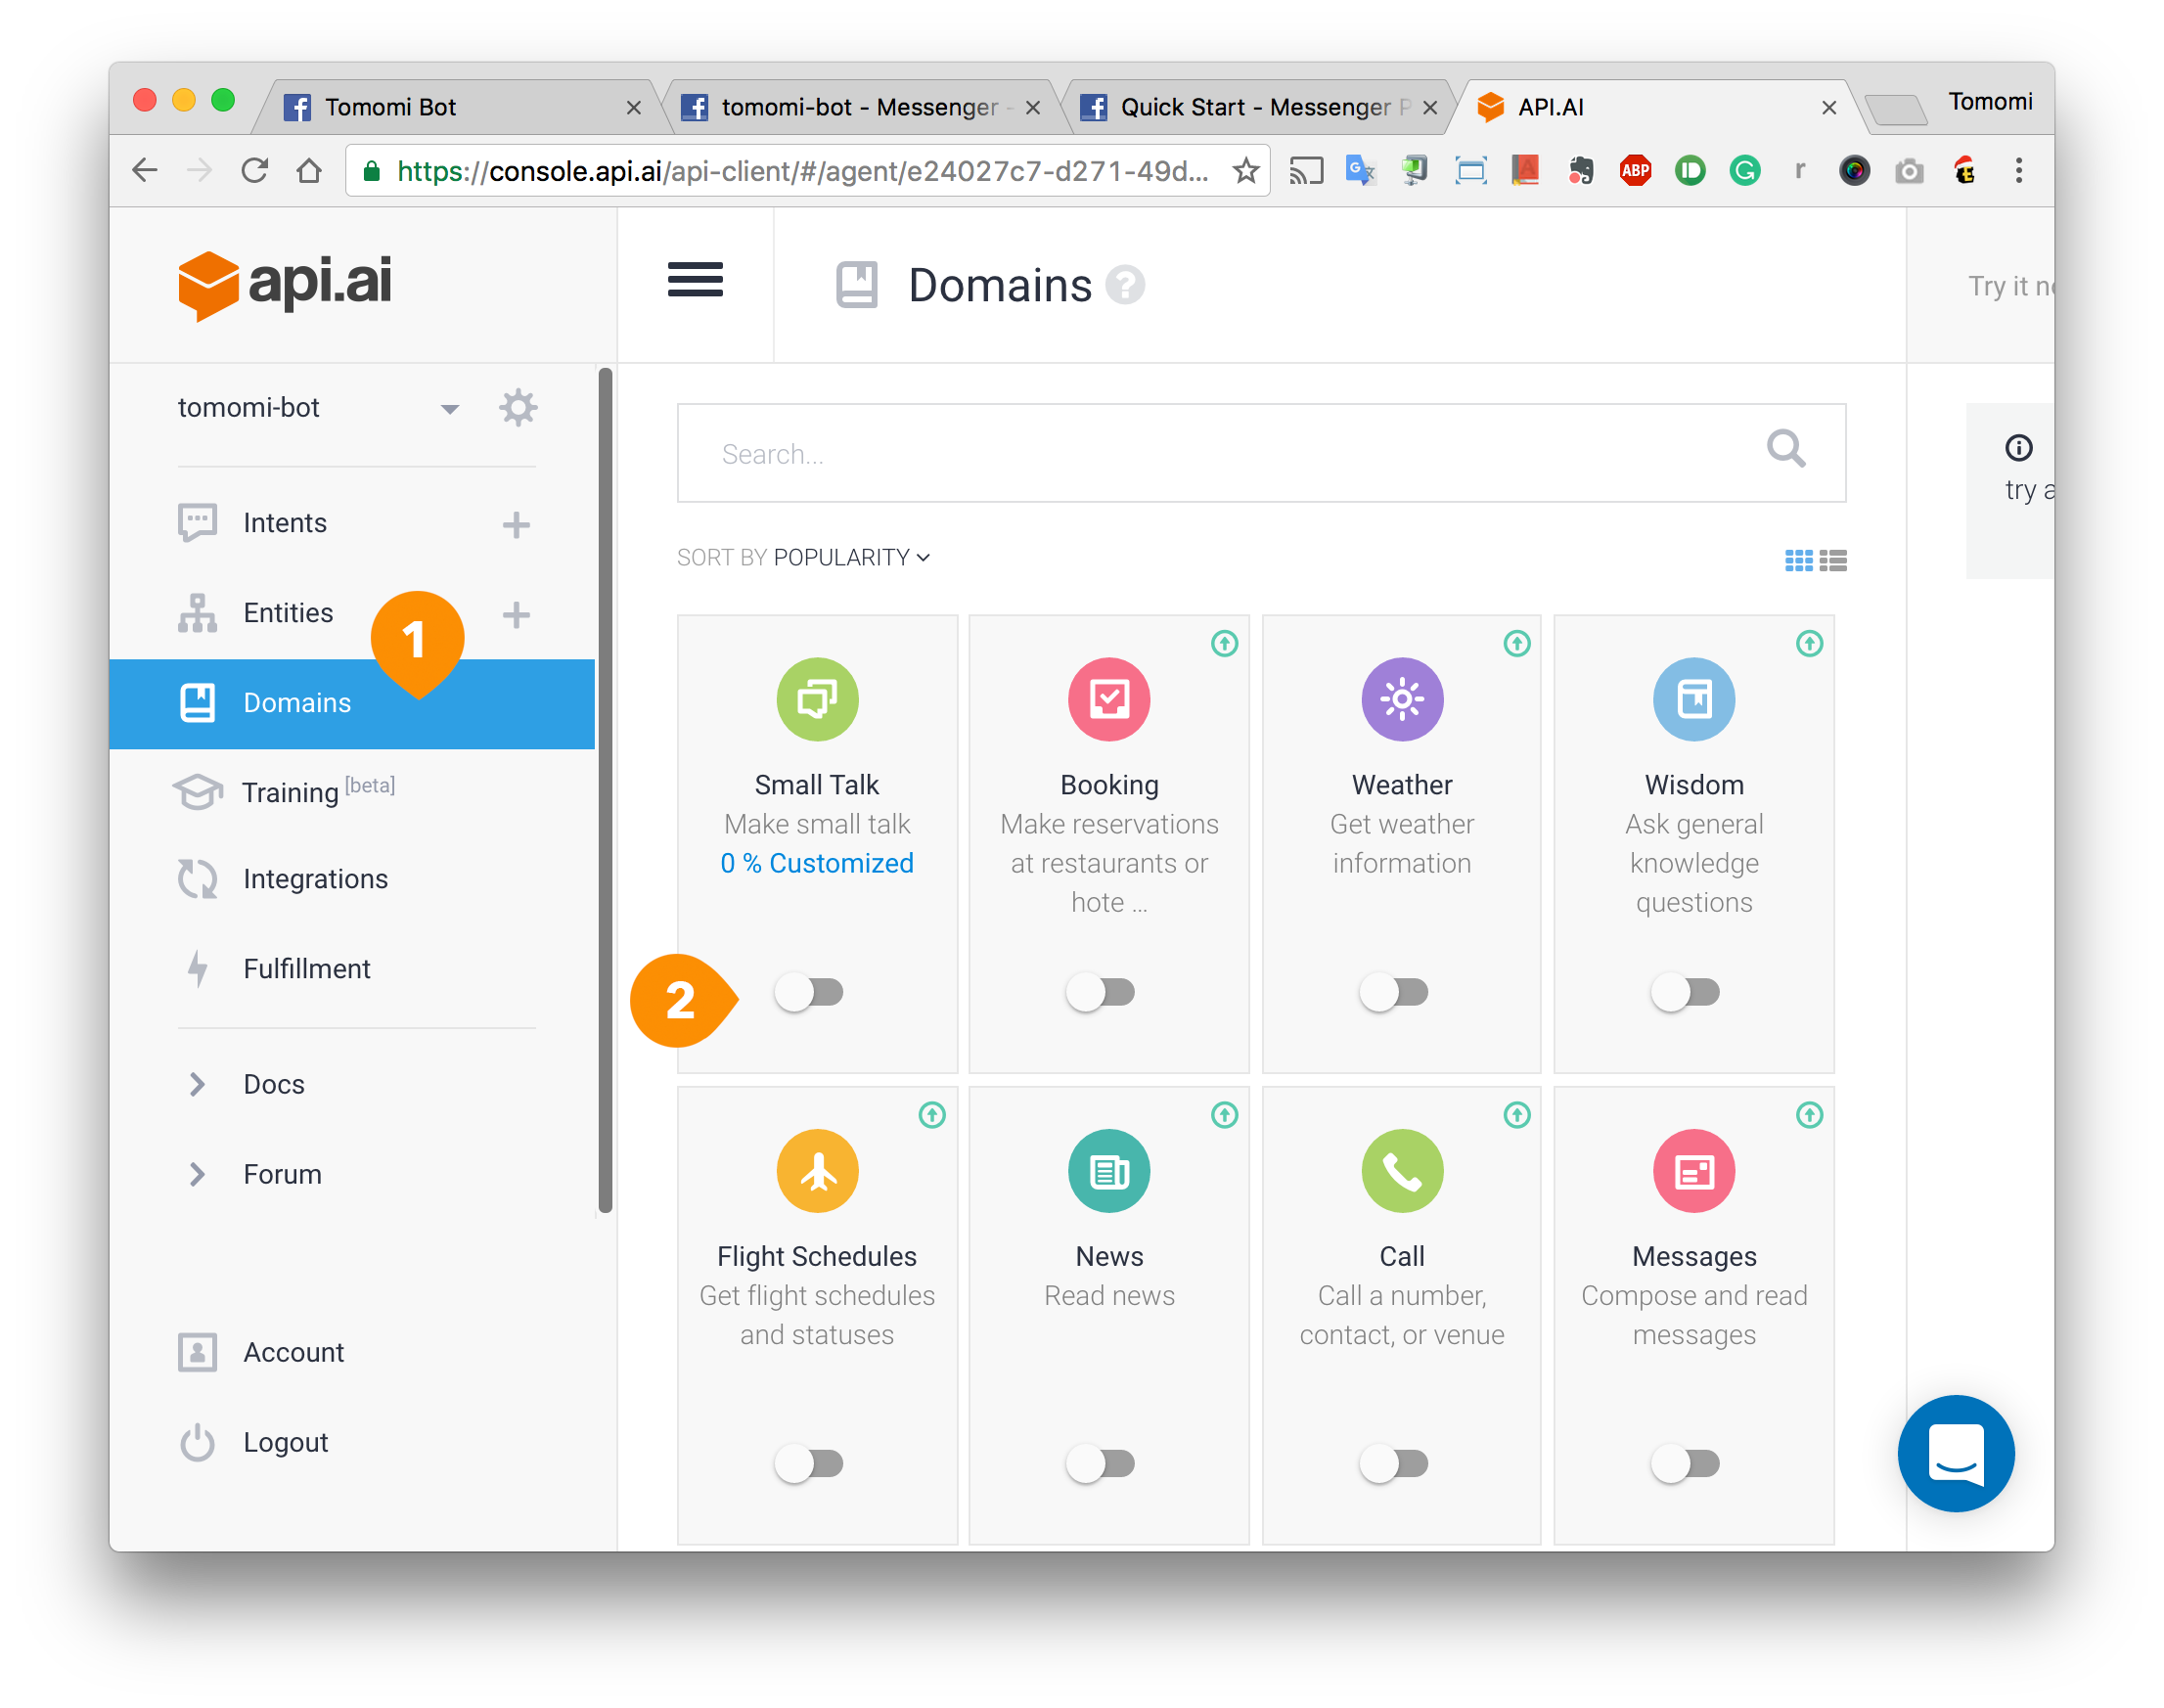
From the left menu (if the menu is not visible, click the “Hamburger menu icon” at the top left to open), click Domains, then activate the Small Talk.
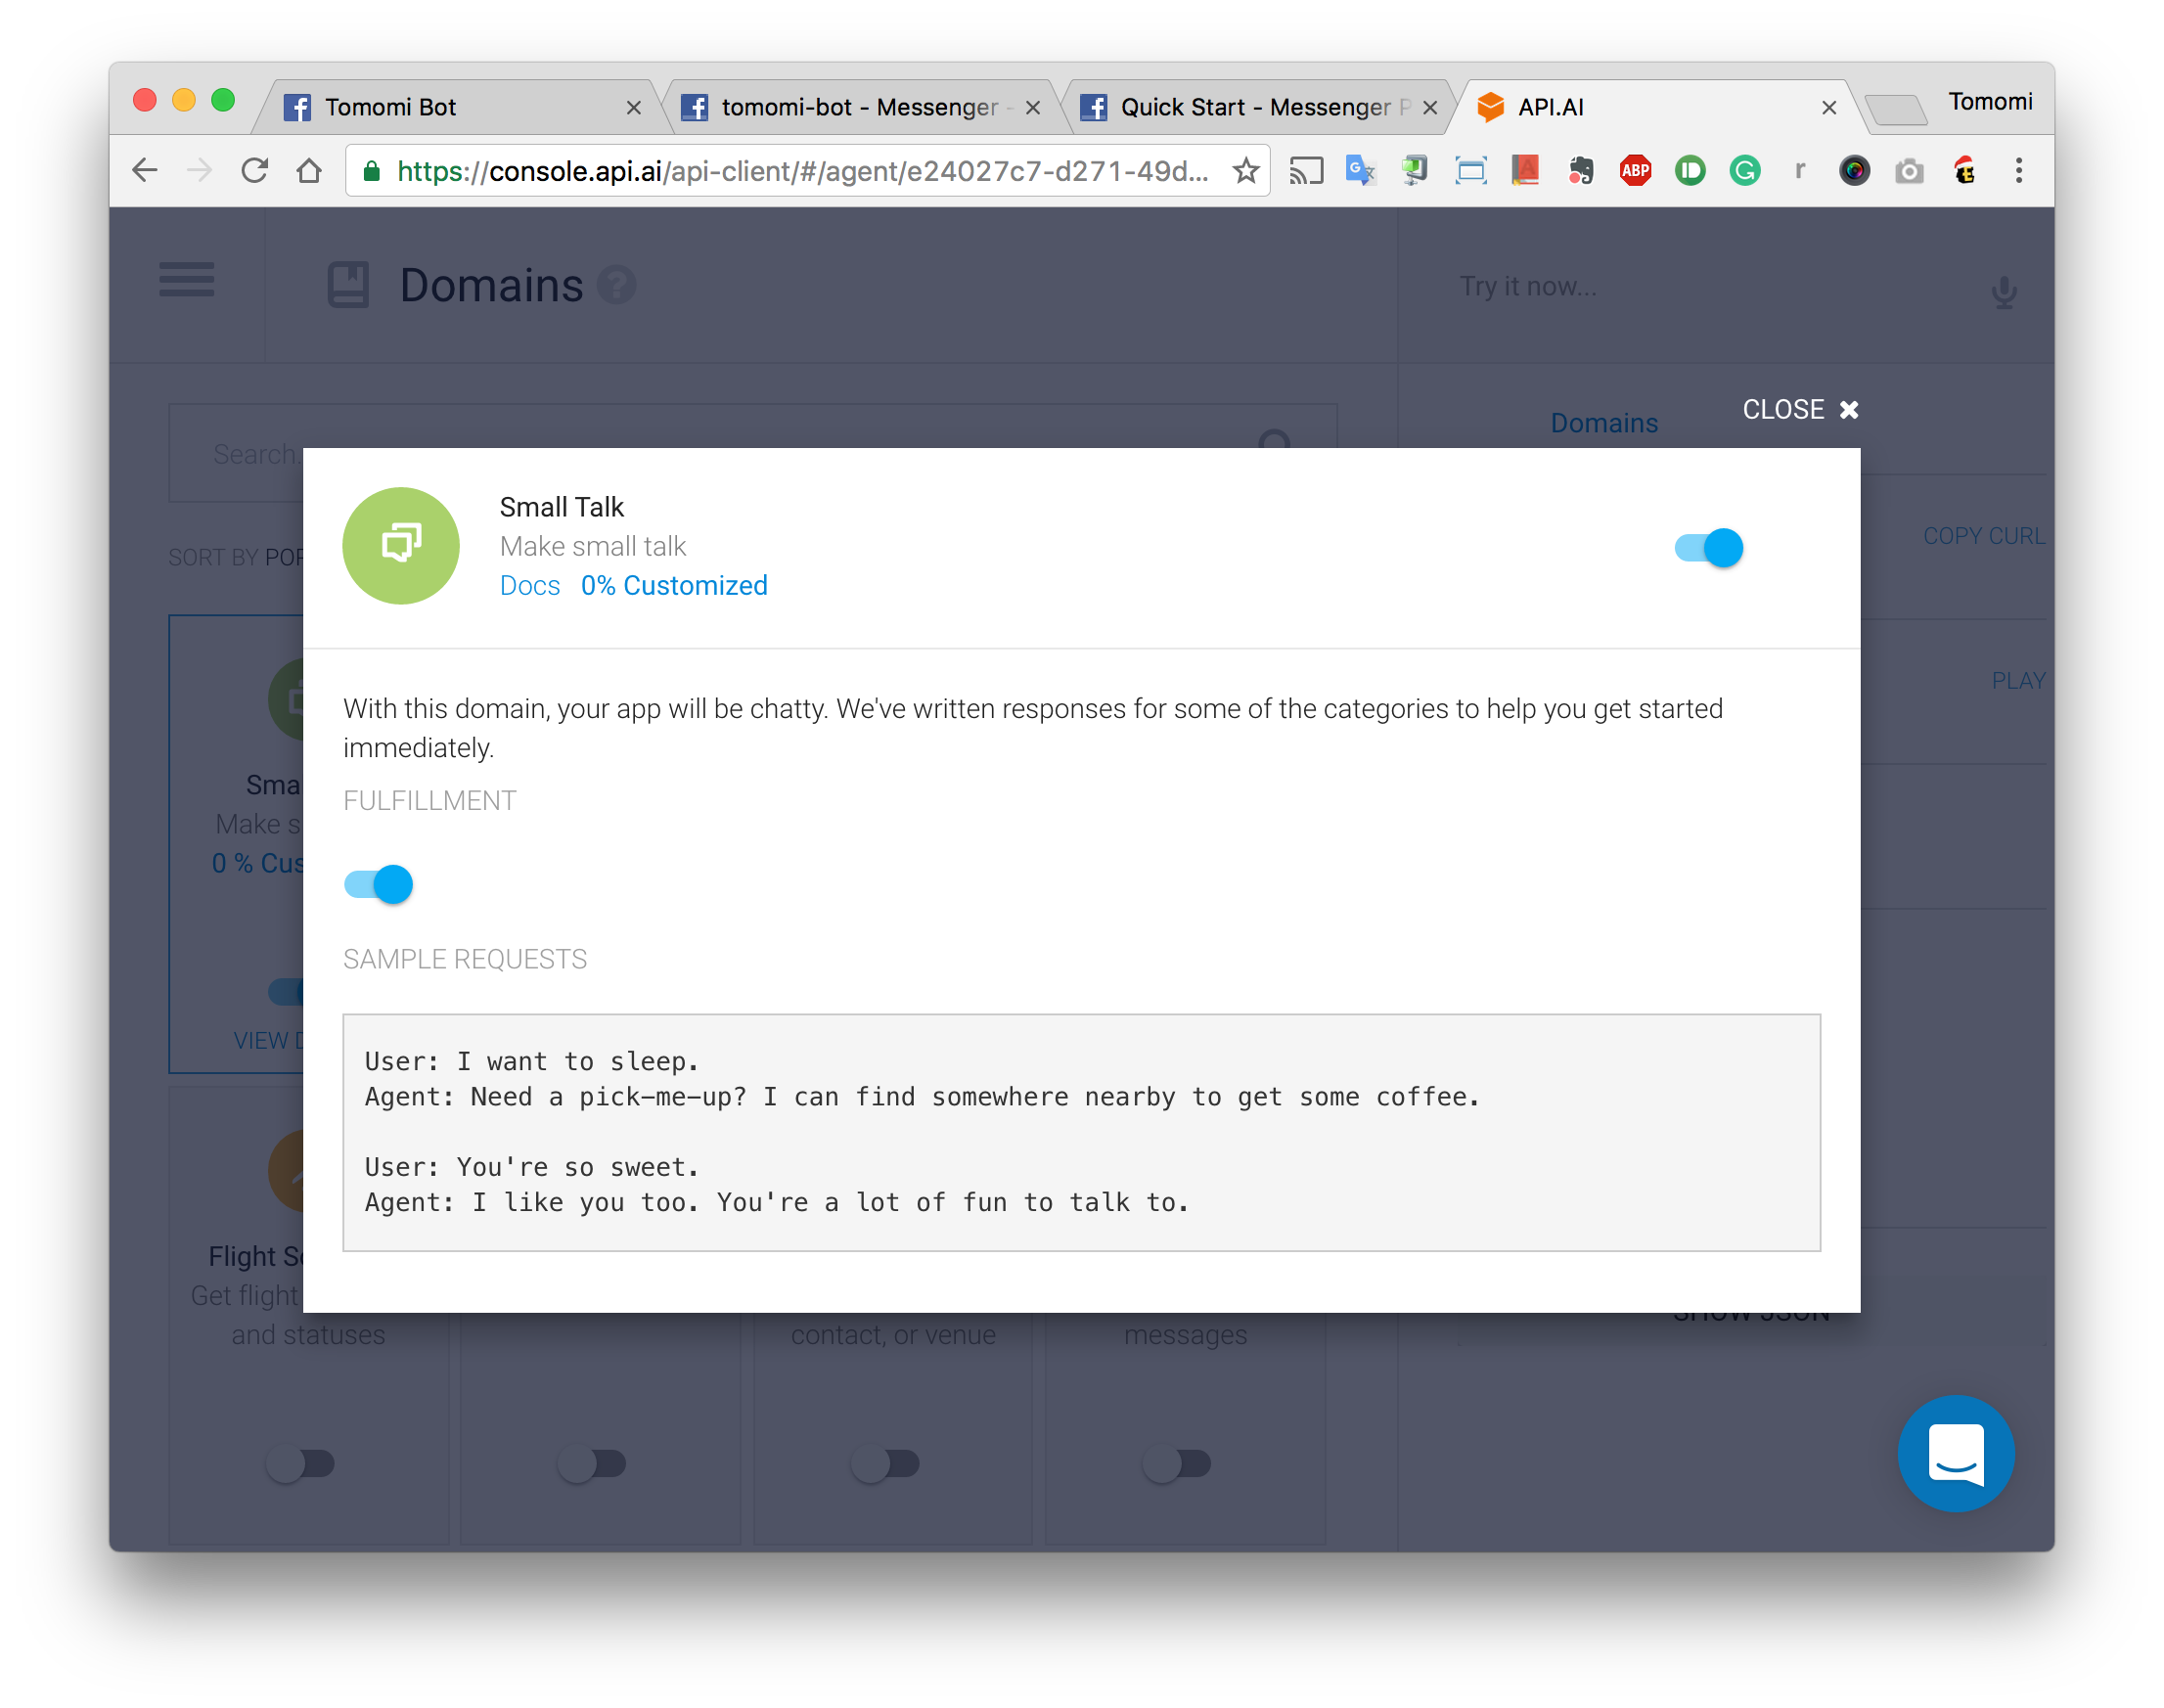
Once activated, click View details then turn on the Fulfillment so that you can later use this feature in your app and customize.
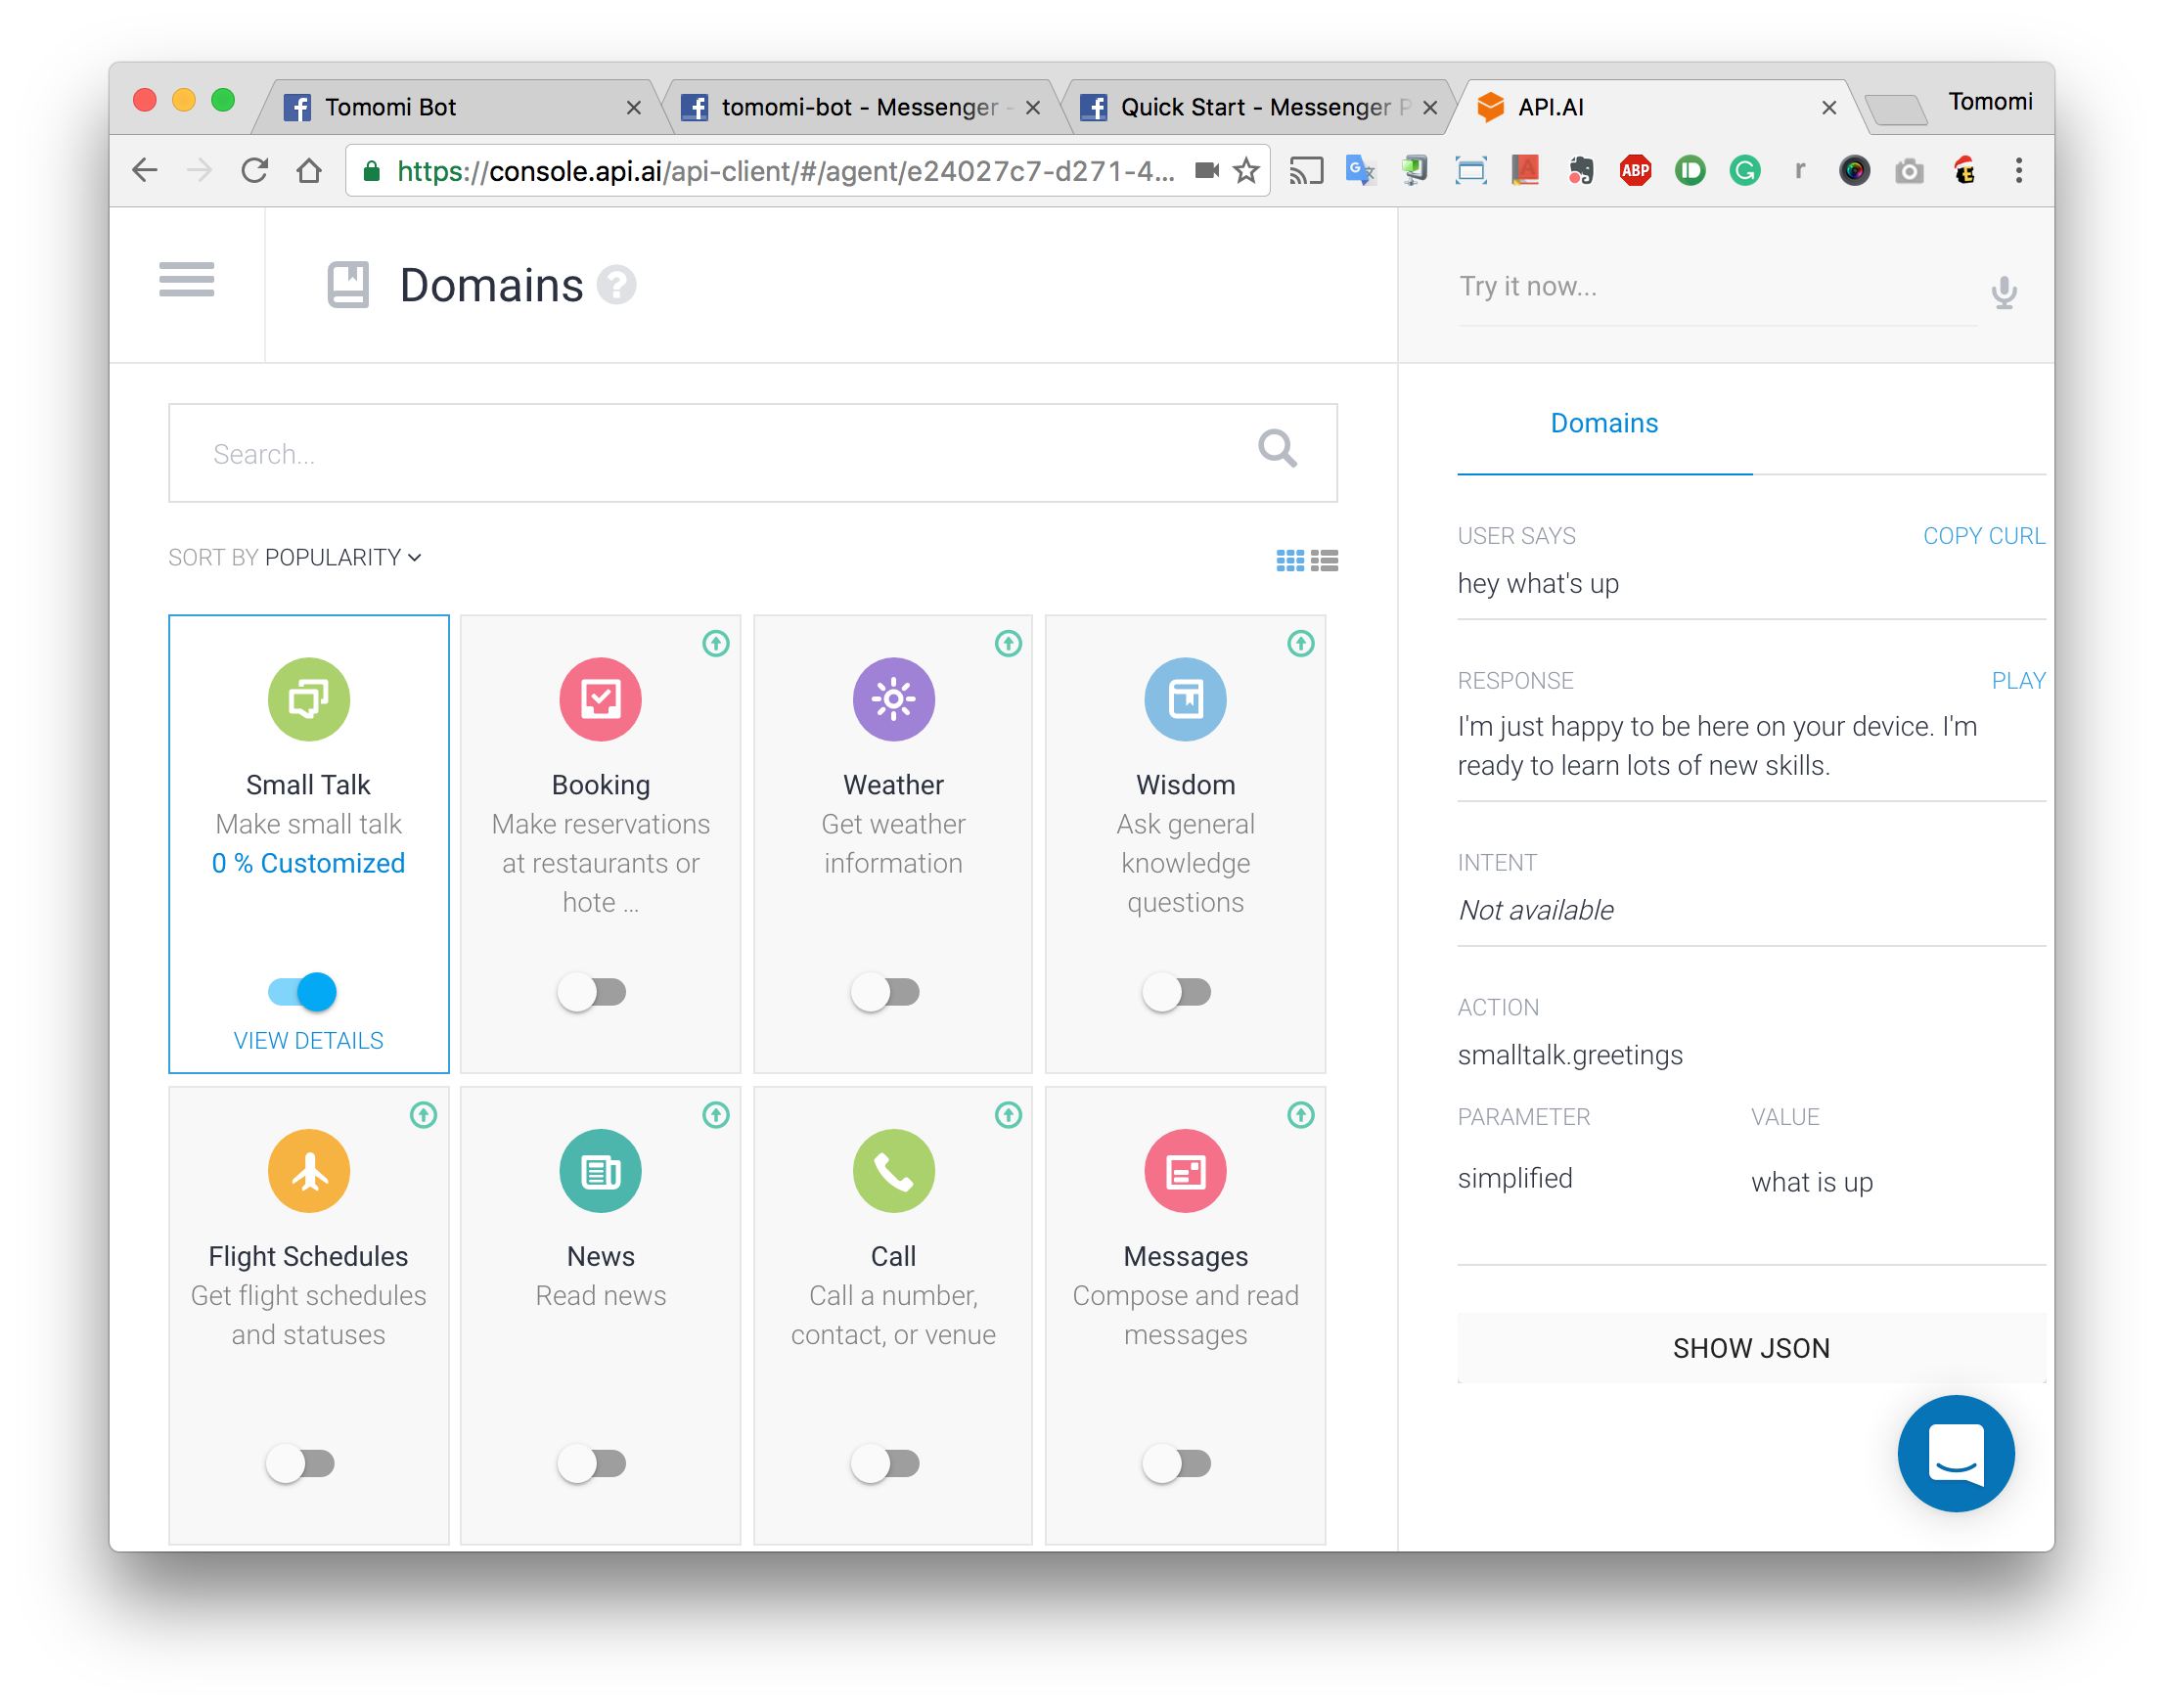
Try the Console at the right hand side. You can either speak or type to test the Small Talk domain:
Now let’s use this feature in your bot. You can always come back here to customize the conversations.
Using API.ai with Node.js
It is actually possible to integrate API.ai with FB Messenger without programming, however, to make it fully customize in the way you want to interact with your FB app, let’s use the service programmatically.
First, install API.ai node.js library:
$ npm install apiai
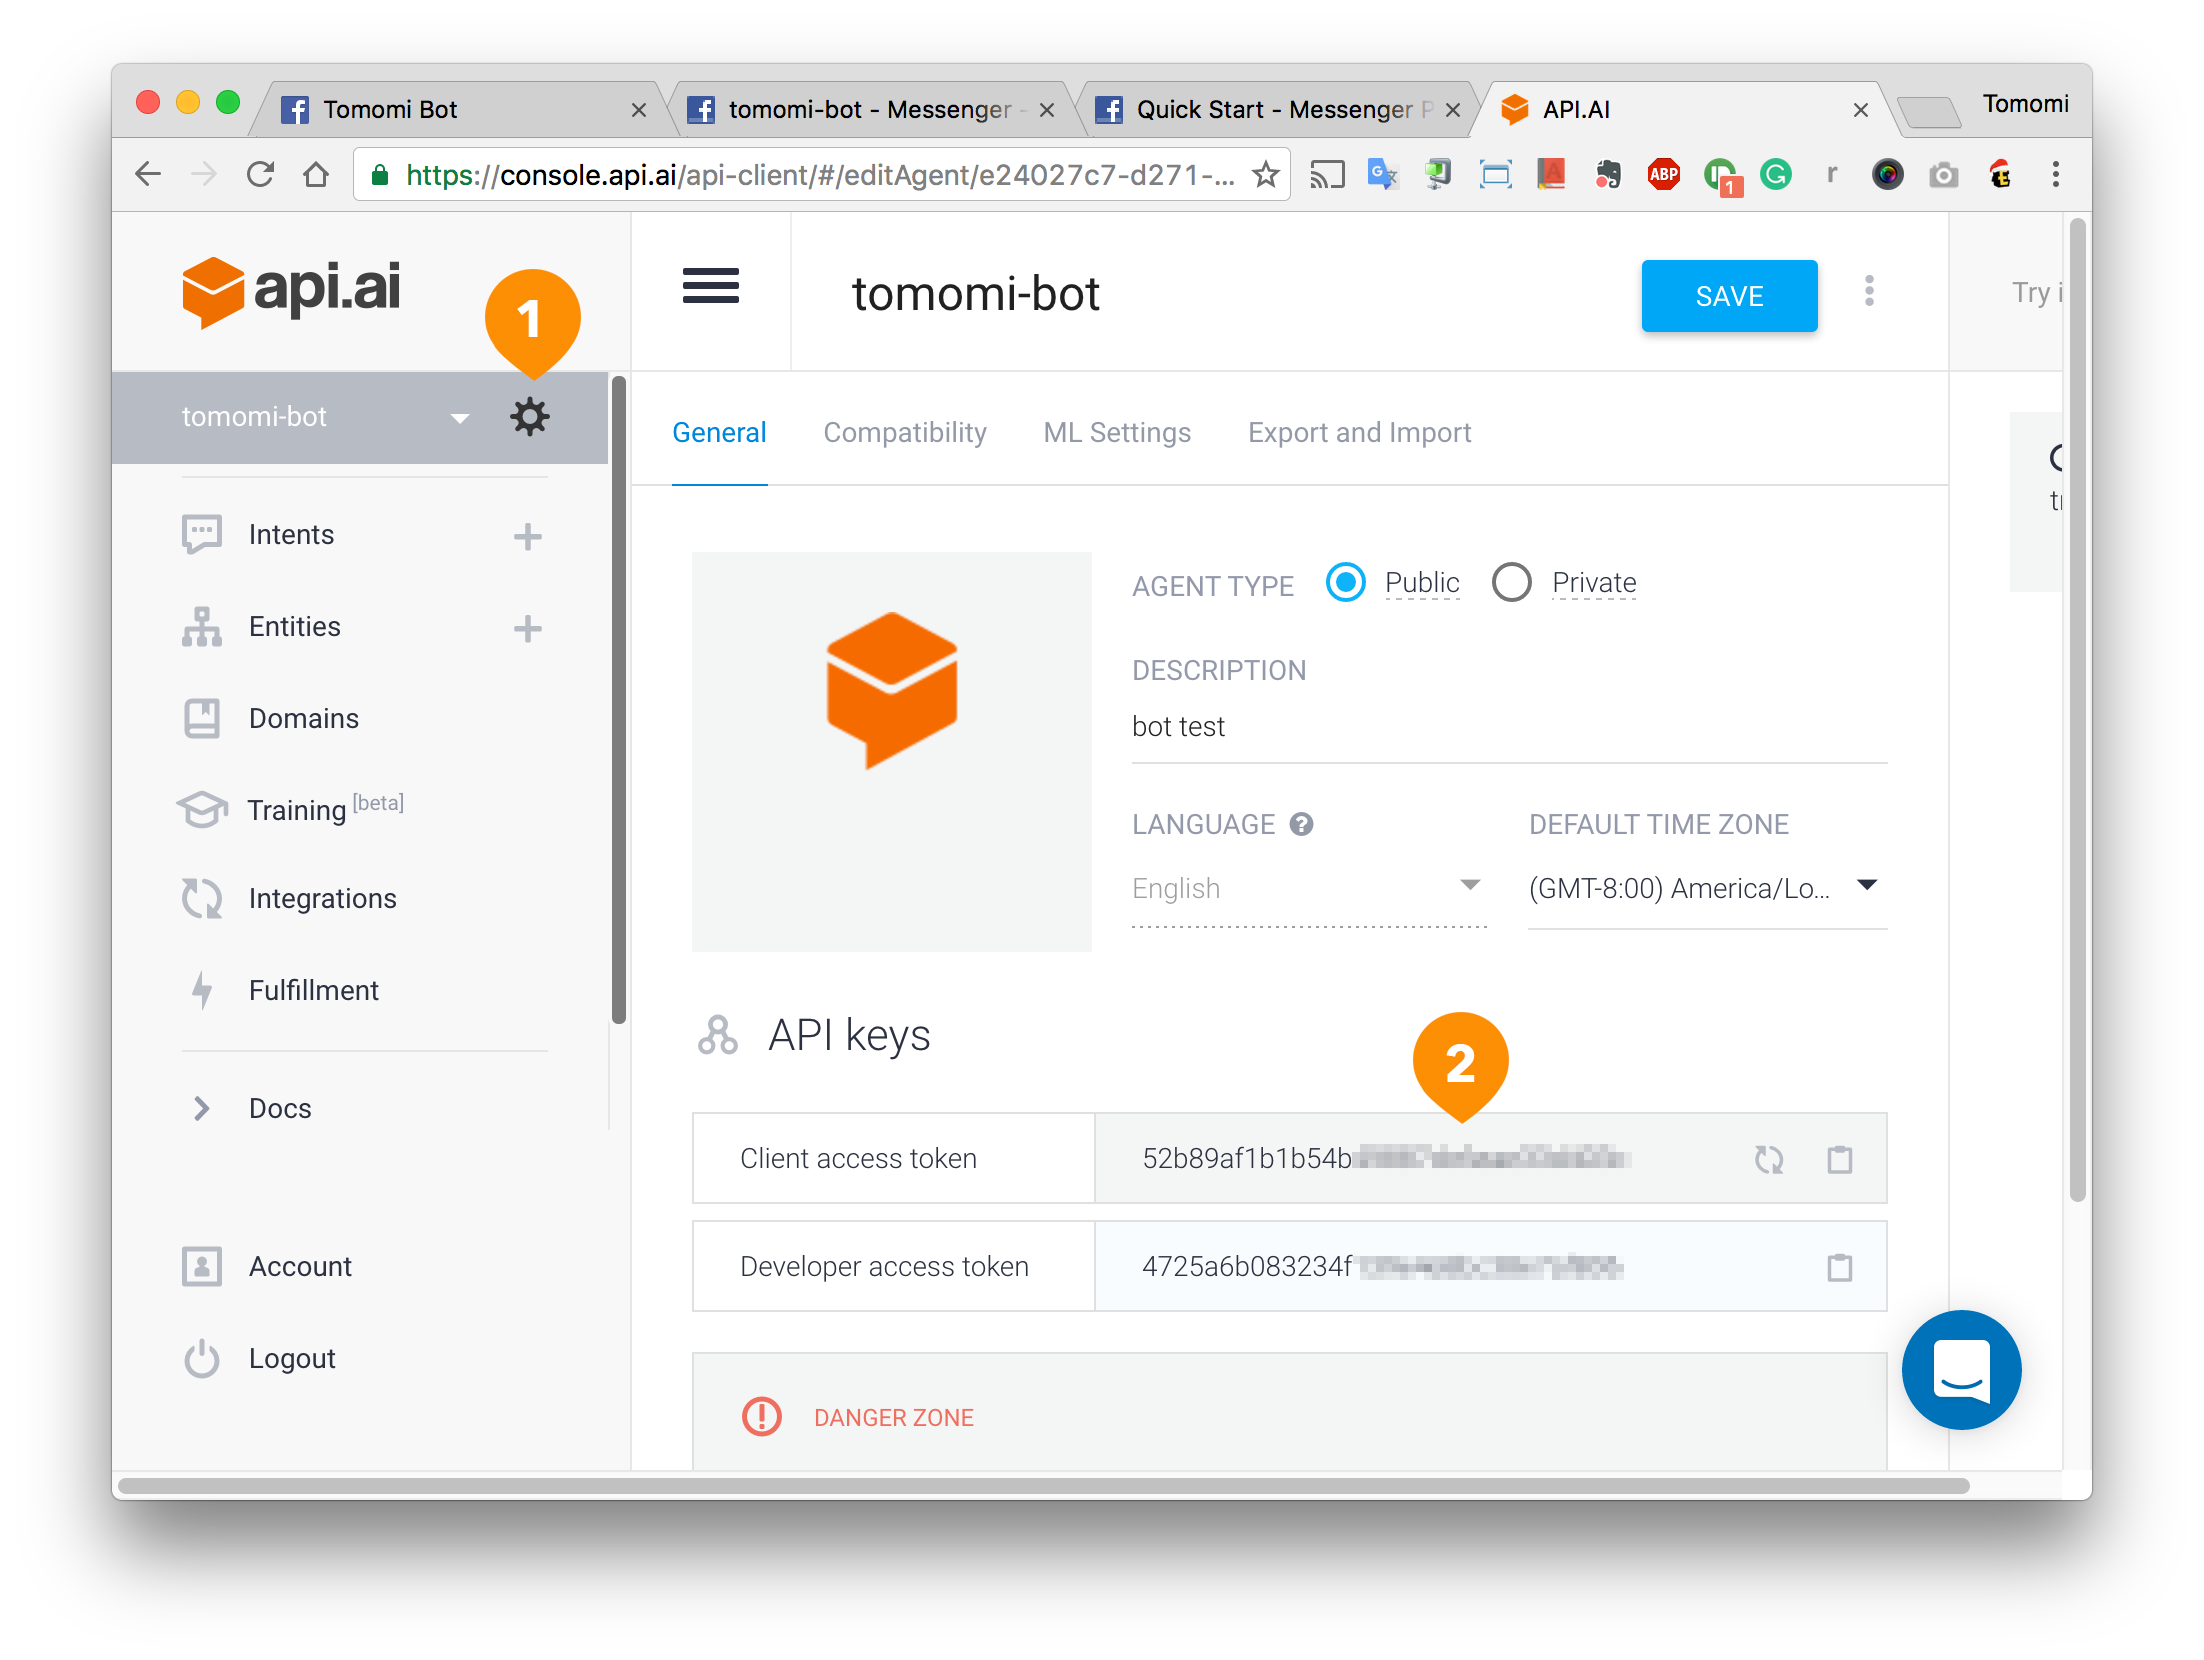
You need your API.ai API key and API secret to use the service with your bot. From the menu, click the “Config” icon to get your API key (“Client access token”):
And go back to your webhook.js and initialize apiai with the API key:
const apiaiApp = require('apiai')(CLIENT_ACCESS_TOKEN);
Refer the usage on its npm doc. It is pretty simple- you just pass a text to API.ai, and do something when you get the response (the response event).
Now, let’s modify the sendMessage() :
function sendMessage(event) {
  let sender = event.sender.id;
  let text = event.message.text;

  let apiai = apiaiApp.textRequest(text, {
    sessionId: 'tabby_cat' // use any arbitrary id
  });

  apiai.on('response', (response) => {
    // Got a response from api.ai. Let's POST to Facebook Messenger
  });

  apiai.on('error', (error) => {
    console.log(error);
  });

  apiai.end();
}
What the code sample above doing is basically getting the info (passed as a param) sent from a user via Messenger, and pass the text content to API.ai. Once the API.ai returns the answer, the response event is triggered.
Where you see the // Got a response… comment in the code sample above, let’s POST the response to the Messenger API:
...
apiai.on('response', (response) => {
  let aiText = response.result.fulfillment.speech;

    request({
      url: 'https://graph.facebook.com/v2.6/me/messages',
      qs: {access_token: PAGE_ACCESS_TOKEN},
      method: 'POST',
      json: {
        recipient: {id: sender},
        message: {text: aiText}
      }
    }, (error, response) => {
      if (error) {
          console.log('Error sending message: ', error);
      } else if (response.body.error) {
          console.log('Error: ', response.body.error);
      }
    });
 });
Now, let’s test your bot. Run the node code, and try sending some messages. If everything is working, you should get replies from the bot:
Awesome.
Making the Bot Tell You Weather Condition
When you activate the Small Talk from the Domains, you may have noticed there are more presets like Weather and Flight Schedules, etc. To use these services, it looks like you need to send inquiry to their sales peeps.
However, of course as an engineer, you can always call the 3rd party APIs to add the features by yourself instead of just flipping the switch and pay. So let’s make your bot to tell users the current weather forecast with the Open Weather Map API.
The goal here is that when a user ask something like “How is the weather in San Francisco?”, your bot will reply with the current weather condition in the given city.
Creating Weather Intents
First, to customize the conversational user interfaces, you need to understand the key concepts of API.ai, especially Entities and Intents for now.
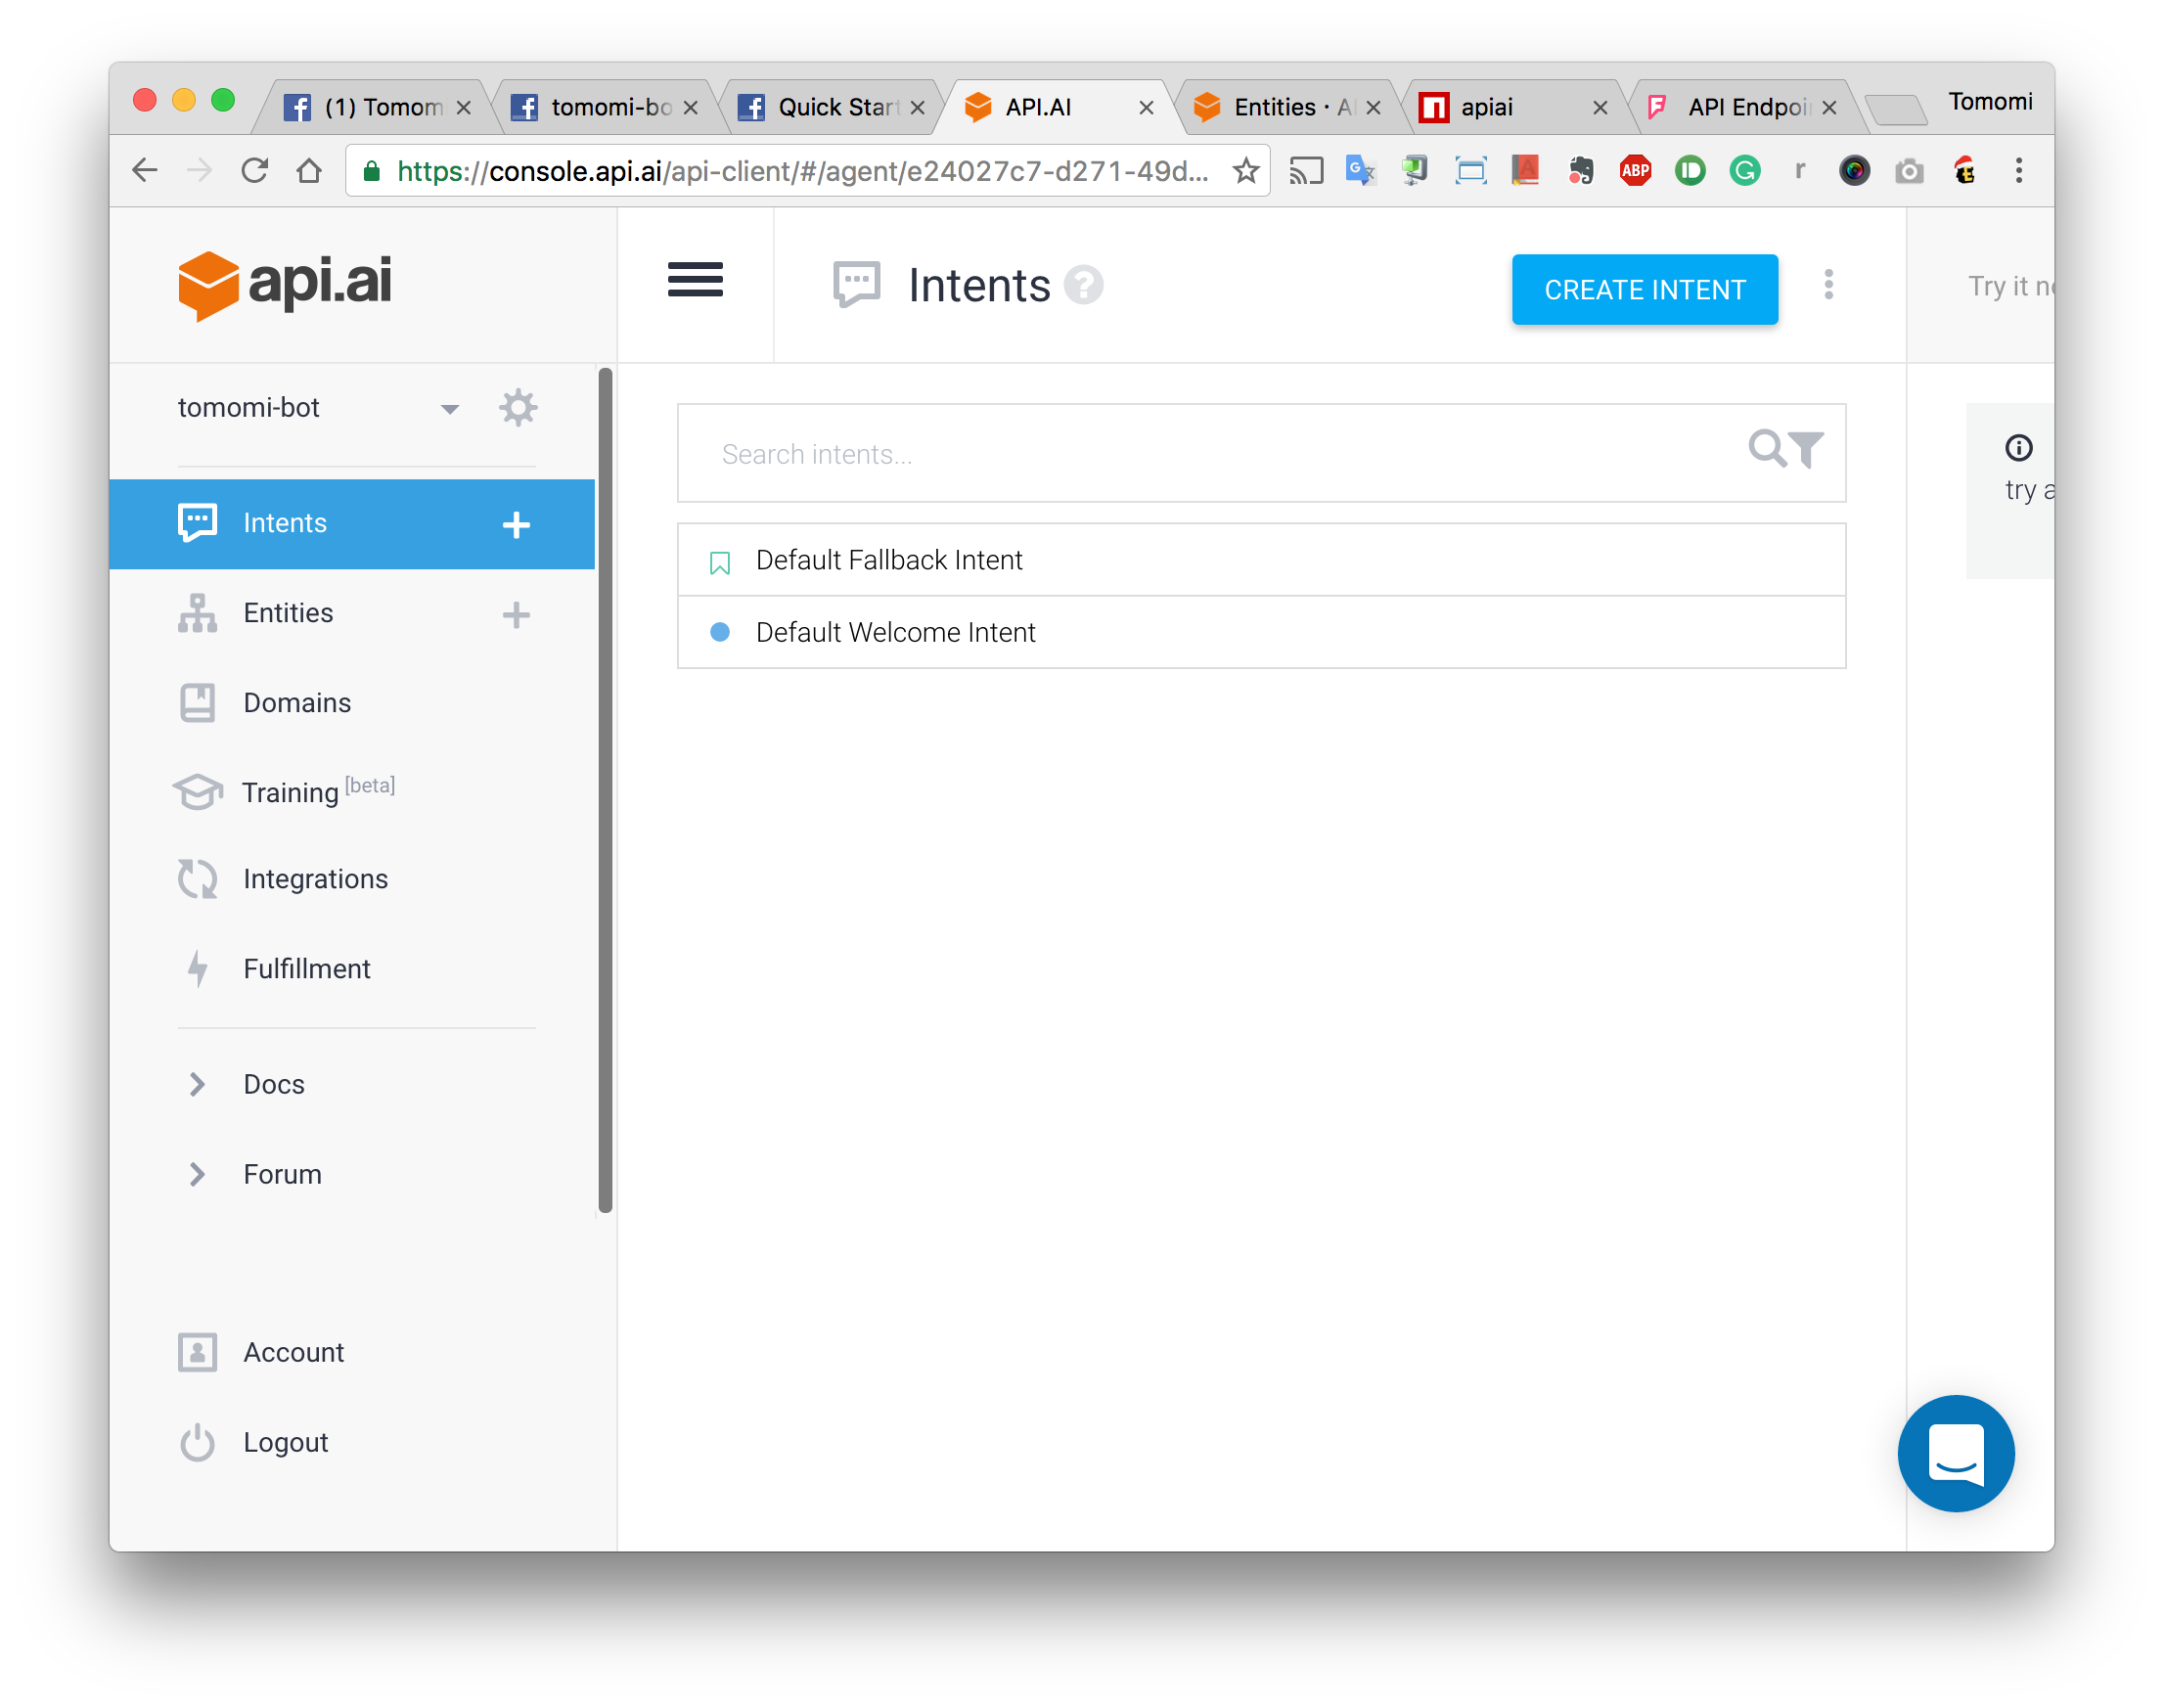
Intents represent a mapping between what a user says and what action should be taken by your software. To make your bot reply the user with a weather info, you need to create a specific Intents.
From the menu, go to Intents and click the CRETAE INTENT button:
Give it a name, such as weather.city.
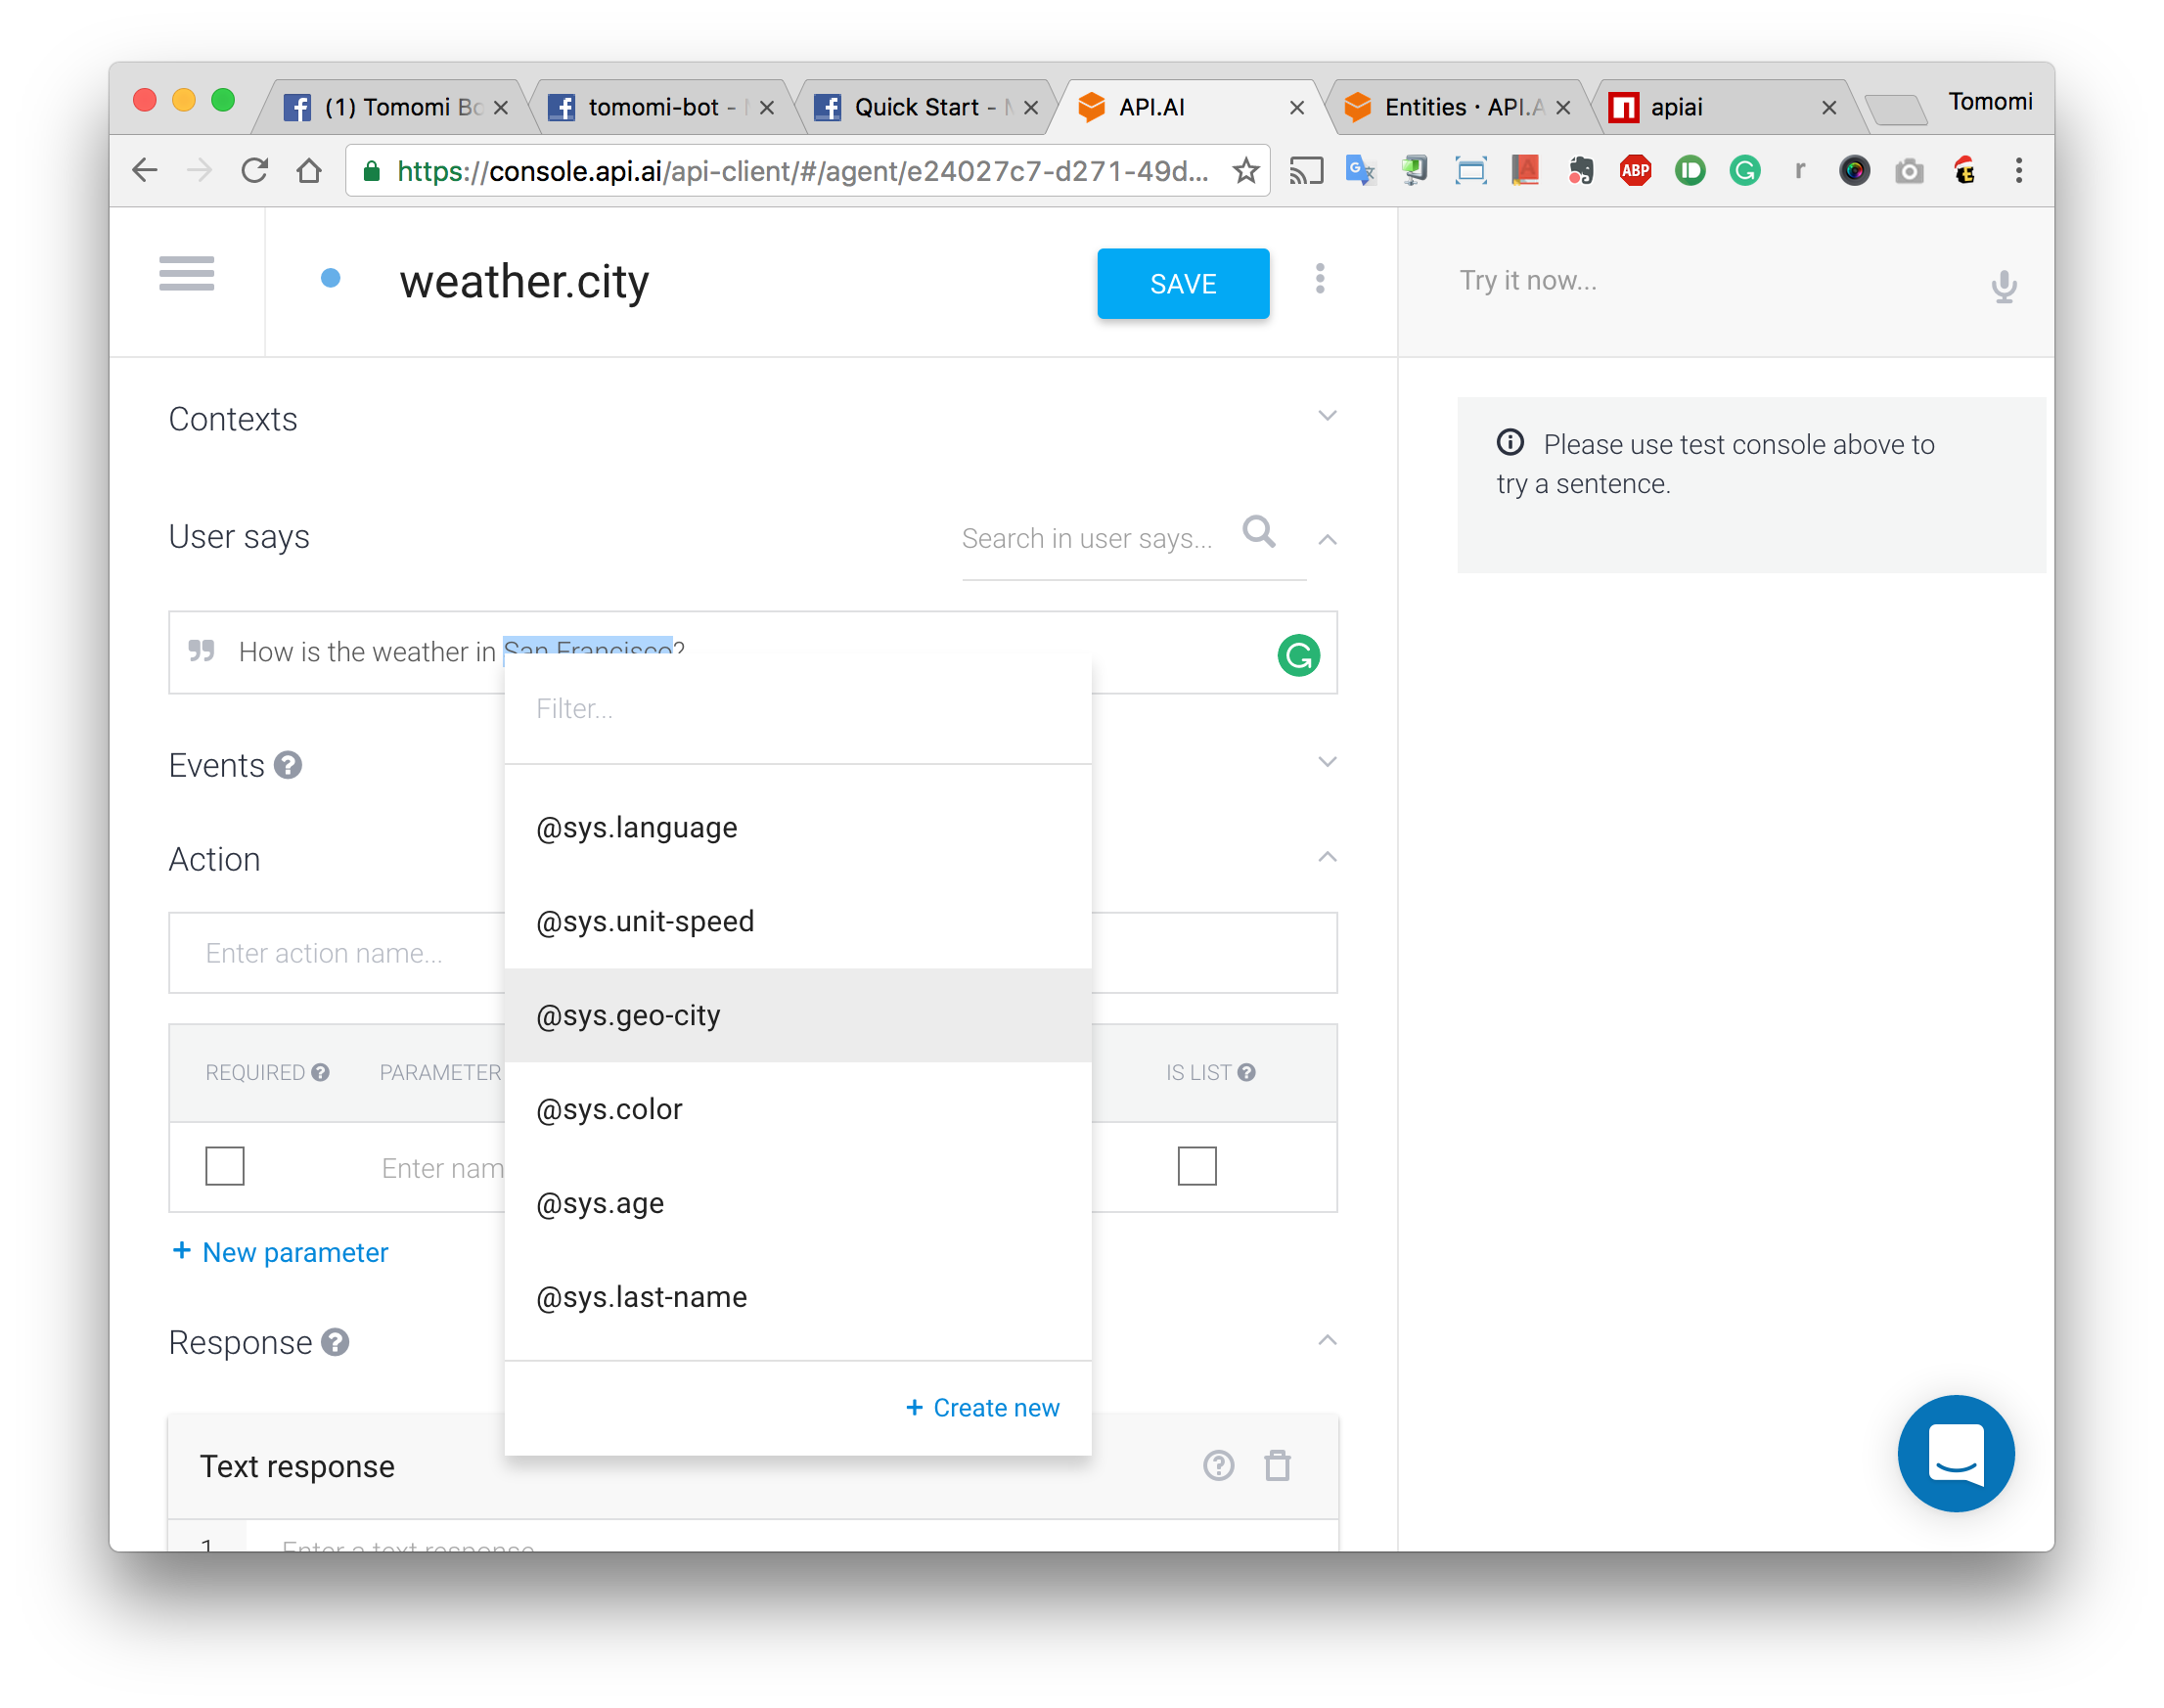
Then create some contexts. Enter a phrase like, “How is the weather in San Francisco?”
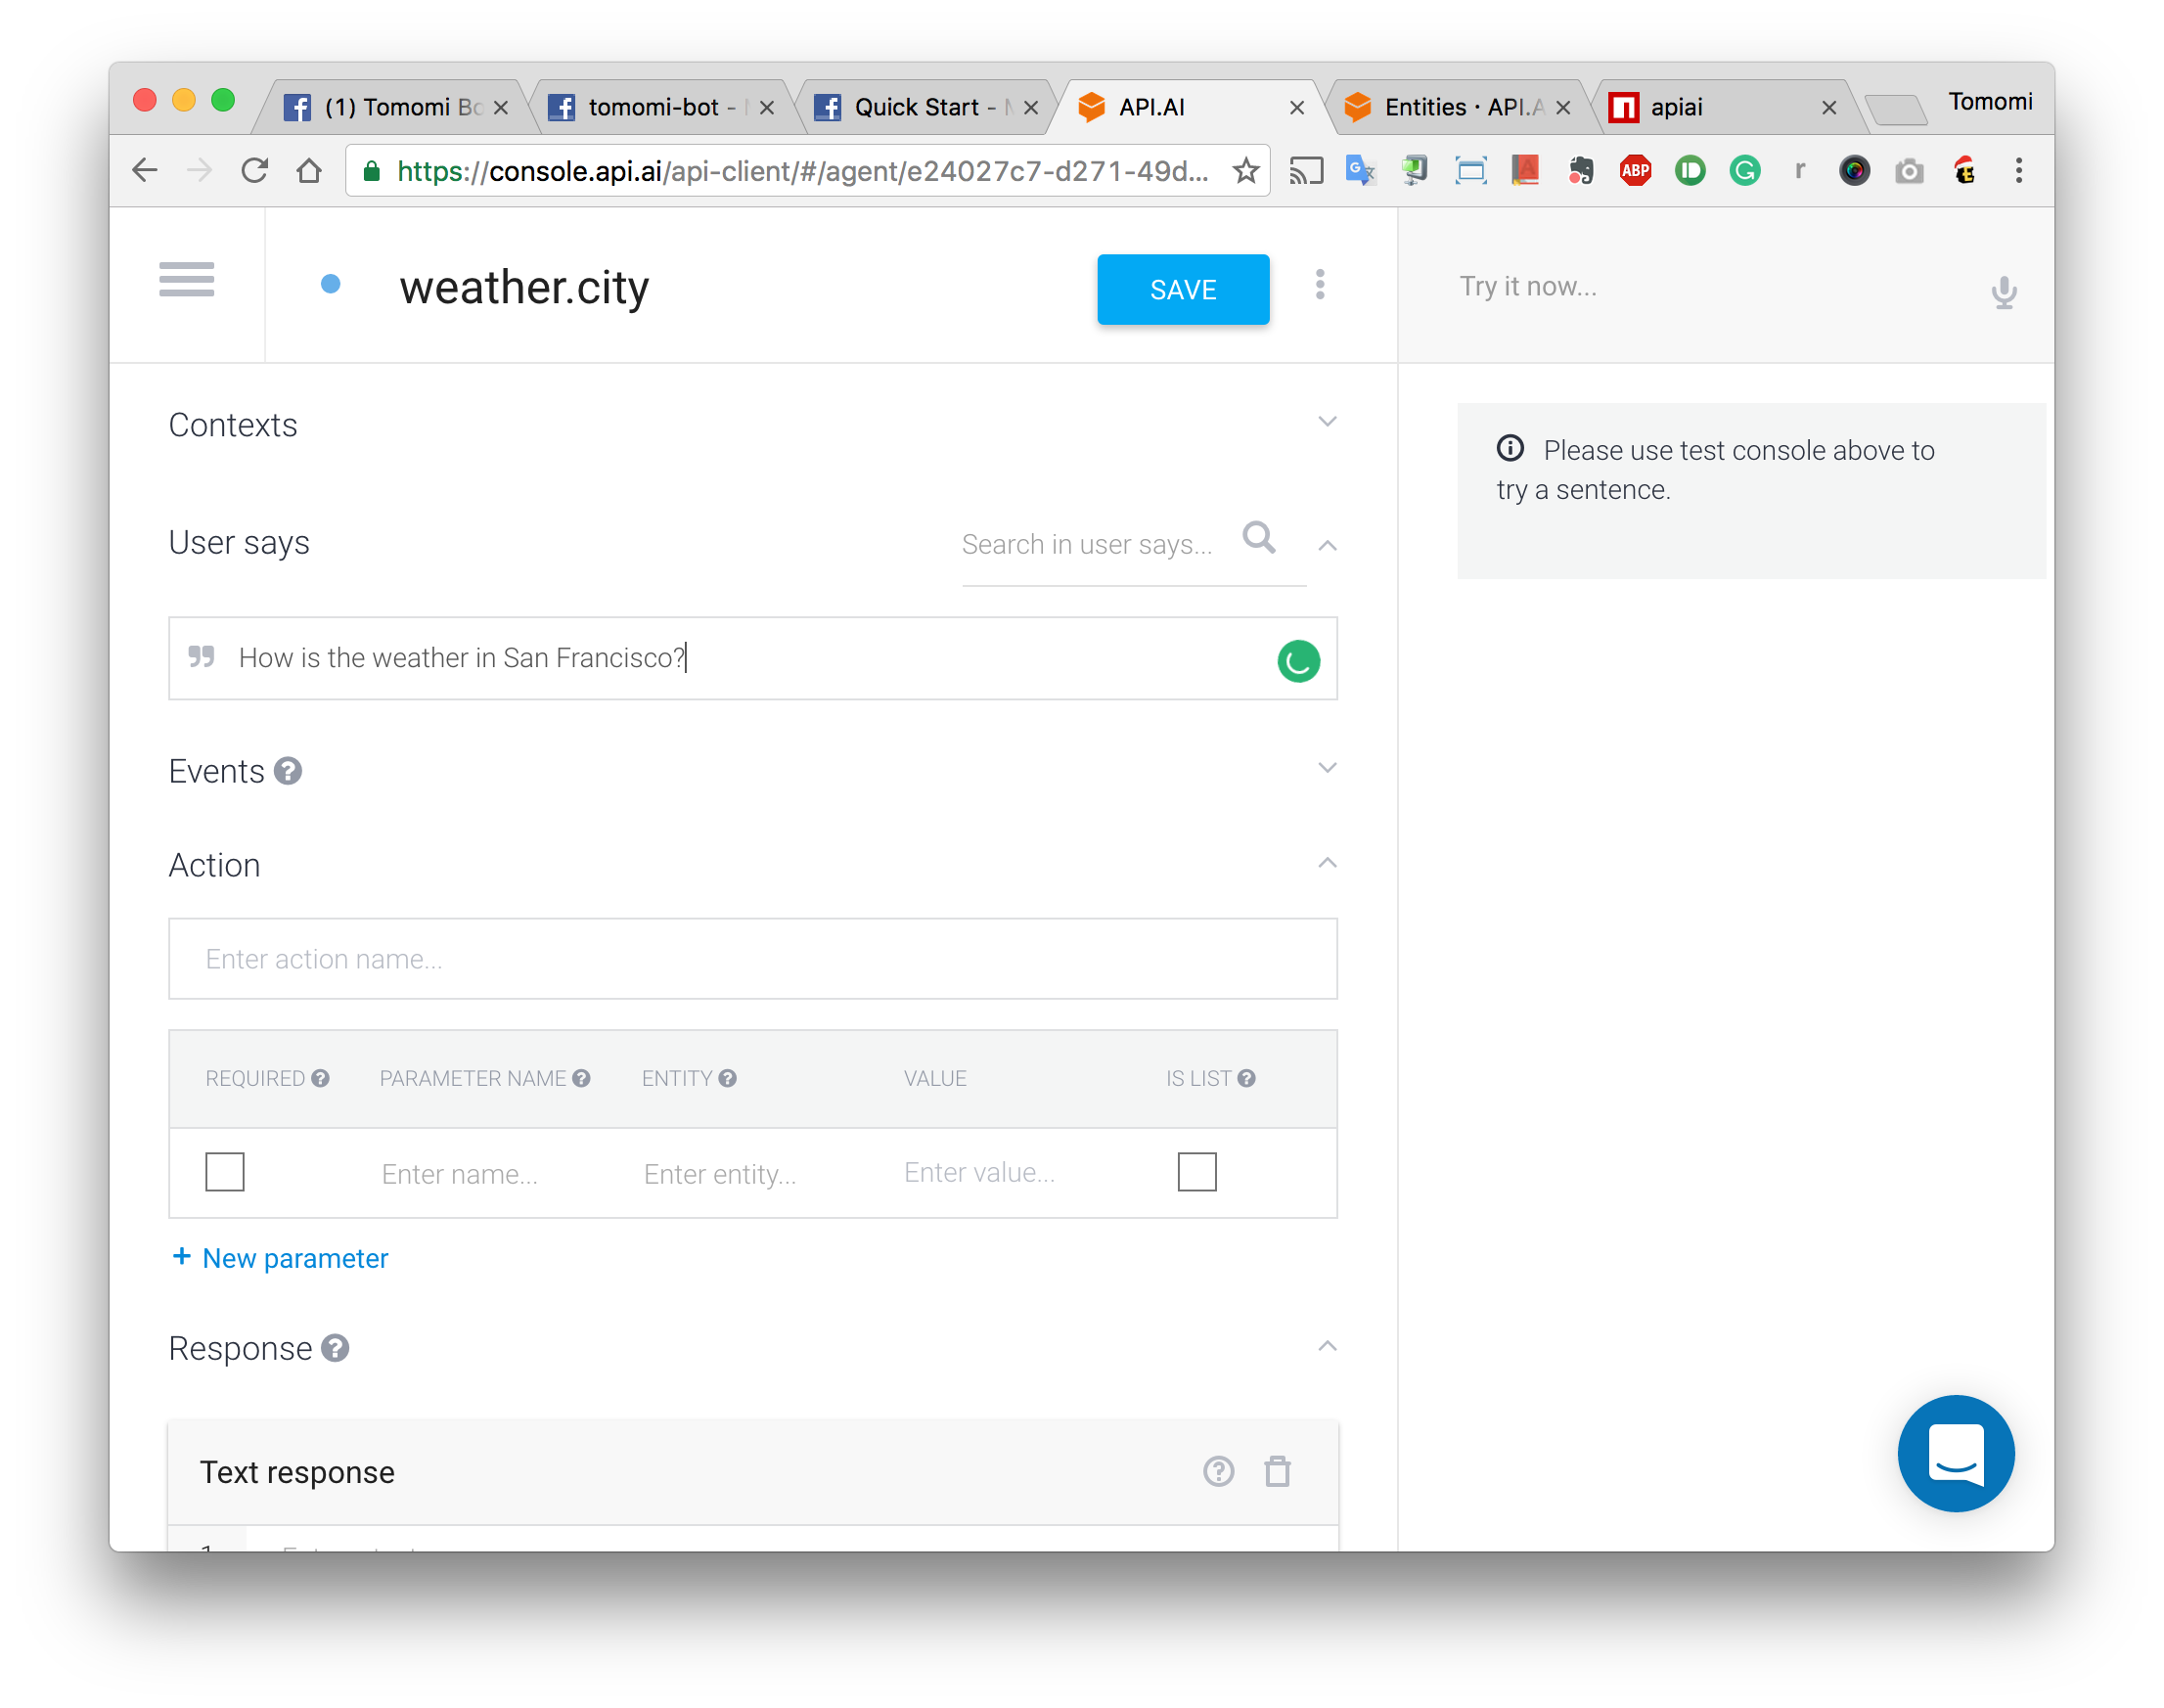
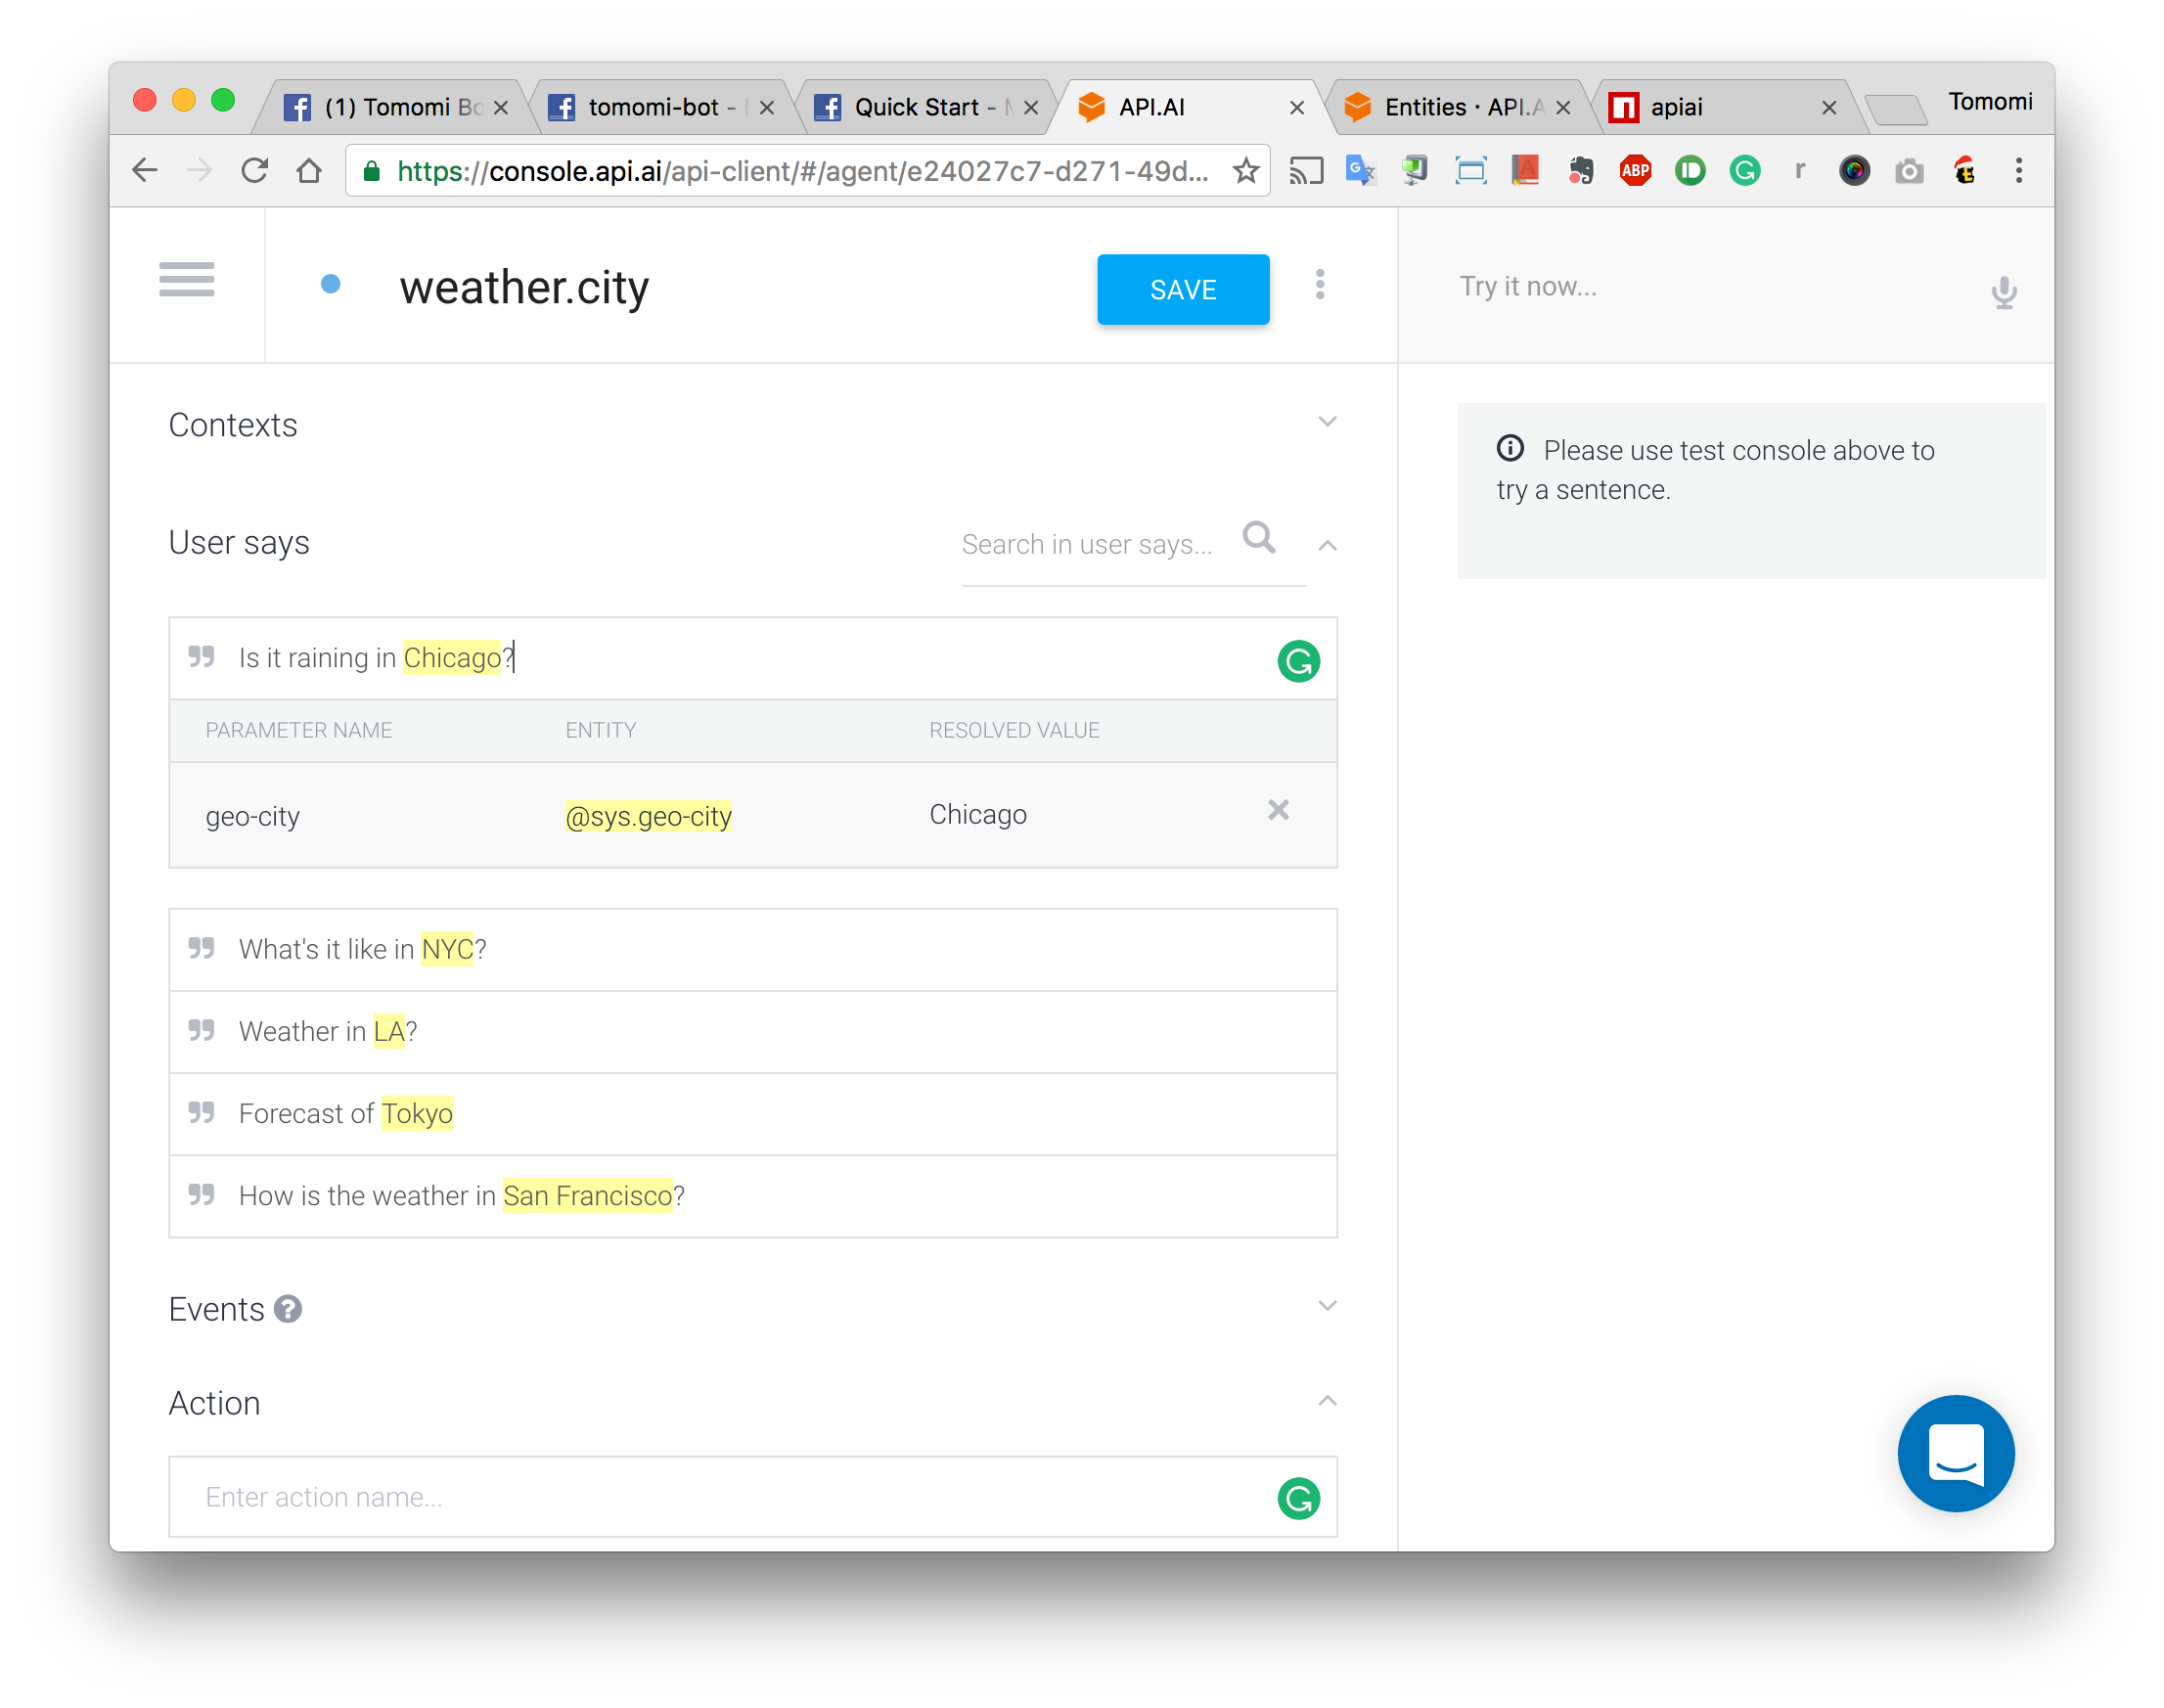
Select the city name (“San Francisco”), and you will get a popup. What you see here are pre-defined entities. There are many entities in the list but what you need here is a collection of cities. So choose @sys.geo-city. The city name will be highlighted.
Major city names have been provided already so you do not need to create them, however if you need to define special entities that not listed there, such as types of cars, food, etc, you will need to create manually. (I am not covering how to define entities in this article this time!)
Create some more contexts:
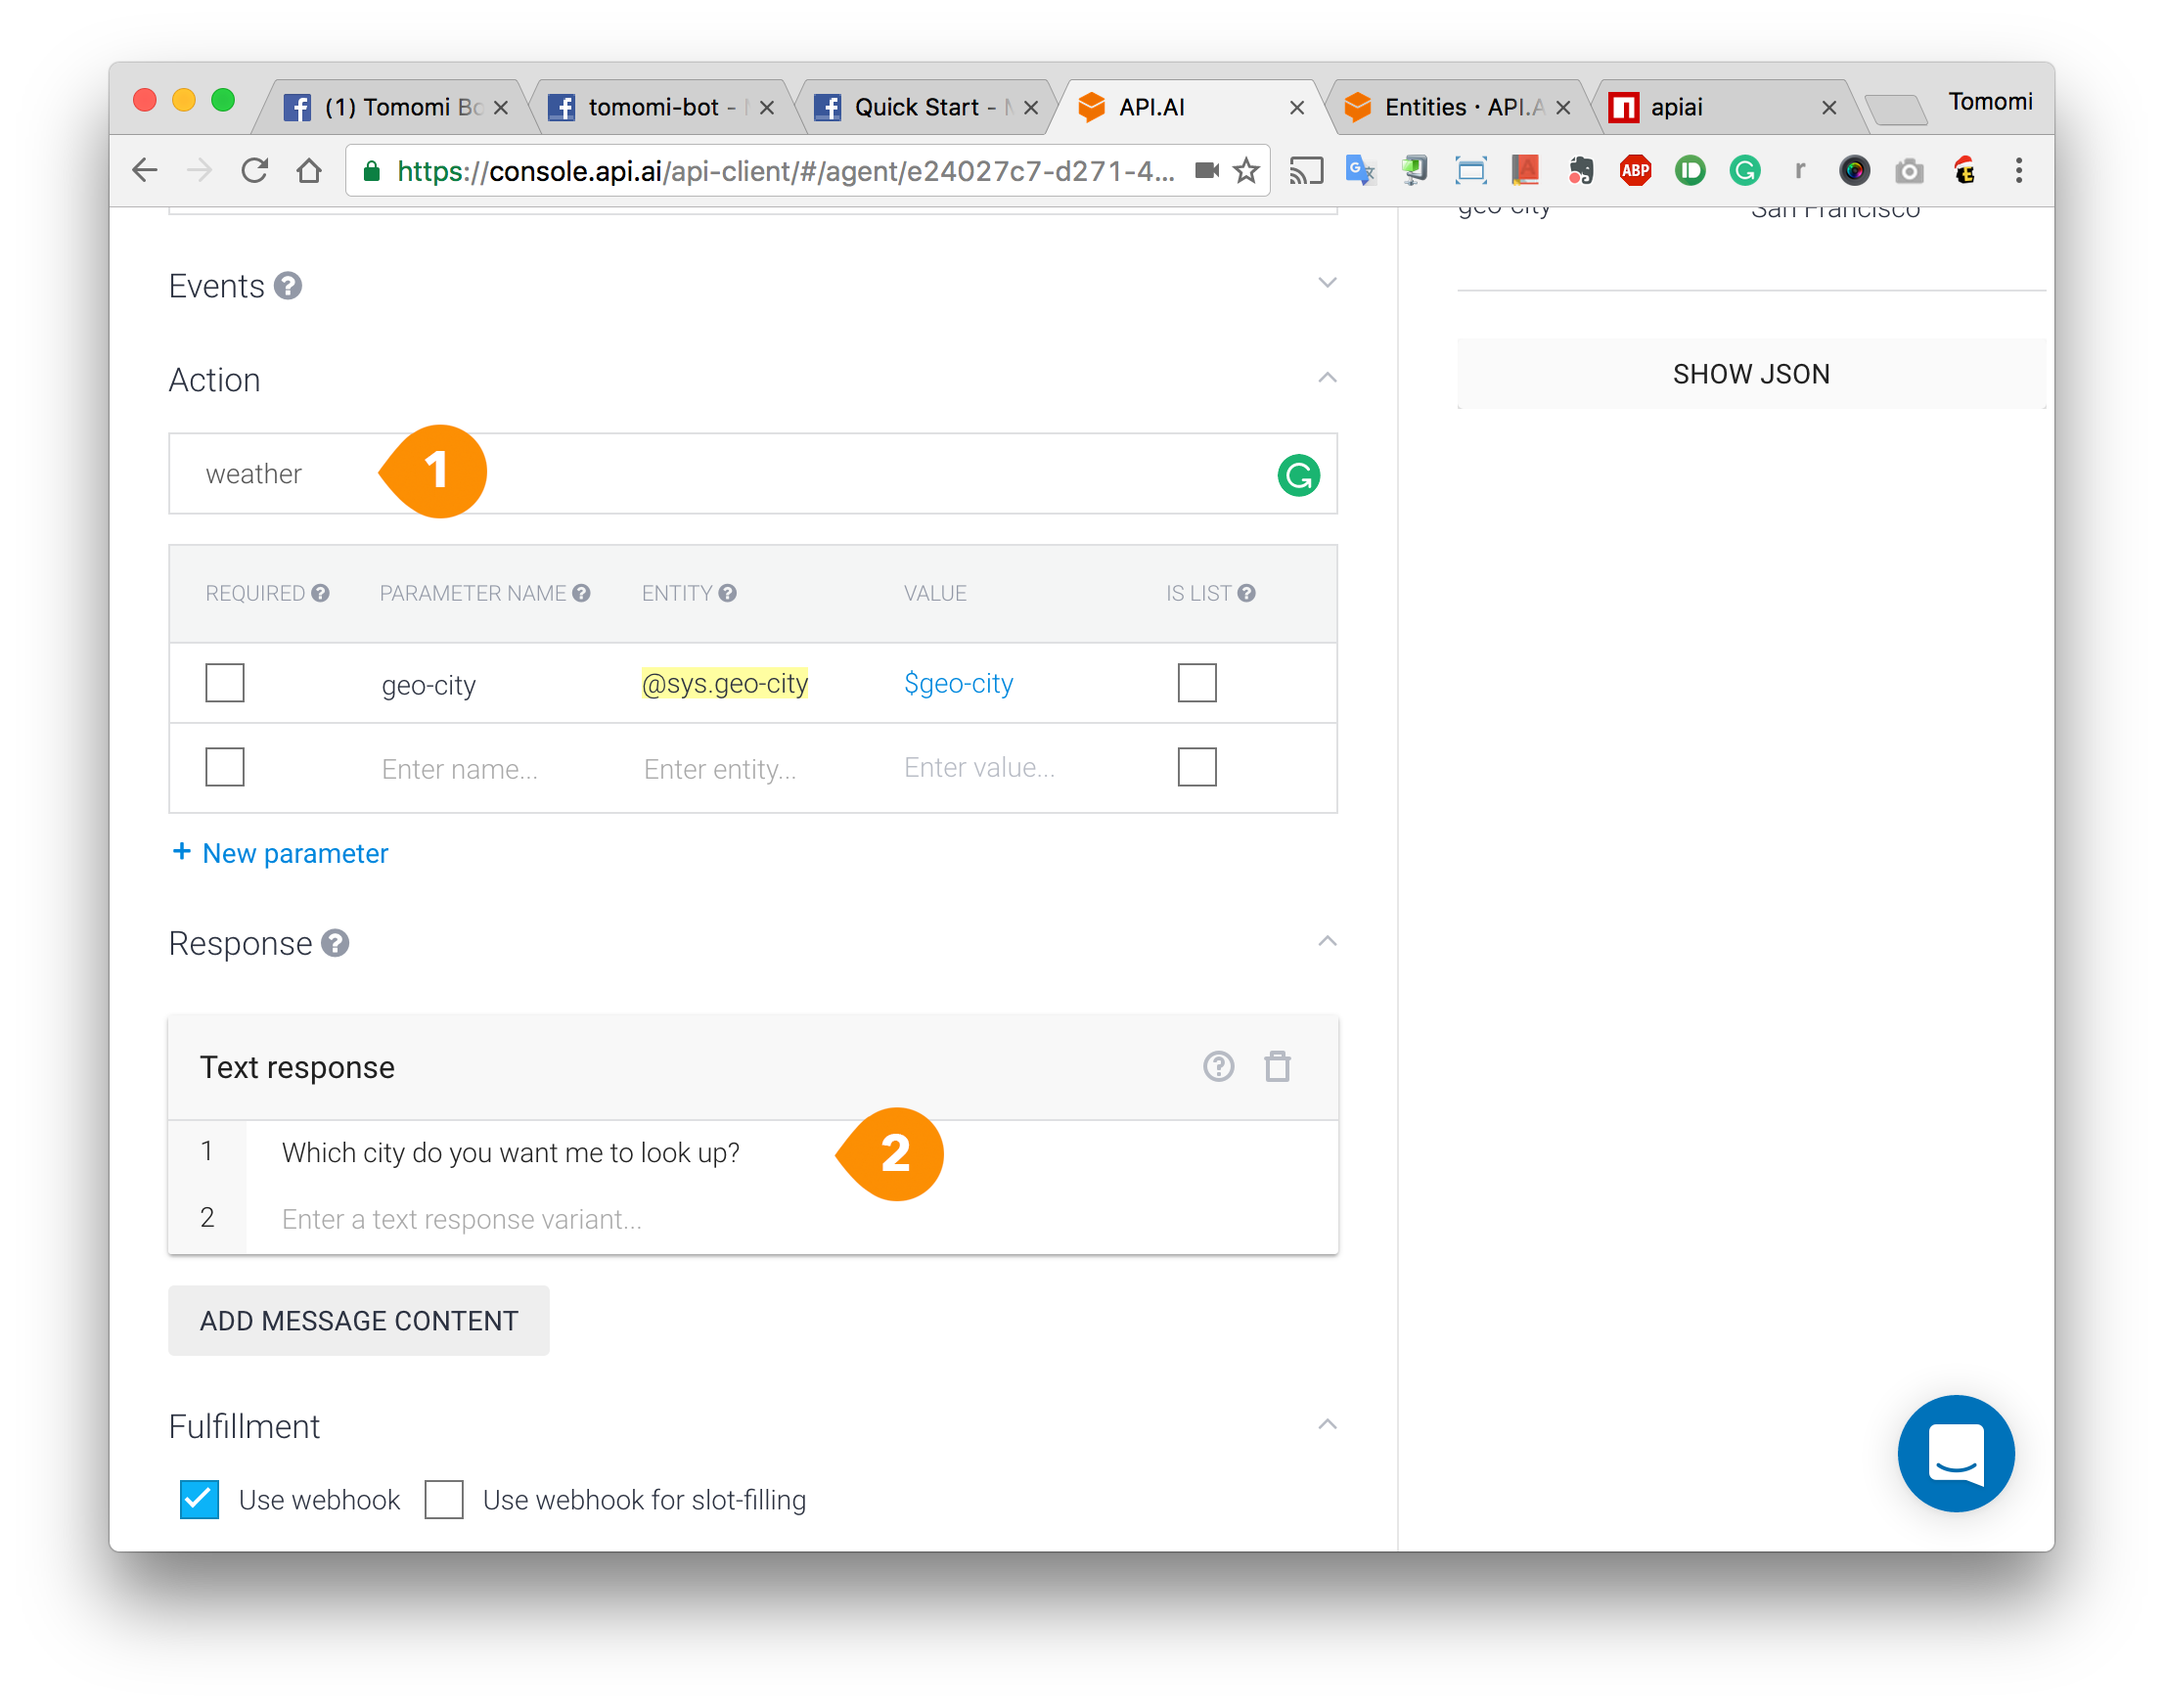
Then (1) scroll down to Action, and enter “weather”. You need this action name on your node code later. Then (2) at Response, enter a default response. Assuming a user ask about the weather without specifying a city, enter something like “Which city?”
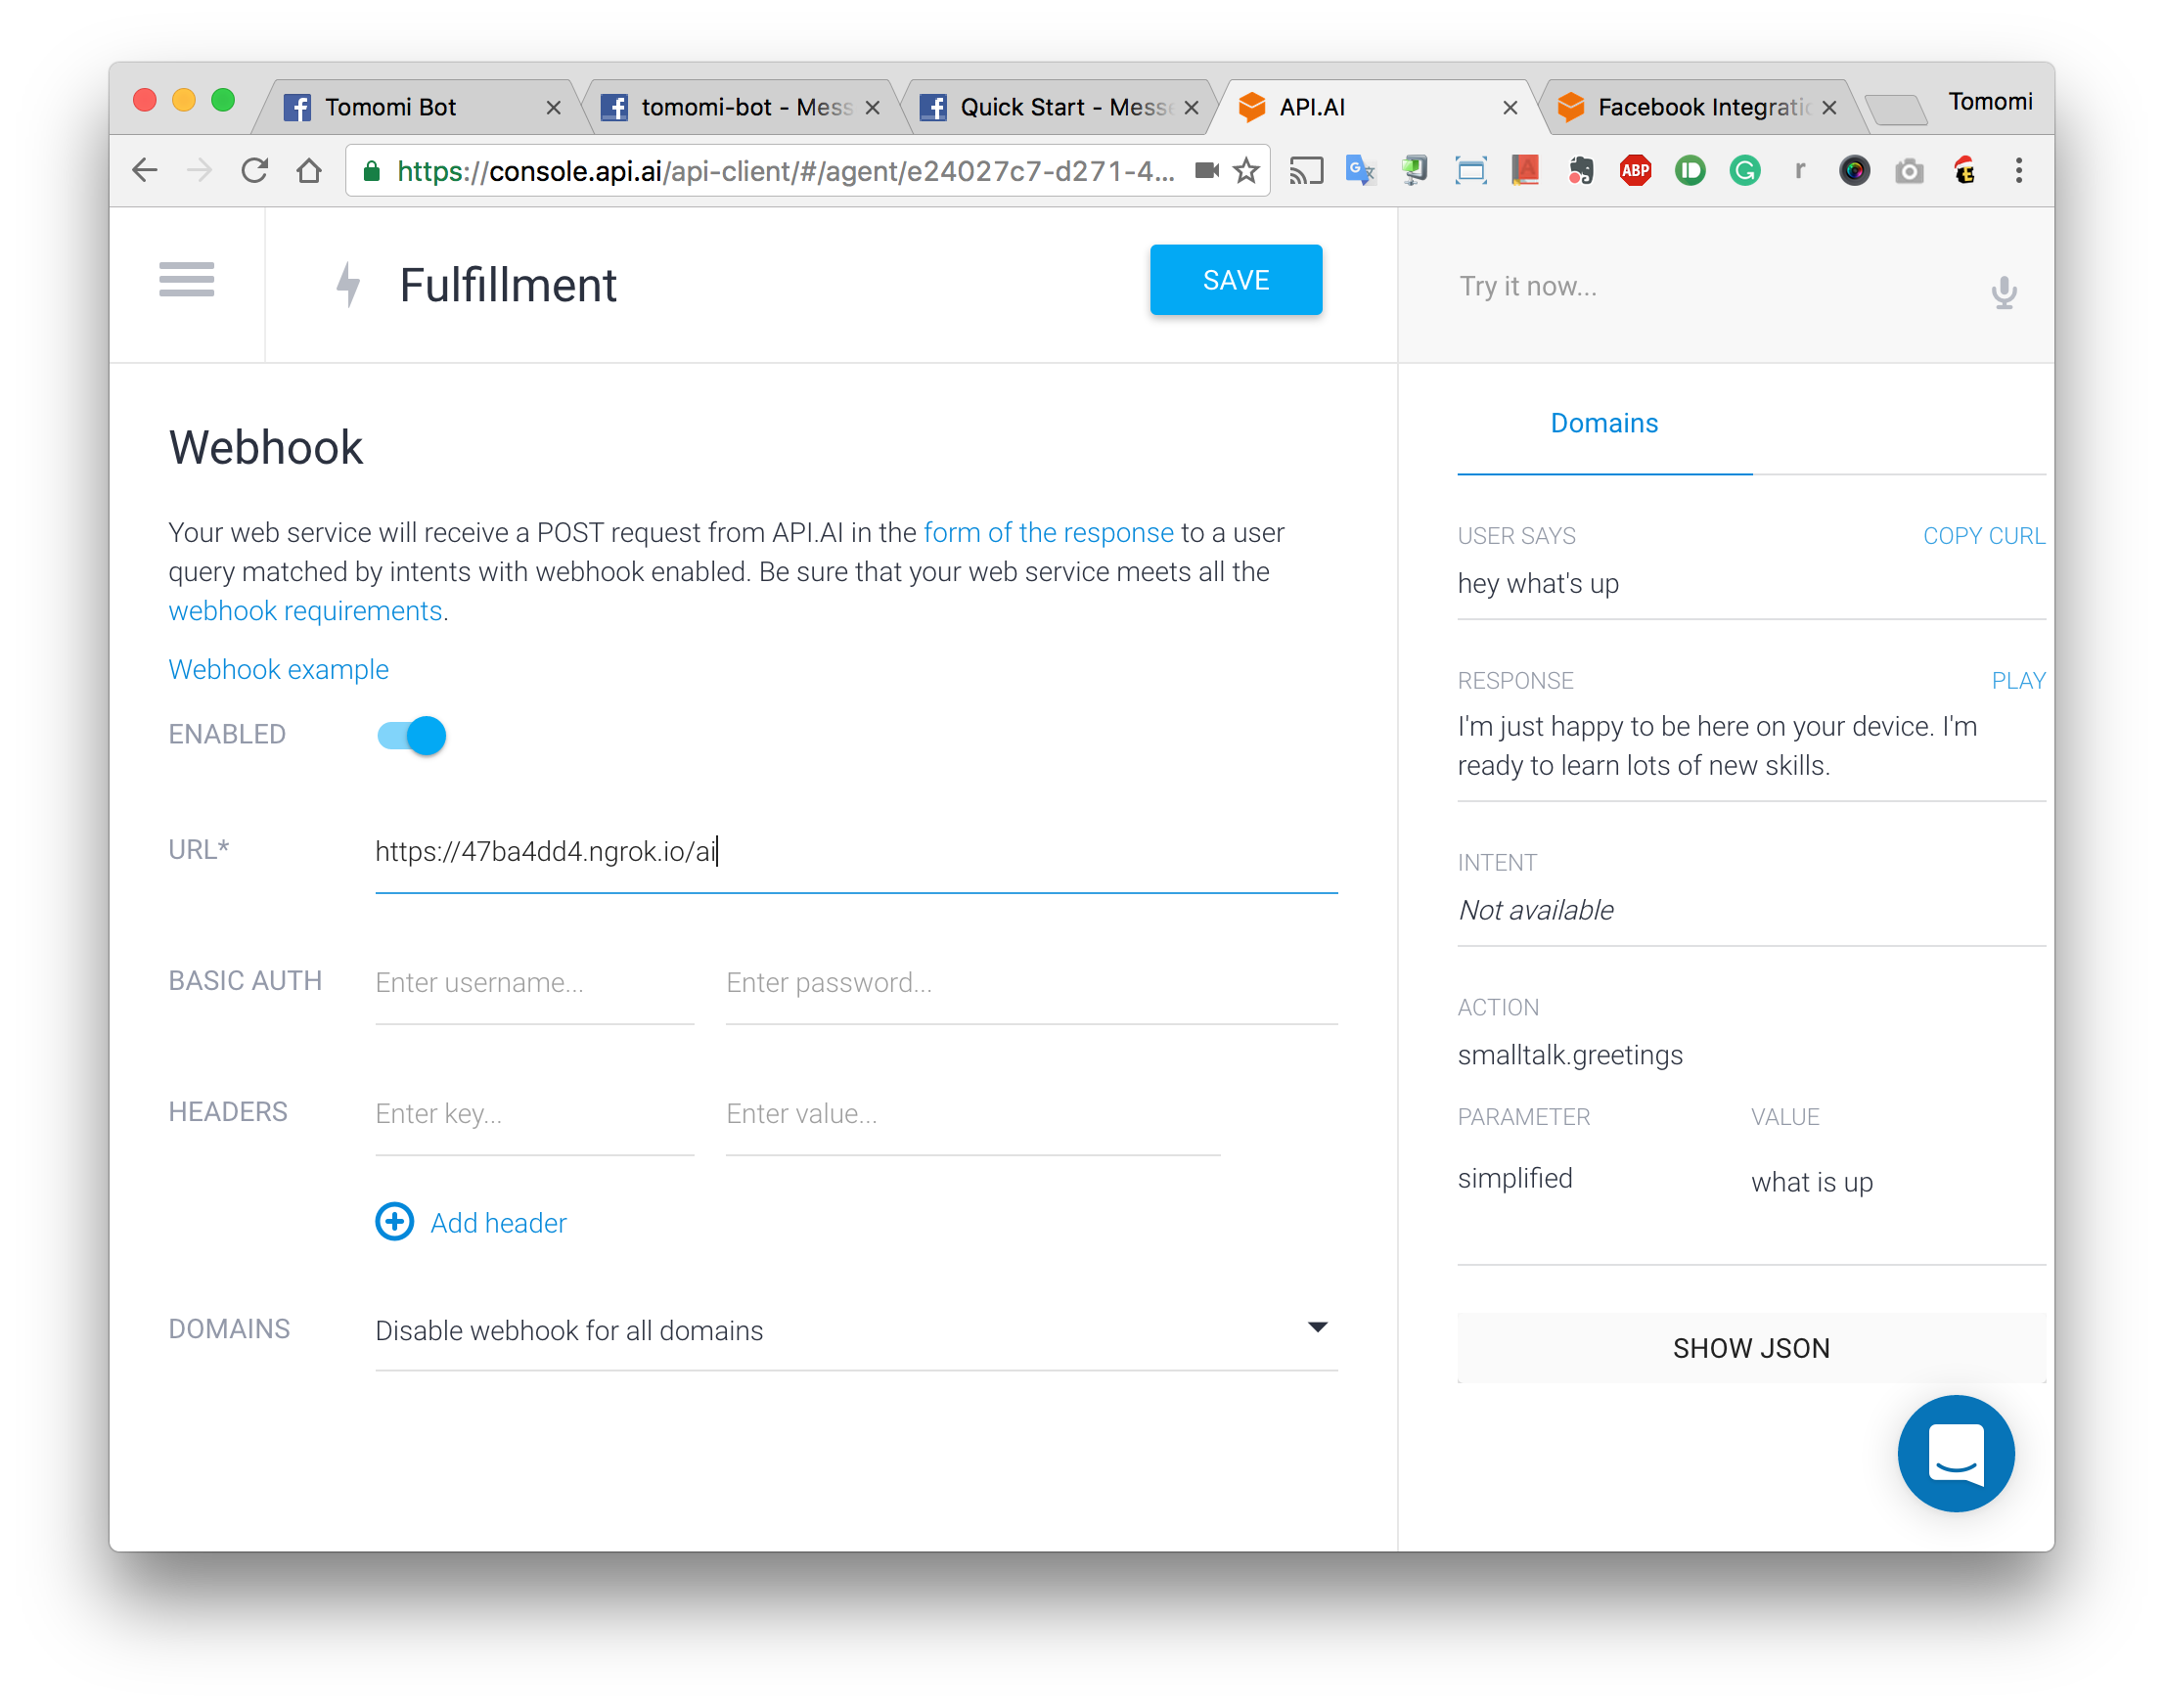
Save the Intents, and go to Fulfillment from the menu. Enable the webhook, and enter the ngrok URL with a route, let’s call it /ai and Save:
Using the 3rd Party API to Look Up the Weather
Go to Open Weather Map, and sign up to get the API key. We are going to use the API to fetch a current weather data for one location.
Let’s just use this REST API with a city name as a param (also, your API key and the temperature unit):
let restUrl = 'http://api.openweathermap.org/data/2.5/weather?units=imperial&APPID='+WEATHER_API_KEY+'&q='+city;
In your webhook.js, create another POST method route, /ai. Remember the action name you’ve specified with API.ai console earlier:
app.post('/ai', (req, res) => {
  if (req.body.result.action === 'weather') {
    let city = req.body.result.parameters['geo-city'];
    let restUrl = 'http://api.openweathermap.org/data/2.5/weather?APPID='+WEATHER_API_KEY+'&q='+city;

    request.get(restUrl, (err, response, body) => {
      if (!err && response.statusCode == 200) {
        let json = JSON.parse(body);
        let msg = json.weather[0].description + ' and the temperature is ' + json.main.temp + ' ℉';
        return res.json({
          speech: msg,
          displayText: msg,
          source: 'weather'});
      } else {
        return res.status(400).json({
          status: {
            code: 400,
            errorType: 'I failed to look up the city name.'}});
      }})
  }
Make sure to return is as JSON that api.ai will read from this webhook.
Let’s test your bot from Messenger:
Yay, now you have your own Messenger bot that chats and answer weather info!
If you deploy your bot, make sure to change your webhook endpoints on both Facebook Developer app setting and API.ai Fulfillment.
I hope you enjoyed the article. Now you can tailor your intents, add more features, and use the training feature for better results to make your bot more interesting!
By the way…
I am currently working at Nexmo and we are working on the Chat API, which integrate multiple chat apps including Facebook, WeChat, LINE, etc. So if you have a business with customers from all over the world especially the countries like China where the Great Firewall prevents people to use Facebook, and if you’d like to set up a customer support chat system, you need to support something like WeChat too.
The Nexmo Chat API can connect multiple chat apps all together. Also there is the SMS API too. I will write about the Chat API soon on Nexmo Blog!
- ← Creating a Slack Command Bot from Scratch with Node.js & Distribute It
- Filterous 2 Photo Manipulation Library is Released! →