
Creating a Slack Command Bot from Scratch with Node.js & Distribute It
![]()
It was raining on a few weekends ago, instead of binge-watching some Netflix shows I decided to do some small project with the Conversational UI / Chatbot, and wrote the HTTP Status Cats command for Slack! Basically, I made my HTTP cats (that gave myself a 15 minutes of fame in 2011) into a slash command for Slack, where can simply type /httpstatus followed by a status code (e.g. 404) on Slack chat and get the status description with the cat pics.
Although I made some positive notes on its developer-friendliness of the Slack’s API docs in my Developer Experiences Matters article, I found it a bit confusing when I actually started developing along with the docs, because there are loaded with info and it is hard to find some resources I need. While developing I took notes of each step, so I decided to share how I have created the HTTP Status Cats command.
There are two parts. You can stop after the step 1 if you don’t wish to distribute your bot:
- Writing a slash command with Node.js and run it locally only on your team
- Making it installable for public (so you can submit your bot to Slack’s App Directory if you want)
My step-by-step instruction uses Node.js, so if you’d like to follow the how-to, make sure Node.js is installed on your machine.
The source code and the HTTP Status Cats command bot app are both available on GitHub
1. Creating Your Private Slash Command
In Slack’s official term, what you are going to do is called Custom Integrations. Before building what they call App, you need this dry-run on your chat room. If you don’t have your own test team account, create one to get started.
Configuring Your Slash Command
Sign in to your Slack account and choose your command at my.slack.com/services/new/slash-commands. In my case, I entered /httpstatus and hit the Add Slash Command Integration button to go to the next page.
You will see the Outgoing payload data with a token etc, but you don’t need to worry about this in this moment. Just go ahead and fill out some of the fields.
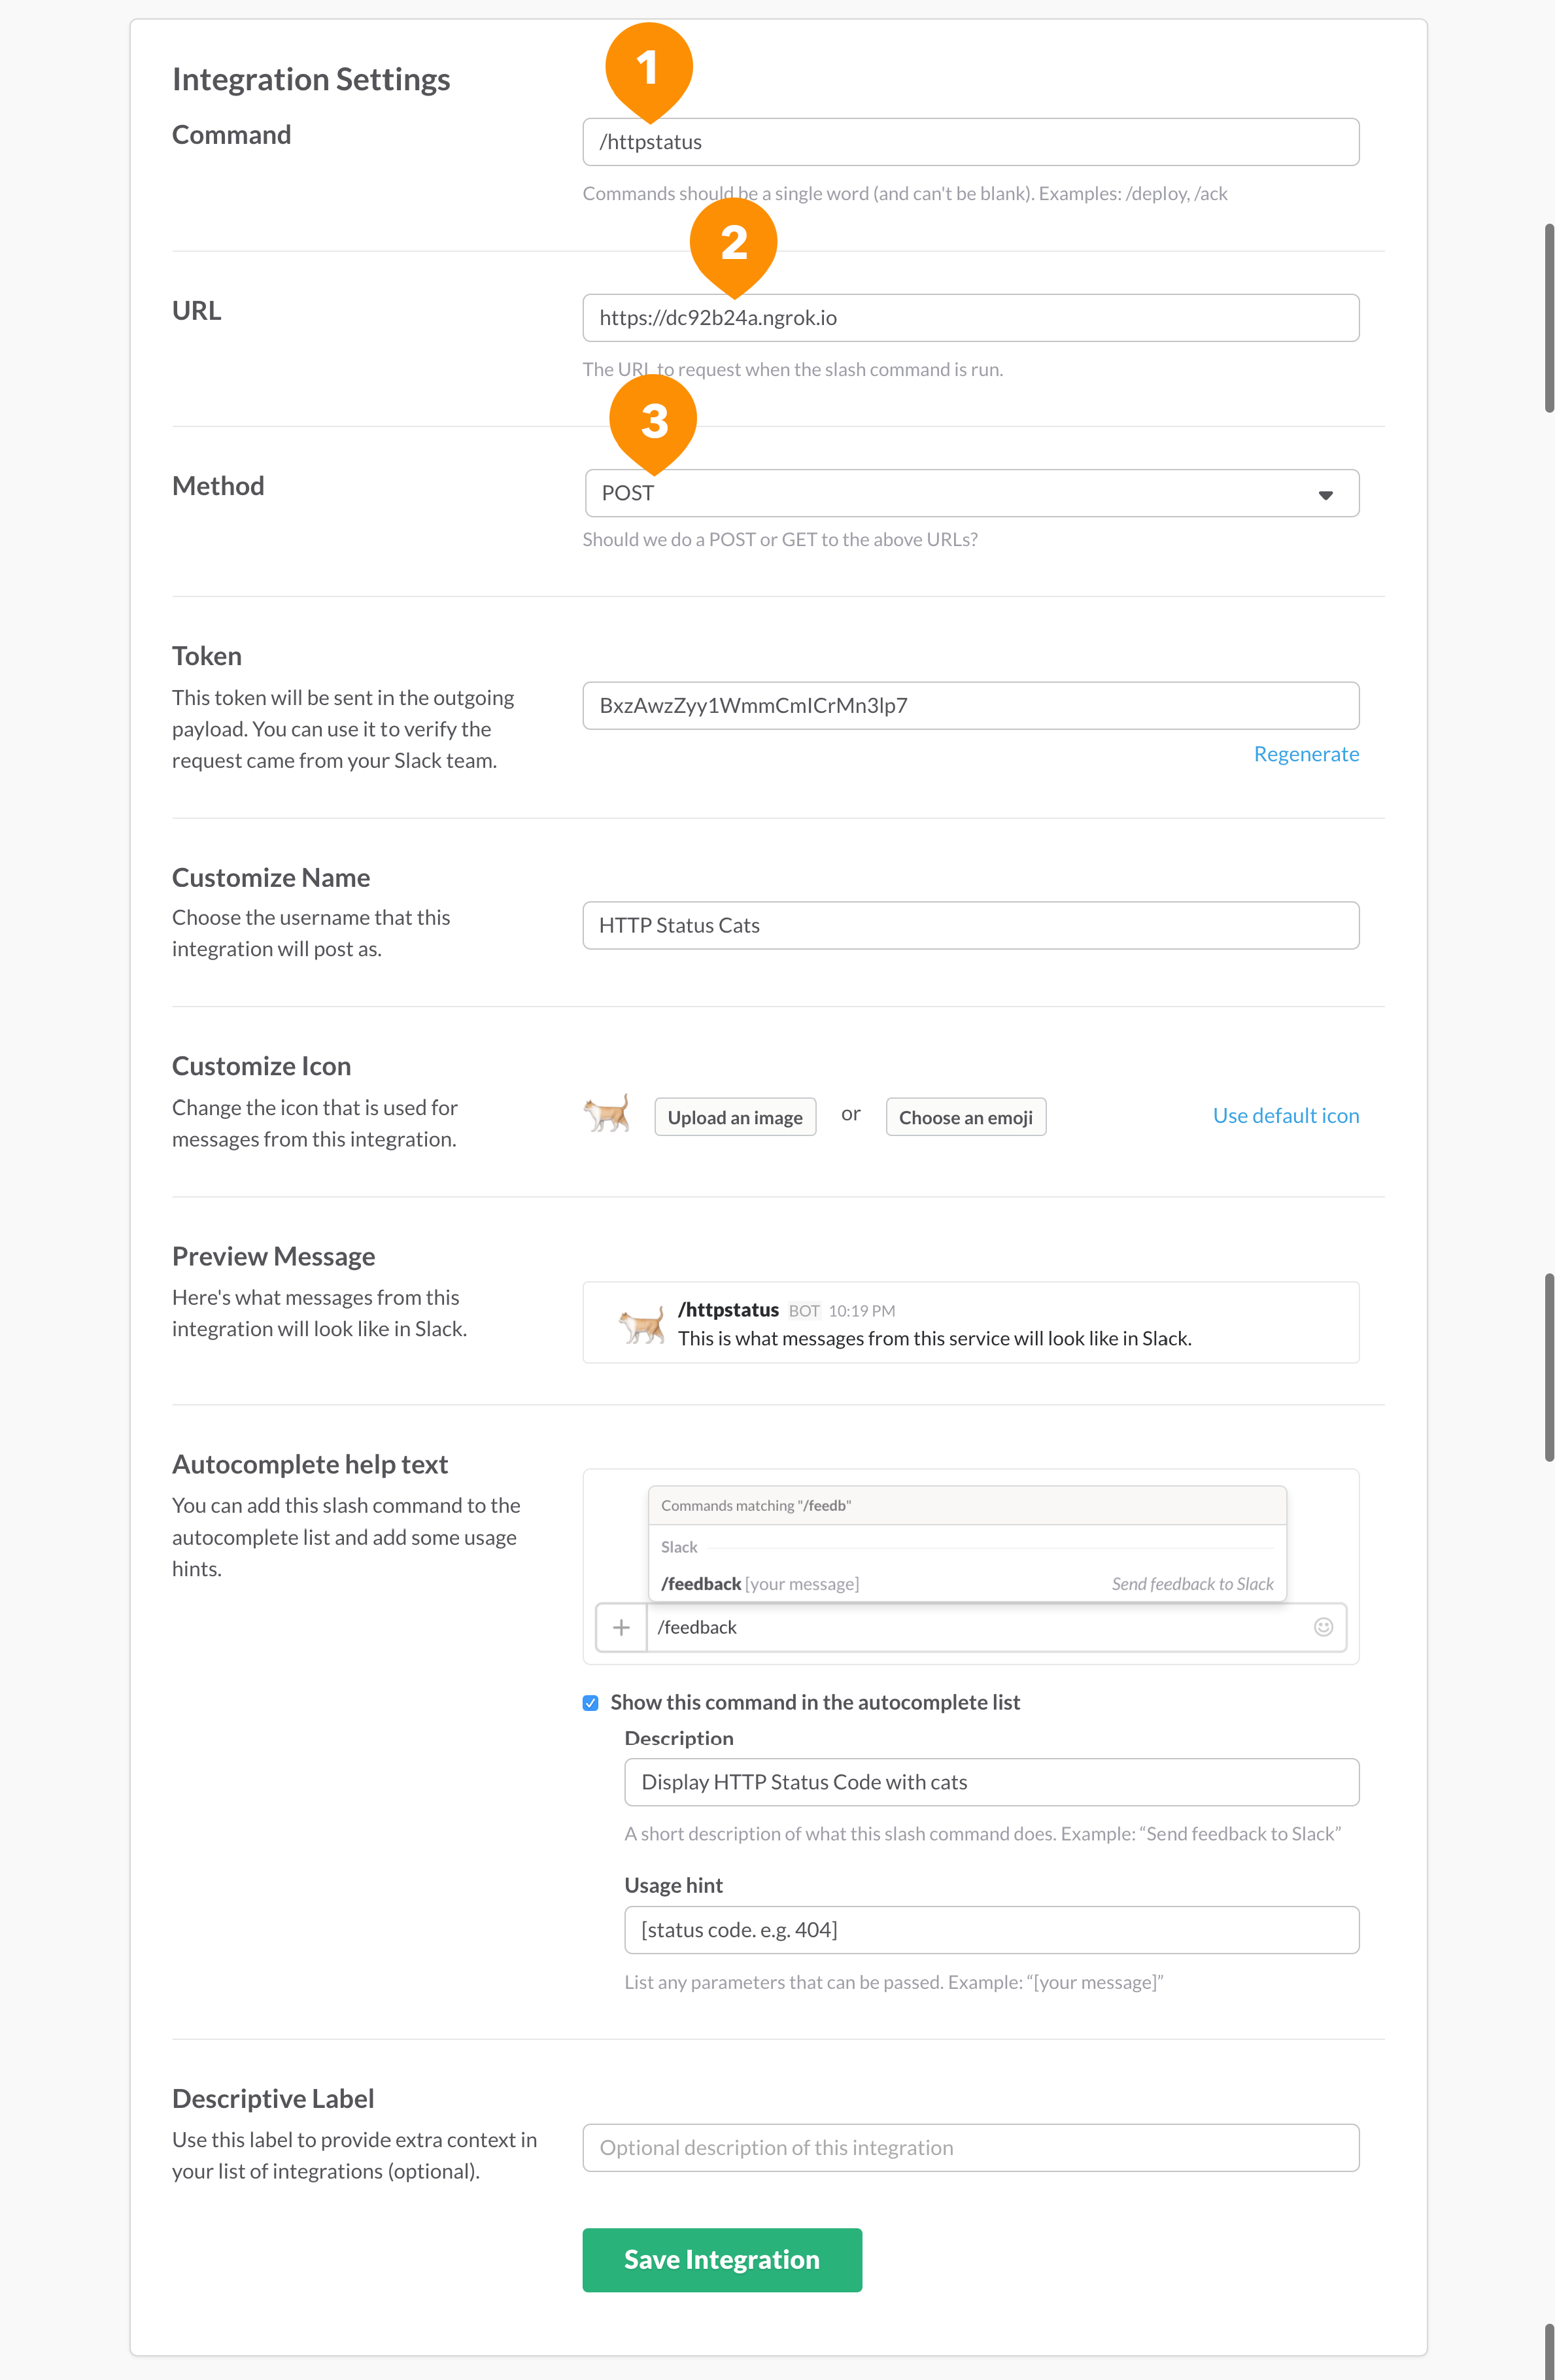
You can skip most of the field for now, but you must enter the (1) Command, (2) URL, and make sure the (3) Method is POST.
Once you enter them correctly, you should see the “Your settings have been saved!” message on top of the screen for a few seconds.
For the URL, I am using a temporary URL from ngrok, which serves my localhost to a public URL. You can probably just put your localhost URL such as http://localhost:3000.
Optional: Using ngrok
If you wish to use ngrok for your development too, download ngrok from https://ngrok.com, run it on terminal:
$ ngrok http 3000

Now you’ve got a ngrok URLs for your local server. In this case, localhost:3000. In this case, copy this URL, http://71f03962.ngrok.io and paste it into the configuration setup.
Writing the Response with Node.js
How it works is that when a user trigger the slash command from Slack client’s interface, the message will be sent to the URL via HTTP POST (or GET if you specified in your config).
When you receive a request from your user, for instance, /httpstatus 302, the data that will be posted to your URL looks like:
command=/httpstatus
text=302
response_url=https://hooks.slack.com/commands/1234/5678
...
Your bot gives a response for the command, /httpstatus 302 with an answer. In this case the bot will answer with the description of status code 302 with [a cat picture](https://http.cat/302.
Now. let’s write the response with Node.js using Express.
First, install Express.JS and body-parser (for POST):
$ npm install express body-parser --save
Create a index .js file, and instantiate express and listen the server to port 3000. Because you have set your ngrok to localhost:3000, you must use the same port!
'use strict';
const express = require('express');
const bodyParser = require('body-parser');
const app = express();
app.use(bodyParser.json());
app.use(bodyParser.urlencoded({ extended: true }));

const server = app.listen(3000, () => {
  console.log('Express server listening on port %d in %s mode', server.address().port, app.settings.env);});
Now, create HTTP POST route method to handle the command:
app.post('/', (req, res) => {
  let text = req.body.text;
  // implement your bot here ...
});
Here, you need to look for the value of text, which comes from a user. To create a HTTP Status bot, the query should be something like “404” for /httpstatus command. You should write some error-checking code to see if you’re getting a right value. If a user enter a wrong value, throw some error or send a message, for example, look only for a digit:
if(! /^\d+$/.test(q.text)) { // not a digit
  res.send('U R DOIN IT WRONG. Enter a status code like 200!');
  return;
}
This message is sent privately to the user who entered a command with an unexpected value.
If the value is what you expect, send a response in JSON:
let data = {
  response_type: 'in_channel', // public to the channel
  text: '302: Found',
  attachments:[
    {
      image_url: 'https://http.cat/302.jpg'
    }
]};
res.json(data);
The answer to the correct command from the user will be displayed publicly by setting response_type as in_channel (The default type is ephemeral, sent as a private message).
This response will look like this on Slack:
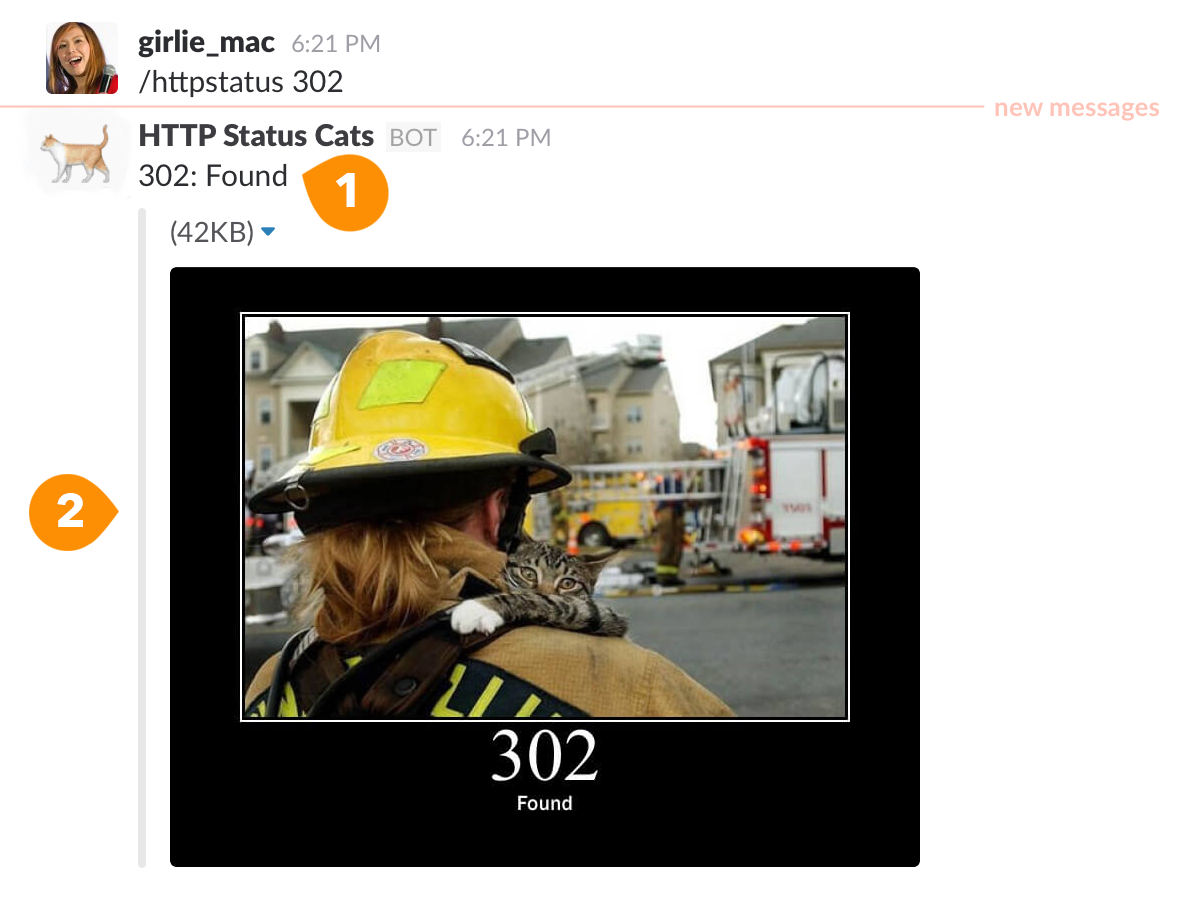
In this example, I am using two parts in the response; (1) text and (2) attachments, which is an additional field displayed within the gray border, where I include an image.
Of course you can display text and change the border color in the attachment if you want. To customize the message format, see Basic message formatting on Slack API docs.
Please note that in this code sample above, I hard-code the text and image URL, but in my actual code, I keep all text strings in a separated file, and look it up if the user query matches. If not, display an error message privately.

Now, run the node code, then test your command on Slack client!
$ node index.js
If everything works fine on your private Slack chat, and you are happy as if, you’re done with the custom integration!
In the next step, you will handle the authentication and deploy the code. So if you want to distribute your command bot, read on!
2. Distributing your Slack Bot
To share your custom integration, you need to deploy the code and make it installable. To do so, you need to work on a few more things.
Setting up Your App
Now you need to register for your app and get your API keys.
First, go to https://api.slack.com/apps, and click the Create an App button.
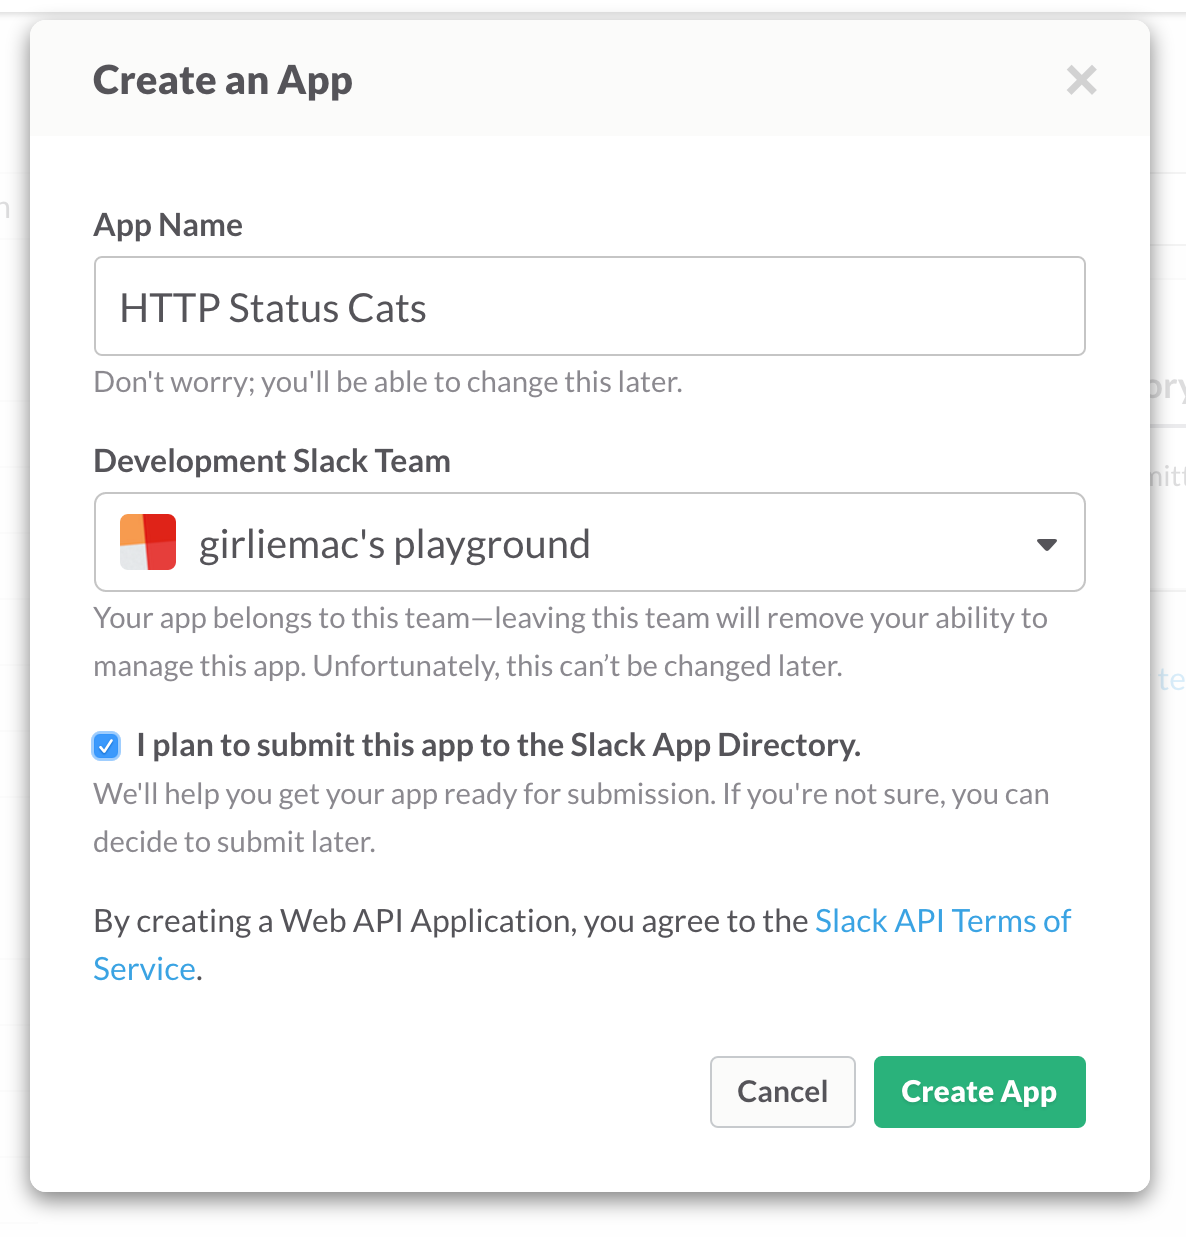
You can fill out the rest of the form later. The App config may be a bit confusing because there are multiple parts (and you may not even notice everything first). For a slash command bot, you need to fill out at least these sections:
- Basic Information (at https://api.slack.com/apps/YOUR_APP_ID/general)
- OAuth & Permissions (at …/YOUR_APP_ID/oauth)
- Slash Commands (at …/YOUR_APP_ID/slash-commands)
Keeping Your Credentials in .env File
Create .env file in the root of your app directory to keep your credentials (Client ID, Client secret, and Verification token) you can find at your app’s Basic Information section.
SLACK_CLIENT_ID=12345XXXXX.09876XXXXX
SLACK_CLIENT_SECRET=535d2f9....
SLACK_VERIFICATION_TOKEN=42P829U...
List the .env in your .gitignore file to keep out from public eyes when you push to git etc.
Using Foreman
To read the .env file from your app, I am using Node Foreman (instead of dotenv module because it failed when deploying to Heroku).
You need to install it globally on your machine:
$ npm install -g foreman
At the root of your app, create a file with name of Procfile and add this in the file:
web: node index.js
When you run our node app, run with
$ nf start
Authenticating a User
Slack uses OAuth 2.0 for a user authentication. You can read the grant flow on the Slack doc, but you actually don’t need to implement the whole OAuth mechanism in your app when you use the Slack Button to authenticate your users. The diagram shows below shows what you need to do, and I took this from the Slack API doc and modified:
Basically, what you are going to do are:
- Set up a web page with the button that passes some params to Slack. (User: After clicking the button, Slack redirects the user to authenticate).
- Your node app will receive a temporary
codefrom Slack viaGET. The temp code expires in 10 min. - Exchange the authorization code for an access token using the
oauth.accessAPI byPOSTing. The auth process is done when your node app receives 200 OK. - Optionally, use the
tokento call another API to get the team name, so that you can redirect the user to the team URL, https://team-name.slack.com right after the auth is done.
When I was reading the Slack docs, I didn’t notice there was a button generator on Slack API page, so I started implementing by myself with Passport (Node.js OAuth middleware). But later I realized that authentication with the button!
Setting up Your Button
First, you need to set up a static web page. It can be a part of your node app, or separated. I made it independently from my node app, and host it on GitHub Pages.
Then go to https://api.slack.com/docs/slack-button, scroll to Add the Slack button to generate your button. Make sure to check Commands for the scope.
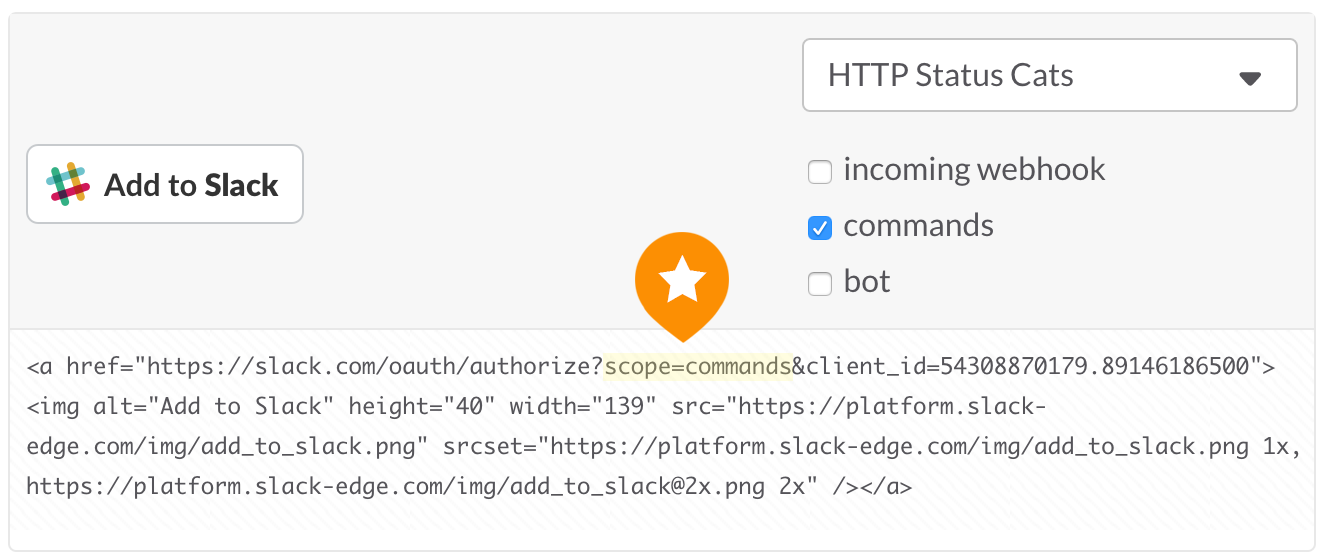
If you want to do the optional API call to get the team info (step 4), you need to tweak the GET param in the auth URL.
<a href="https://slack.com/oauth/authorize?scope=commands+team%3Aread&client_id=your_client_id">
Notice the scope- along with commands, add team:read (Escape the : as %3A). You can learn more about OAuth scopes on the Slack API docs.

Issuing Token
Let’s use Express.js again to GET the temporary code (req.query.code) from Slack.
I am using /slack route. You can name whatever you want but make sure that you use the URL (Use your grok URL such as http://71f03962.ngrok.io/slack during development) as a Redirect URL at OAuth & Permissions at https://api.slack.com/apps/YOUR_APP_ID/oauth as a part of your App configuration.
Once you get the temp code, you need to POST the code along with your credentials to exchange the code for an access token.
To POST, I am using request, a HTTP request client for Node.js.
$ npm install request --save
Once installed, get the temp code via GET (from a user auth) for a token via POST using auth.access API:
const request = require('request');

app.get('/slack', function(req, res){
  var data = {form: {
      client_id: process.env.SLACK_CLIENT_ID,
      client_secret: process.env.SLACK_CLIENT_SECRET,
      code: req.query.code
  }};
  request.post('https://slack.com/api/oauth.access', data, function (error, response, body) {
    if (!error && response.statusCode == 200) {
      // You are done.
      // If you want to get team info, you need to get the token here
      let token = JSON.parse(body).access_token; // Auth token
    }
  ...
Optional: Redirecting the User to the Team URL
Once the auth is done, you are done. However, I wanted to give a slightly better UX by redirecting the user to the chat room, instead of dumping the user right there like I’ve seen in many 3rd party Slack apps.
To obtain the team name (as a part of the chat room URL), use team.info API.
Add this where you got the access token in the code sample above:
...
  request.post('https://slack.com/api/team.info', {form: {token: token}},     function (error, response, body) {
    if (!error && response.statusCode == 200) {
      let team = JSON.parse(body).team.domain;
      res.redirect('http://' +team+ '.slack.com');
    }
  });
You need to use the access token to be able to access the API. Once successfully done, the API returns the user’s team info including the team name (team.domain), so use it to redirect the user to the team chat room URL.
Ta-da! Now your user should be re-directed to a right place!
For this article, I simplified all my code, but check out the entire code on GitHub to see all the error handlings and when to use Verification token for your app.
Deploying to Server
Of course, you can deploy wherever you want. But if you want to deploy to Heroku like I did, I found this article by Heroku helpful.
Make sure to set up your env vars (where you set in your .env file) with the heroku config command such as heroku config:set API_KEY=123
Once you are done with the deployment, go back to your Slack App setting page to change the OAuth & Permission URL from your ngrok URL to the Heroku URL.
As you see, writing a Slack slash command itself is easy, but to figuring out the whole process to make the bot available to everybody was a bit pain for me. I spent most of my time reading the docs to just figuring out, and spend far less for coding.
So I hope my writing was helpful for you.

comments powered by